Loading...
Loading...
Loading...
Loading...
Loading...
Loading...
Loading...
Loading...
Loading...
Loading...
Loading...
Loading...
Loading...
Loading...
Loading...
Loading...
Loading...
Loading...
Loading...
Loading...
Loading...
Loading...
Loading...
Loading...
Loading...
Loading...
Loading...
Loading...
Loading...
Loading...
Loading...
Loading...
Loading...
Loading...
Loading...
Loading...
Loading...
Loading...
Loading...
Loading...
Loading...
Loading...
Loading...
Loading...
Loading...
Loading...
Loading...
Loading...
Loading...
Loading...
Loading...
Loading...
Loading...
Loading...
Loading...
Loading...
Loading...
Loading...
Loading...
Loading...
Loading...
Loading...
Loading...
Loading...
Loading...
Loading...
Loading...
Loading...
Loading...
Loading...
Loading...
Loading...
Loading...
Loading...
Loading...
Loading...
Loading...
Loading...
Loading...
Loading...
Loading...
Loading...
Loading...
Loading...
Loading...
Loading...
Loading...
Loading...
Loading...
Loading...
Loading...
Loading...
Loading...
Loading...
Loading...
Loading...
Loading...
Loading...
Loading...
Loading...
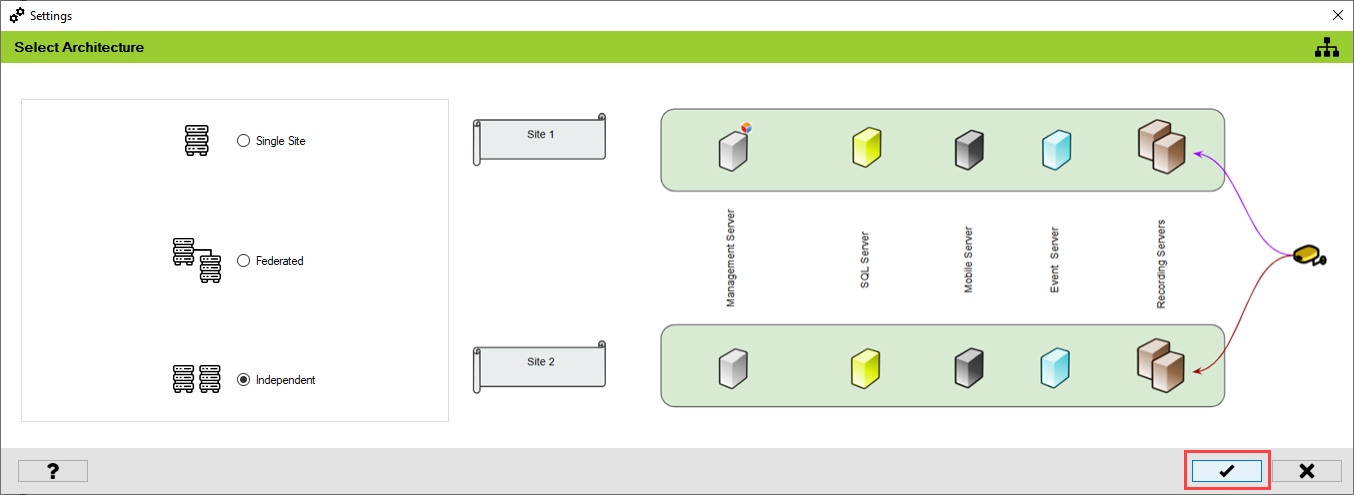
Multiple Redundancy Architecture Options
Explore supported RMF architectures below. Each design is optimized for different redundancy needs, from single-site failover to active-active multi-site deployments. Click on any architecture to view deployment diagrams, setup steps, and configuration best practices.
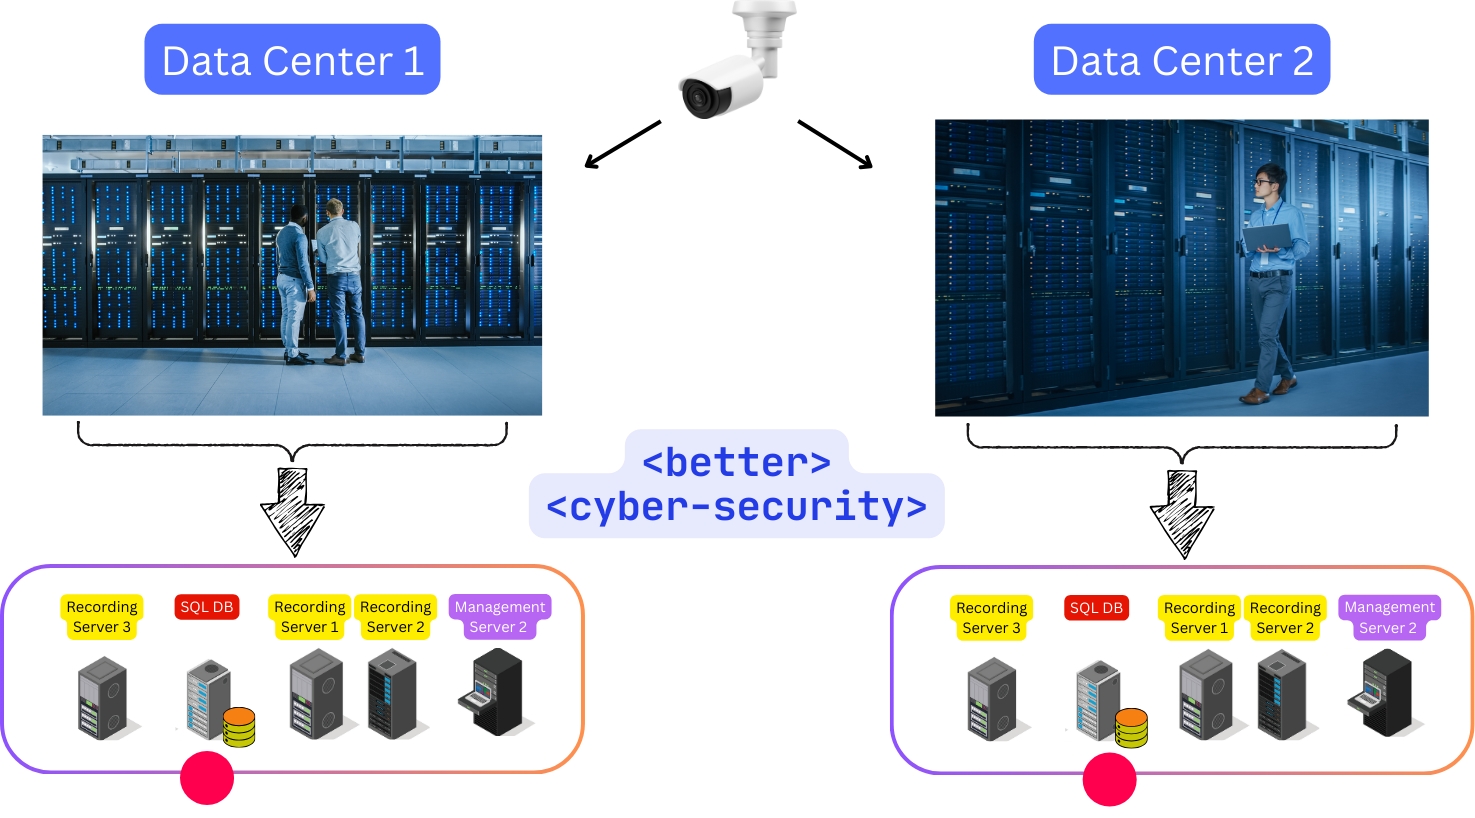
Recommended for better cybersecurity -Federated
Recommended for better cybersecurity -Independent
Replication needs a super-admin password and an open DB port.
The attacker steals the sysadmin-level replication account via an open port 5022 and pivots into other databases.
The sync connector only makes an outbound secure call with a short-lived, narrow-scope token through the XProtect API/SDK (provided certificates are enabled on XProtect). Even if stolen, the damage is limited, and no DB port is open.
In this attack mode, malware adds a rogue admin to the database.
All copies end up with the rogue admin. Every failover site is compromised.
Per-object replication control enables administrators to establish a policy that mandates manual confirmation for replicating the Users/Roles category and quarantining rogue accounts.
Redundancy Management Framework for Milestone XProtect - Version 7
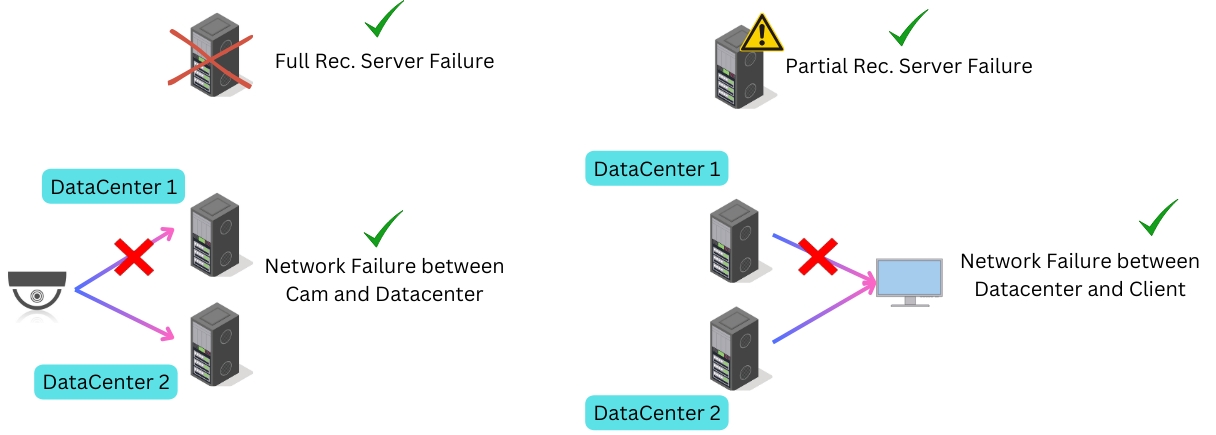
The Vega Redundancy Management Framework (RMF) is software designed to enhance Milestone XProtect Video Management Software (VMS) by providing recording server redundancy in all architectures, as well as cybersecure management server and SQL redundancy in specific architectures, all within a single software package. Key components facilitate cybersecure data synchronization between data centers, ensure rapid video failover at each client, and enable high-availability alarms. RMF ensures that cybersecurity is central to the design of a redundant system.
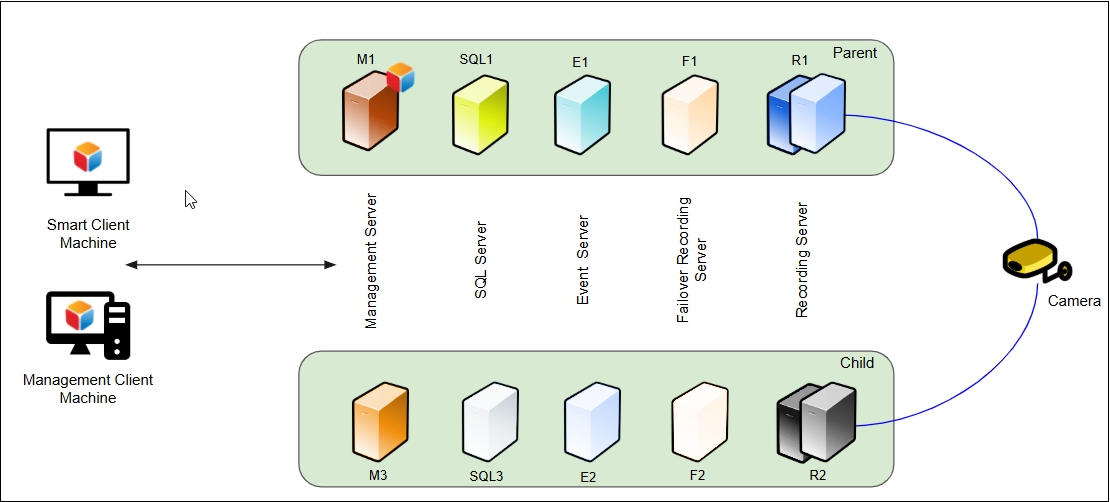
Active-Active Redundancy through Federation
Primary recorders are located at a parent milestone site, while secondary recorders are situated at a child site. There are two distinct databases: one at the parent site and another at the child site. Each camera streams to both sites simultaneously.
This setup ensures redundancy for all XProtect components, including the Management Server, Event Server, SQL Server, and Recording Servers.
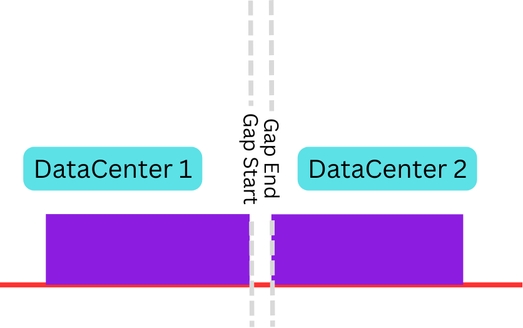
Cybersecure Design: Separate data centers with no inter-site clustered components enable independent cybersecurity policies at each. A compromise in one does not automatically compromise the other.
Clean Software Update Workflows: Since there are no inter-site clustered components, one site can be taken offline completely while the other site continues to serve clients. If things go wrong during an upgrade, the blast radius is contained within a single site.
SQL Insulation: There is no cross-site SQL clustering; therefore, SQL corruption in one site does not automatically affect the other site. All SQL synchronization is achieved through the Milestone API, which fails when reading from a corrupt database.
Increased levels of redundancy require higher infrastructure costs for multi-server deployments.
Equal and Independent sites
While the two data centers are independent, services and SQL can still be clustered within a single data center. RMF installation varies accordingly. Use the links below to navigate to the relevant RMF installation section.
Redundancy through Federation
While the two data centers are federated, services and SQL can still be clustered within a single data center. RMF installation varies accordingly. Use the links below to navigate to the relevant section.
Active-Active Redundancy for Recording
Primary and Secondary recorders are part of a single Milestone deployment that utilizes one database. It is important to note that clustered SQL databases, clustered Management Servers, and the Milestone Management Server Failover are all classified as a 'Single Site' because they operate on a single unique database.
This setup ensures redundancy for the Recording Servers only. To achieve redundancy and failover for other Milestone components, solutions such as Milestone Management Server Failover, Windows Clustering with AlwaysOn SQL, or Evidian Clustering must be deployed in conjunction with RMF.
Lower cost: Usually, fewer servers result in lower infrastructure costs.
Weak Cybersecurity Design: Even with Always-On SQL clustering, there is only one effective database. A hack into one copy is a hack into all copies and will compromise all video security.
Potential Outages during Upgrades: Even if clustering is used for failover, during software upgrades, all nodes must be taken offline and upgraded. The system experiences a loss of functionality during the process, which worsens if there are issues during upgrades, potentially causing all video security to fail.
In this attack mode, ransomware encrypts the raw data pages of the database.
Encrypted pages stream to every replica; all copies are locked.
Raw pages never move. API calls to the primary database fail. Standby stays clean and can be promoted.
Follow the steps below to validate the downloaded installer.
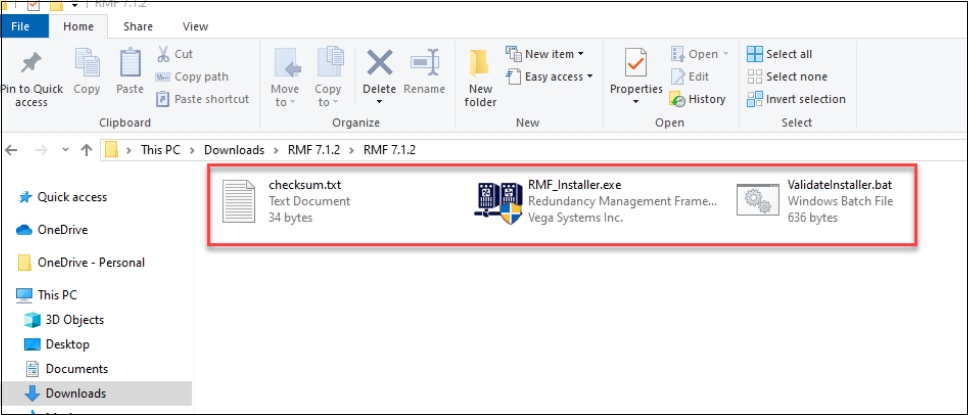
Perform the following pre-installation steps to download and unzip the RMF Installer files:
Navigate to the download link provided and download the RMF zipped file.
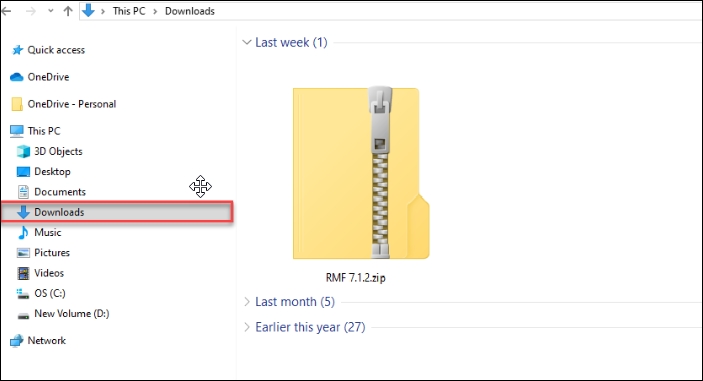
Locate the RMF zipped file from the Downloads folder.
Right-click the zipped file and click Extract All.
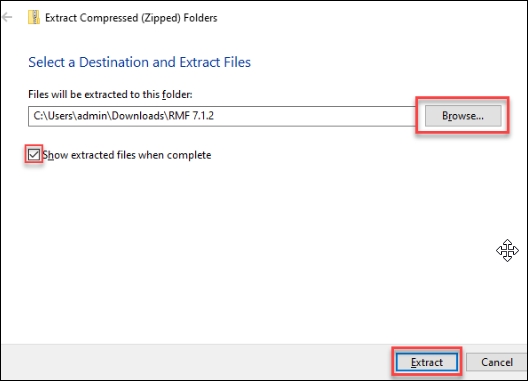
Click Browse to select a destination where the zipped file contents will be extracted, then click Extract. Then, select the check box to show the extracted files when they are complete.
Step Result: After extracting the RMF zipped file, the following files are available.
Unblock the installer after downloading it to ensure that the host system will run the installer. Often, because the installer was downloaded online, the host system automatically blocks it for security reasons.
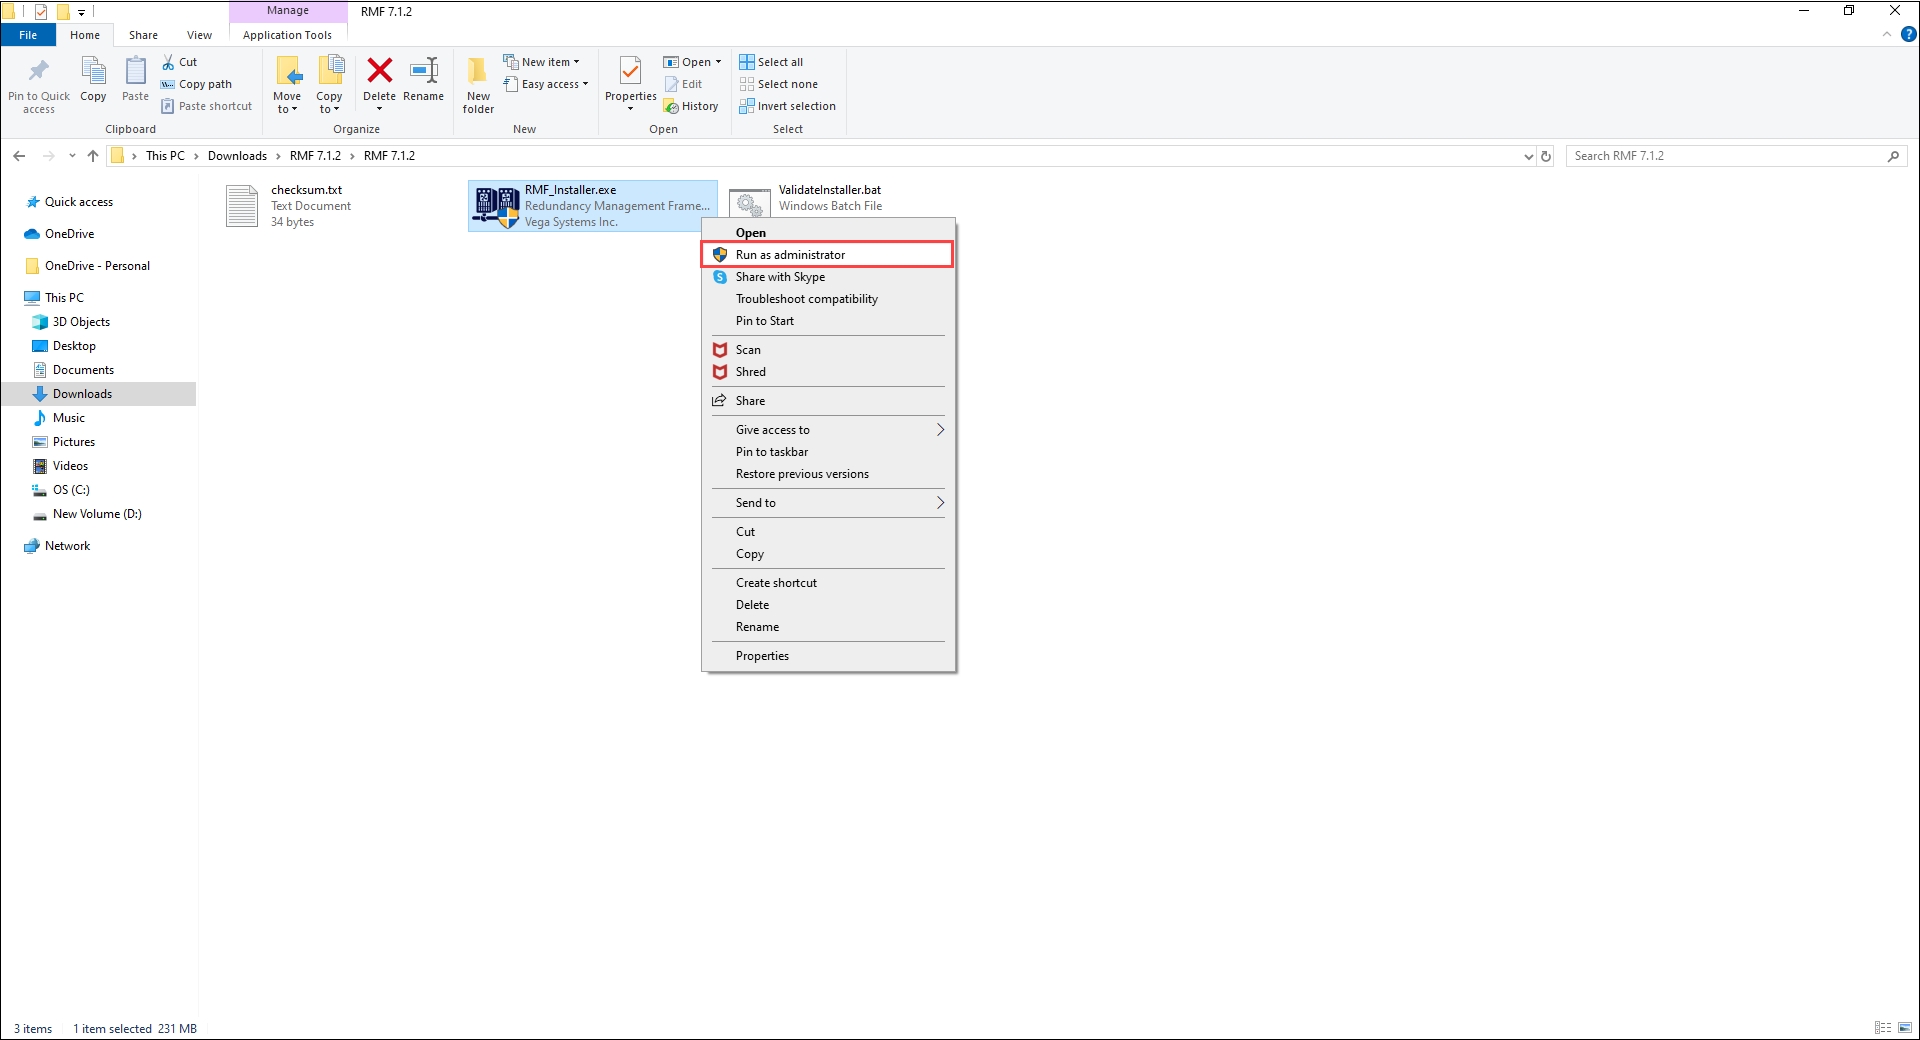
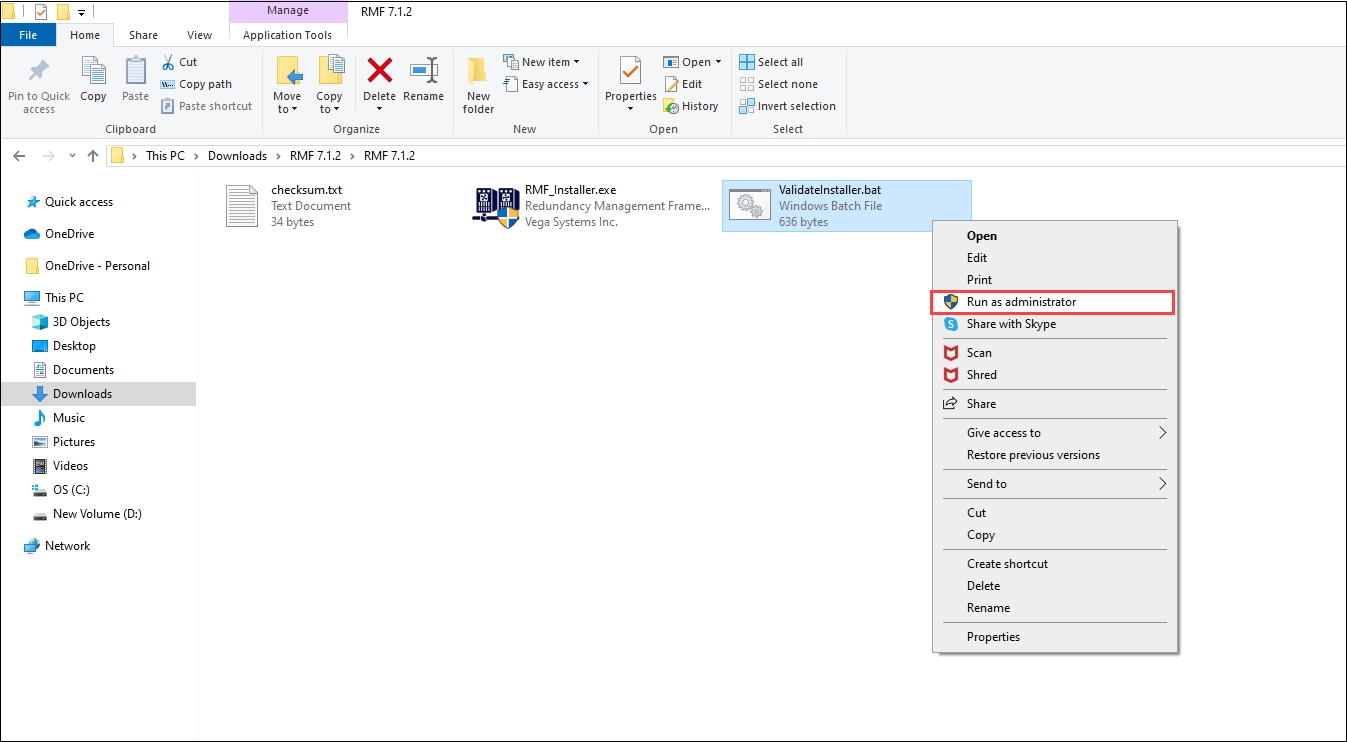
Perform the following steps to ensure that the RMF installer is valid and not corrupted during download:
Right-click ValidateInstaller.bat file.
Click Run as Administrator.
Step Result: The following success screen must appear. Otherwise, download the RMF folder again and execute the ValidateInstaller.bat file.
This section provides a roadmap for determining which RMF components need to be installed on which machines, based on the redundancy architecture.
Before installing RMF components, ensure that each machine has the following software pre-installed:
.NET Framework 4.8
Additionally, machines that will host the RMF service components must have:
Internet Information Services (IIS) 7.0 or higher version
Milestone Management Client Software
If your Primary and Secondary recorders are part of a single Milestone deployment with a single database, go to the section.
If your Primary recorders are part of a Parent Milestone site, and the Secondary recorders are part of a Child site, go to the section.
If your Primary recorders are part of one Milestone deployment, and the Secondary recorders are part of a separate, independent Milestone deployment, go to the section.
RMF offers the following key features:
Cybersecurity-first: The API Object Transfer mechanism used by RMF provides a Malware-Filtered Alternative to byte-for-byte legacy SQL synchronization.
Active-Active Redundancy: Cameras stream to both primary and secondary recorders, eliminating recording gaps caused by recorder failures.
Explore how RMF protects you from specific SQL attack vectors
SQL replication ensures availability but offers no protection against malware or corrupted data. Vega Systems' Object Intelligence framework adds a cybersecure layer to redundancy. By synchronizing only trusted objects through APIs, RMF, when deployed in , or architectures prevents harmful or unknown changes from propagating, keeping secondary systems clean and resilient.
The RMF comprises of the following software components.
The Vega RMF solution consists of three primary components: Services, Configuration UI, and Client. Each of these components plays a crucial role in ensuring high availability, synchronization, and seamless management within the RMF ecosystem.
⚙️Services: The RMF solution comprises two key services designed to provide synchronization and high-availability features.
RMF Smart Sync Service - This service ensures seamless synchronization of control data across data centers. It manages essential elements, including devices, streams, roles, views, and groups, thereby maintaining consistency and operational efficiency.
Follow this section if your Federated Parent Milestone Management Server is clustered or has Management Server Failover. Note that clustering is intra-site.
For non-ui driven installation - such as by a software management tool.
This section describes the Silent installation procedures of RMF Services and Client.
Steps to install RMF Services, UI, and Client components.
Refer to the following sections for RMF Pre-installation, Installation, Post-Installation, and Uninstallation procedures.
This section describes the RMF Smart Client Manual installation procedure.
Perform the following steps to install the RMF Smart Client component on the Smart Client machine:
Complete all the steps as described in the section.
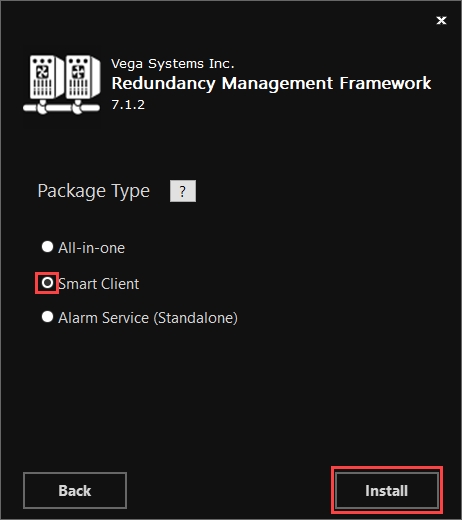
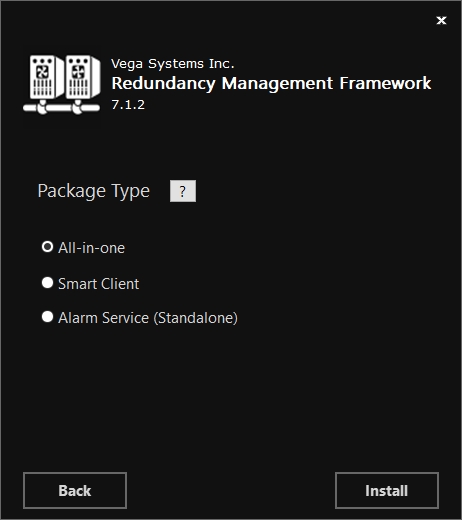
Select the Smart Client option in the Package Type dialog box and click Install.
This section describes the RMF Services Manual installation procedure.
Perform this procedure to install the following components: RMF Smart Sync Service, RMF Configurator UI, and RMF Alarm Service. Note that the Client component is also installed by default.
Complete all the steps as explained in the section.
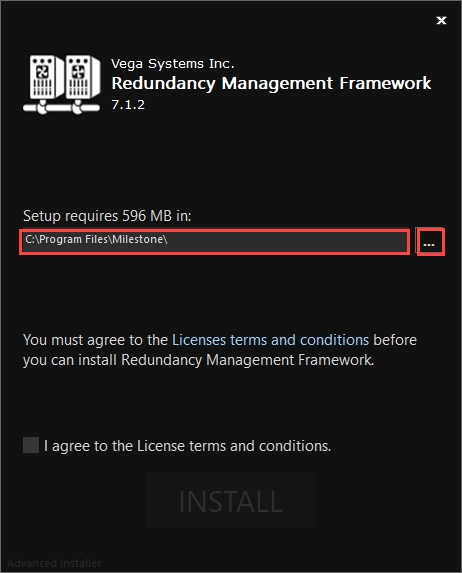
Right-click the RMF_Installer.exe file and select Run as Administrator.
3. Ensure that the RMF Setup path is pointed to the path where the Milestone is installed.
Active-Active Redundancy through Equal and Independent sites
Primary recorders are part of one Milestone deployment, while the Secondary recorders belong to a separate, independent Milestone deployment. This architecture features two unique databases, one at each site. The sites are not Federated. Each camera streams to both sites simultaneously.
This setup ensures redundancy for all XProtect components, including the Management Server, Event Server, SQL Server, and Recording Servers.
For UI driven installation
This section describes the manual installation procedures for RMF Services and the RMF client.
A system that performs full-image replication sends every row and column in the database to the secondary site, regardless of whether that site is cleared to hold the information. If the primary contains PII, payroll data, export-controlled CAD files, or patient records, the replica now does, too—even if it sits in a lower-trust network, another country, or a public cloud.
RMF Smart Sync Service, RMF Configurator UI, and RMF Alarm Service
RMF Smart Client
RMF Smart Sync Service, RMF Configurator UI, and RMF Alarm Service
RMF Smart Client


Cause Agnostic Failure Detection and Mitigation: Effectively detects and addresses various types of failures, helping to mitigate video monitoring outages caused by multiple issues.
Rapid Stream-Level Failover: This capability integrates failure detection and mitigation into each client view. It enables deployments to achieve stream-level, sub-second live video failover and fast playback failover. Each client view window independently determines its source recorder, independent of other windows and client machines allowing for seamless transitions.
Redundant Event Pipelines: This system delivers high-availability alarms by leveraging redundant event pipelines, ensuring critical alerts are not missed during failures.
Automatic Synchronization: Automatically synchronizes critical information, including roles, devices, stream parameters, views, and device groups, between two data centers to deliver a hands-free experience to the administrator.
Multi-Architecture Support: It supports active-active deployments with a single database, such as redundant recorders in a single XProtect deployment, as well as multiple databases, including federation and independent sites. Deployments with multiple databases provide benefits such as improved cybersecurity and the ability to avoid outages during software updates.
Precision Synchronization: Offers precise synchronization of stream and device features, allowing you to synchronize only what's necessary.
Support for XProtect Professional+: Provides failover support with XProtect Professional+.
API calls fail when attempting to retrieve the object, and corruption is not replicated even when object-level controls are disabled.

SQL Replication delivers availability. But does it provide Cybersecurity?
Traditional replication engines, such as SQL Failover, SQL Server Always On Availability Groups, Microsoft Failover Cluster with shared SAN storage, VMware vSphere HA/vMotion, Milestone Management Server Fa on shared datastores and SQL Server Log Shipping, were designed for continuity at any cost: they stream every byte, healthy or hostile, from a primary database to its standby in near real-time. This blind fidelity works wonders for availability, but it also guarantees that a single corrupt row, ransomware-encrypted page, or rogue admin account is instantly mirrored across your entire estate. In today's threat environment, that "always identical" philosophy is less a safeguard than a high-speed propagation channel for attacks.
RMF's object-level synchronization inverts that risk profile by making every change pass through Milestone's API, one self-contained object at a time. Because each user, policy, or device is treated as a discrete payload, the sync engine can validate, log, transform, or outright block it before it ever crosses network boundaries.
This fine-grained pipeline operates over a single HTTPS port with narrowly scoped tokens—no open database endpoints, no sysadmin logins—eliminating the lateral-movement footholds that classic replication leaves exposed. In practice, you keep the business intent ("copy the new camera,” "add this schedule") while stripping away the accidental or malicious noise that turns replicas into unwitting accomplices.
Explore subsequent pages to see how the RMF approach helps keep cybersecurity at the center of redundancy.
RMF Alarm Service - Designed for high availability, this service utilizes redundant event pipelines to deliver reliable alarm management, ensuring that critical events are processed without disruption.
💻Configuration UI: The RMF Configurator, integrated within the Milestone Management Client, serves as the central interface for RMF configuration and management. Its key functionalities include:
Configuring RMF settings to align with organizational requirements.
Managing the RMF Smart Sync Service for data synchronization.
Creating and managing RMF workflows to streamline operational processes.
Executing bulk password updates efficiently.
Client: The RMF Smart Client Component is designed to enhance system resilience and ensure continuous operation in both Live and Playback modes. Its core features include:
Stream-Level Failover - Automatically switches to backup streams in case of primary stream failure, maintaining uninterrupted access to video feeds.
By combining these components, the RMF solution provides a robust, high-availability framework that enhances system reliability, synchronization, and user control.
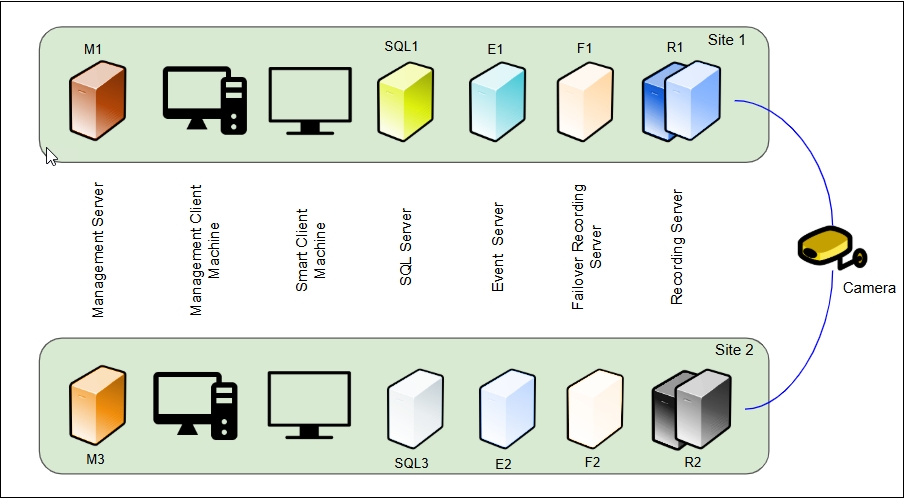
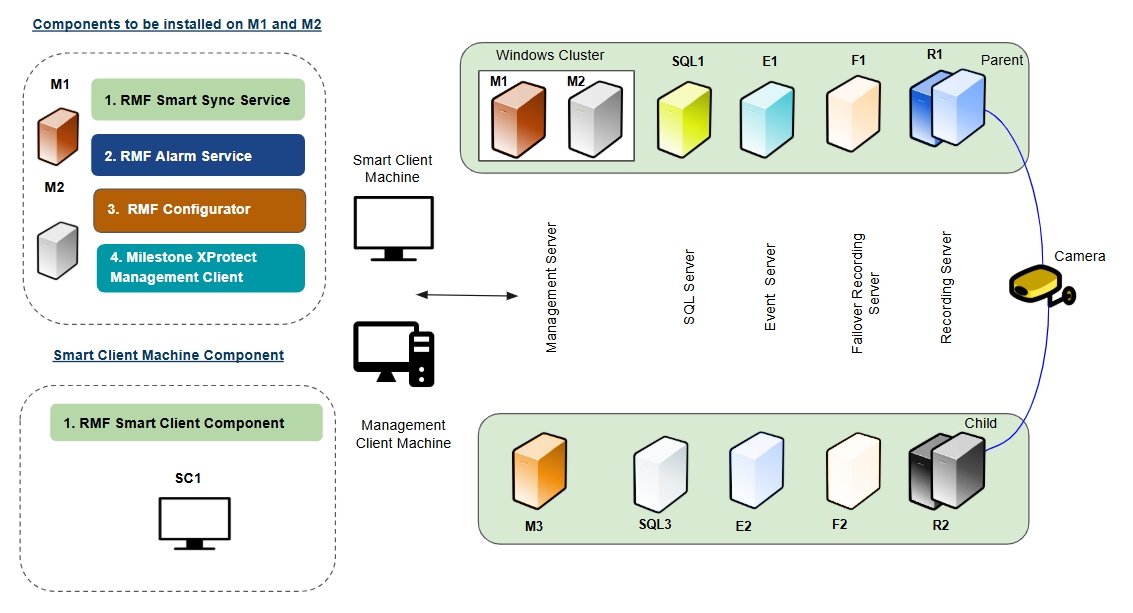
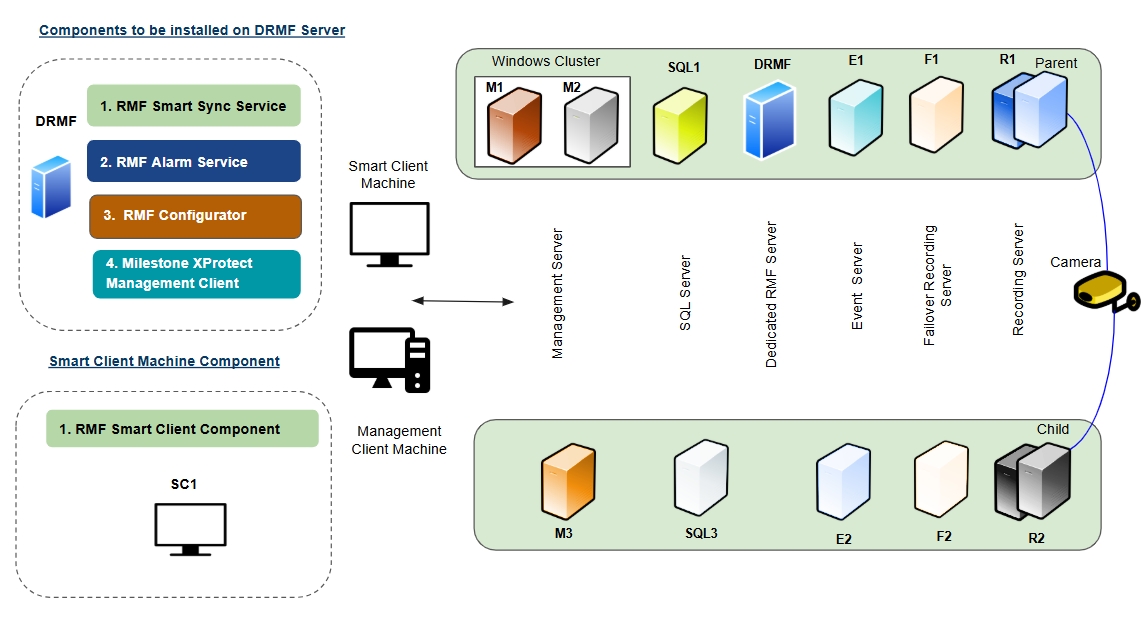
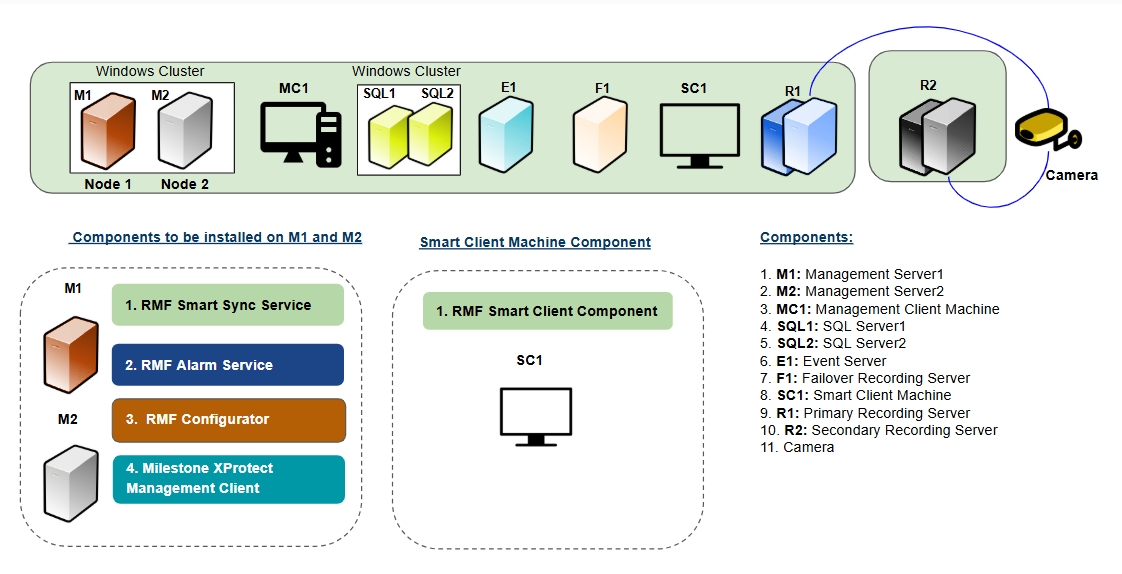
RMF Service Components
The following Service components are installed on the Management Servers M1 and M2:
RMF SmartSync Service
RMF Alarm Service
RMF Configurator
Milestone Management Client
For more information on the RMF Services installation, refer to the following sections:
RMF Services (Manual Installation)
RMF Services (Silent Installation)
Post Installation Procedure (RMF Services)
For additional information on the Milestone XProtect Management Client, refer to the Milestone XProtect documentation.
RMF Smart Client Component
The RMF Smart Client Component is installed on the Smart Client Machine (SC1).
For more information on the RMF Smart Client installation, refer to the following sections:
RMF Client (Manual Installation)
RMF Client (Silent Installation)
Post Installation Procedure (RMF Smart Client)
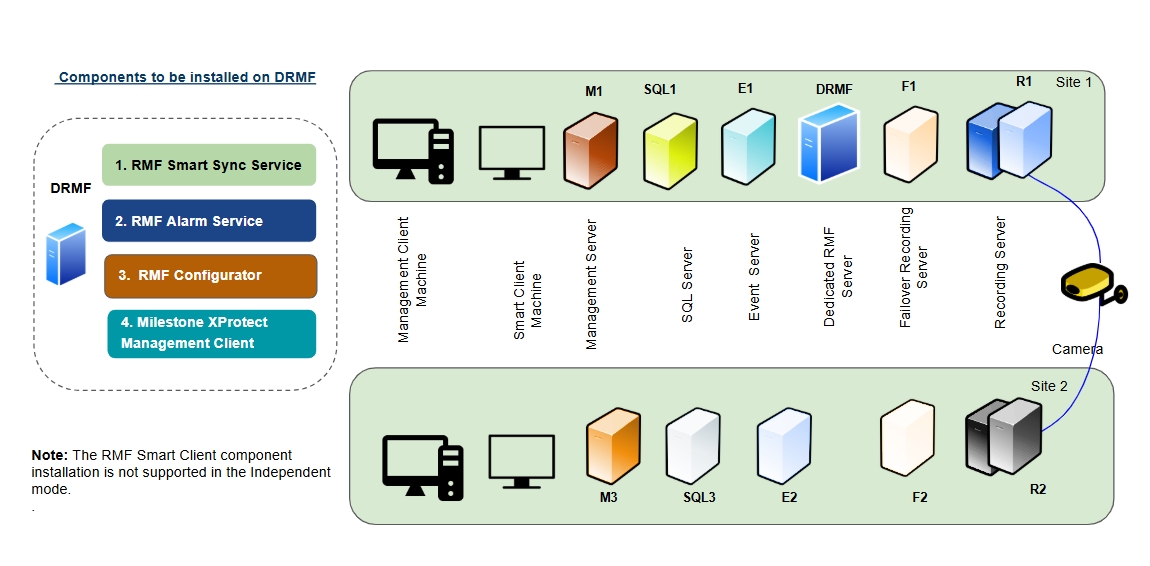
For a Federated architecture and clustered mode with more than 500 cameras, the RMF services components must be deployed on a Dedicated RMF Server (DRMF). This server must have the exact machine specifications as the Milestone Management Server. The DRMF server can be clustered to ensure high availability.
RMF Service Components
The following Service components are installed on the Dedicated RMF Server (DRMF):
RMF SmartSync Service
RMF Alarm Service
RMF Configurator
Milestone Management Client
For more information on the installation procedures of these components, refer to the following sections:
RMF Services (Manual Installation)
RMF Services (Silent Installation)
Post Installation Procedure (RMF Services)
For additional information on the Milestone XProtect Management Client, refer to the Milestone XProtect documentation.
RMF Smart Client Component
The RMF Smart Client Component is installed on the Smart Client Machine (SC1).
RMF Smart Client (Manual Installation)
RMF Smart Client (Silent Installation)
Post Installation Procedure (RMF Smart Client)
The primary continues to log new transactions, but because the standby never acknowledges them, its transaction log can’t be cleared. That log swells until the primary’s disk space is exhausted as well, turning a single “full disk” on the backup into a complete outage for the entire system.
Because the primary and standby servers are no longer joined at the hip by an ever-growing transaction log, a full disk on the backup becomes a localized maintenance issue rather than a cascading system failure.

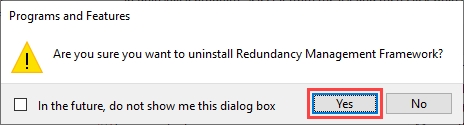
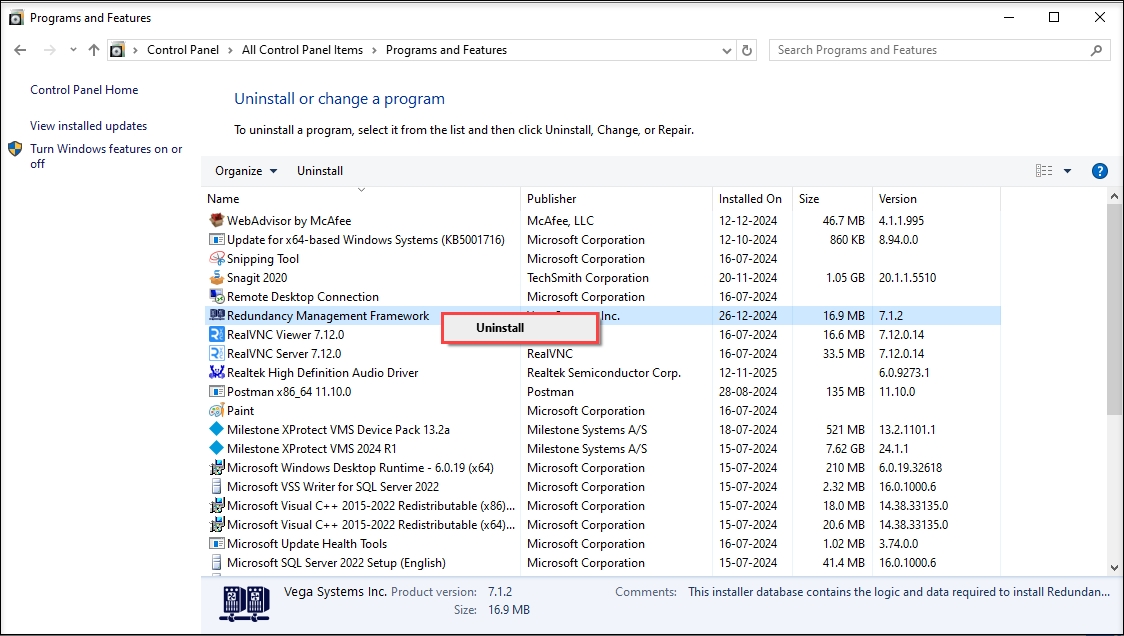
Uninstallation
Pre-installation
Manual Installation
Silent Installation
Post-Installation
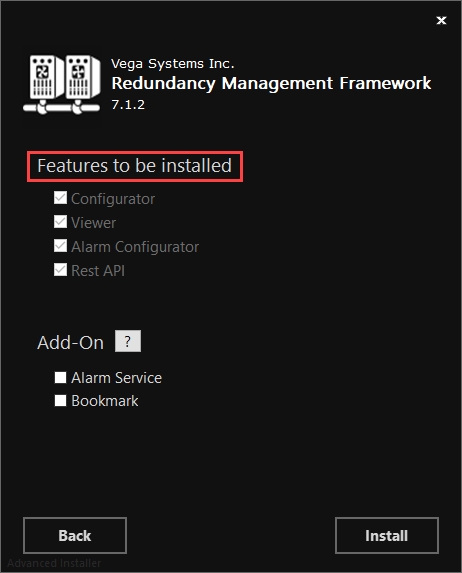
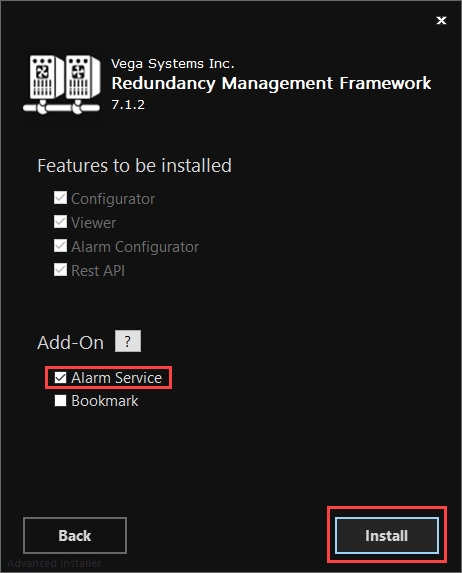
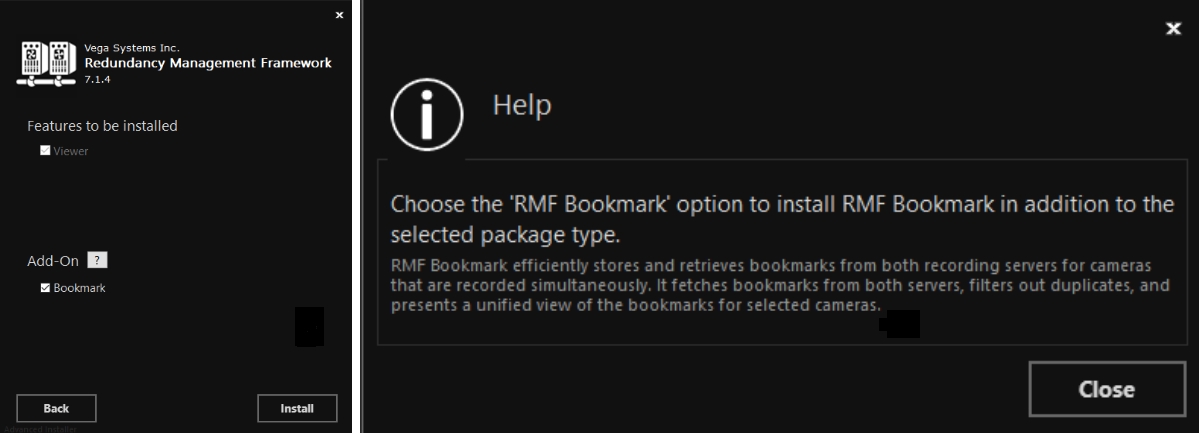
There are no features to be configured in this package type. Only Viewer is set by default.
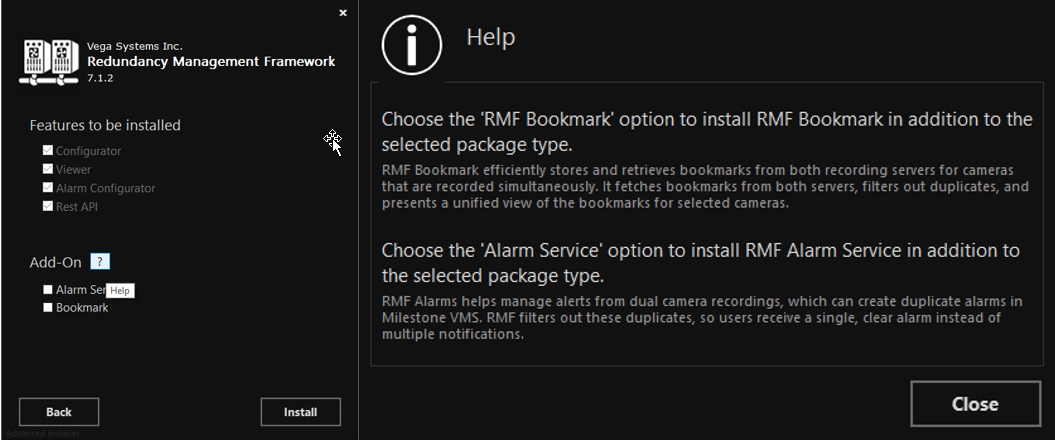
Click the Help icon to view details regarding the Add-On.
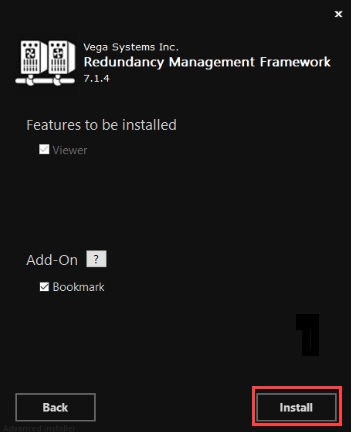
If needed, select Bookmark from the Add On option.
Click Install to proceed with the installation.
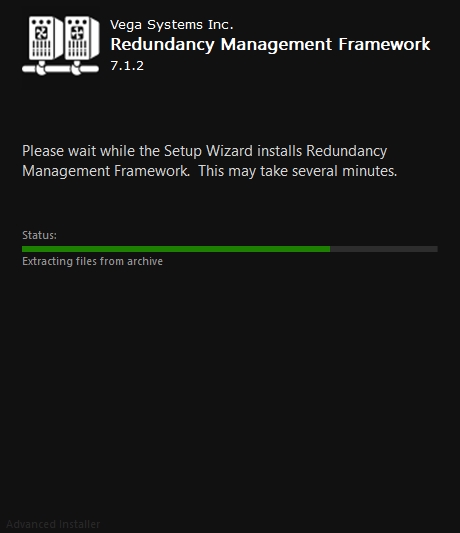
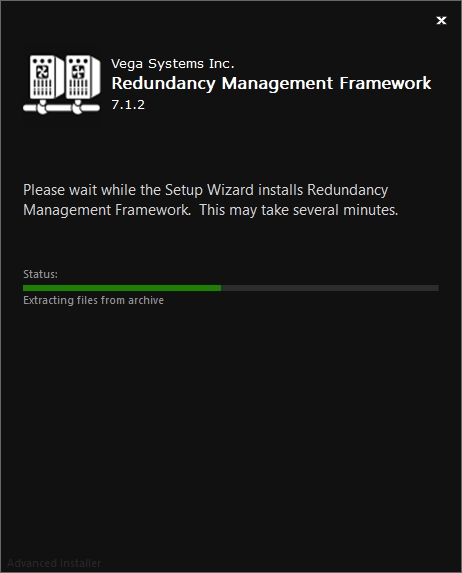
Step Result: The following screen displays the installation status.
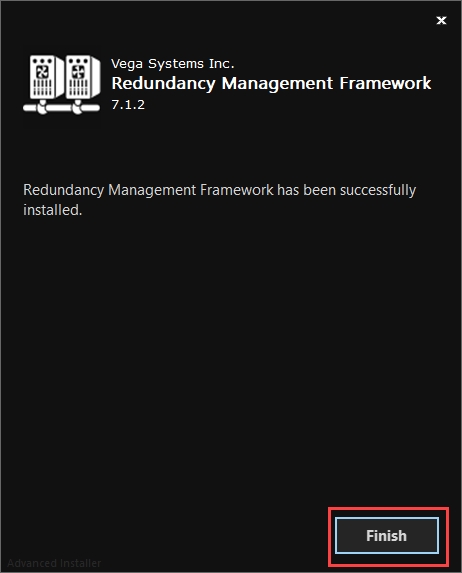
Click Finish to complete the RMF installation procedure.
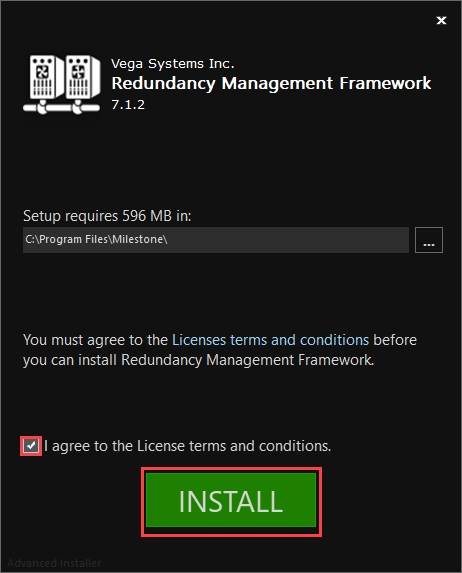
Or, for OEM installs, click on the ellipsis icon (...) and navigate to the location where the OEM is installed.
Click License Terms and Conditions and read through the terms and conditions before installing RMF.
Select the check box I agree to the License Terms and Conditions and click INSTALL.
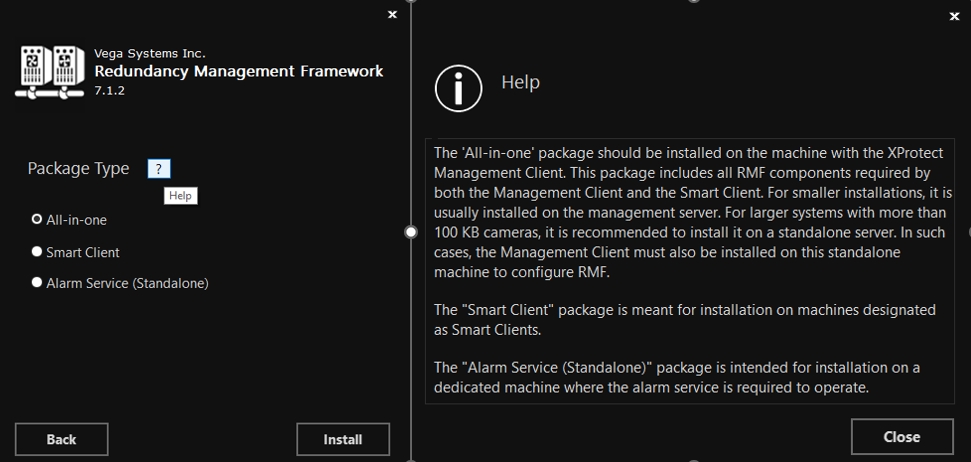
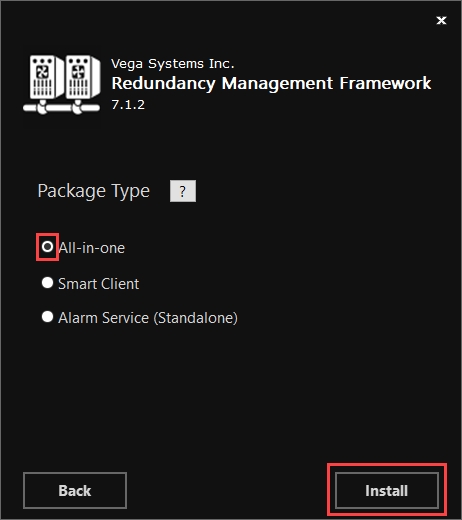
Step Result: The following screen lists all the package types.
Click the Help icon to view the details for each Package type.
Select the All-in-one option in the Package Type dialog box and click Install.
Select Alarm Service from the Add On options to install Alarm Service. Then click Install.
Step Result: The following screen displays the installation status.
Click Finish to complete the RMF installation procedure.
Clean Software Update Workflows: Since there are no inter-site clustered components, one site can be taken offline completely while the other site continues to serve clients. If things go wrong during an upgrade, the blast radius is contained within a single site.
SQL Insulation: There is no cross-site SQL clustering; therefore, SQL corruption in one site does not automatically affect the other site. RMF achieves all SQL synchronization through the Milestone API, which fails when reading from a corrupt database.
Cleaner user experience: Since sites are independent, camera visibility and alarm handling are straightforward. In contrast, in a Federated architecture, child site cameras are visible in the parent, resulting in the user seeing two sets of cameras in the client.
No Stream Level Failover in RMF: RMF does not support stream-level failover in the Milestone Smart Client. However, one can achieve this by using a PSIM, such as Prysm, that supports failover with an independent Milestone site.
Increased levels of redundancy require higher infrastructure costs for multi-server deployments.
Per-object selectors – You define which object categories (e.g., Cameras, Policies) can replicate.


A Cybersecurity-First Approach to Redundancy
Unlike traditional high-availability architectures that replicate everything—including mistakes and malware—RMF provides cybersecurity by design. It combines selective object-level synchronization, which prevents malicious or unintended changes from spreading, with fully isolated data centers that eliminate shared attack surfaces and block lateral threats. Together, these two layers provide a resilient and secure foundation for mission-critical video infrastructure.
We explore these two pillars of RMF's architecture in the pages that follow.
Follow this section if your Federated Parent Milestone Management Server is not Clustered and does not have Management Server Failover.
For a Federated architecture and non-clustered mode with less than 500 cameras, deploy the following components:
RMF Service Components
The following Service components are installed on the Management Server M1:
RMF SmartSync Service
RMF Alarm Service
RMF Configurator
Milestone Management Client
For more information on the RMF Services Installation, go to the following sections:
For additional information on the Milestone XProtect Management Client, refer to the Milestone XProtect documentation.
RMF Smart Client Component
The RMF Smart Client Component is installed on the Smart Client Machine (SC1).
For more information on the RMF Smart Client installation, refer to the following sections:
For a Federated architecture and non-clustered mode with more than 500 cameras, the RMF services components must be deployed on a dedicated RMF server (DRMF). This server must have the exact machine specifications as the Milestone Management Server and can be clustered to ensure high availability.
RMF Service Components
The following Service components are installed on the Dedicated RMF Server (DRMF):
RMF SmartSync Service
RMF Alarm Service
RMF Configurator
Milestone Management Client
For more information on the RMF Services installation, refer to the following sections:
For additional information on the Milestone XProtect Management Client, refer to the Milestone XProtect documentation.
RMF Smart Client Component
The RMF Smart Client Component is installed on the Smart Client Machine (SC1).
For more information on the RMF Smart Client installation, refer to the following sections:
Isolated datacenters block lateral threats
A large percentage of deployed high-availability architectures rely on cross-site service clustering, which increases cyber risk by creating shared attack surfaces. RMF, when deployed in Federated or Independent architectures, takes a different approach: each data center operates independently, with no shared clustering or storage. This isolation blocks lateral movement during an attack and ensures a clean, uncompromised environment is always available for recovery.
Traditional cross-site clustering relies on deep system-level integration between data centers, typically involving shared authentication domains, real-time database replication, and mutual access to control services and storage. For the cluster to function seamlessly, each site must implicitly trust the other across all layers of the stack. This broad trust model means that any compromise—whether through malware, misconfiguration, or insider threat—can rapidly propagate across the entire cluster. The exact mechanisms that deliver high availability also erase meaningful security boundaries between sites, violating zero-trust principles and increasing the blast radius of a breach.
The RMF solution (when deployed in or architectures) replaces clustering with a service-based model that treats each data center as an independent entity. There is no requirement for shared authentication, storage, or real-time database replication. Instead, RMF operates through a lightweight service that connects the two sites over a narrow, explicitly defined communication channel with limited privileges and no direct system-level access. This design dramatically reduces the trust surface and prevents lateral movement between sites. Even if one site is compromised, the other remains fully insulated. By eliminating the need for persistent cross-site trust, RMF aligns with zero-trust architecture and provides a far stronger foundation for cybersecurity and resilience.
Follow this section if your Single Site Milestone Management Server is Clustered or has Management Server Failover.
For a single-site architecture and clustered mode with fewer than 500 cameras, deploy the following components:
RMF Service Components
The following Service components are installed on the Management Servers M1 and M2:
RMF SmartSync Service
RMF Alarm Service
RMF Configurator
Milestone Management Client
For more information on the RMF Services installation, refer to the following sections:
Add RMF Service Components to cluster management
Additionally, add the Smart Sync Service and the Alarm Service to the Cluster Manager. Including these services in the cluster ensures that the standby node activates them when it becomes active, and RMF services have HA. The information below illustrates the process for the RMF alarm service when using Windows Clustering. Repeat the steps for RMF Smart Sync Service. If using Milestone Management Server Failover, the steps may vary slightly, but the outcome should be the same.
For additional information on the Milestone XProtect Management Client, refer to the Milestone XProtect documentation.
RMF Smart Client Component
The RMF Smart Client Component is installed on the Smart Client Machine (SC1).
For more information on the RMF Smart Client installation, refer to the following sections:
For a single-site architecture and clustered mode with more than 500 cameras, one must deploy the RMF services components on a Dedicated RMF Server (DRMF). This server must have the exact machine specifications as the Milestone Management Server. For high availability, the DRMF server can be clustered.
RMF Service Components
The following Service components are installed on the Dedicated RMF Server (DRMF):
RMF SmartSync Service
RMF Alarm Service
RMF Configurator
Milestone Management Client
For more information on the installation procedures of these components, refer to the following sections:
For additional information on the Milestone XProtect Management Client, refer to the Milestone XProtect documentation.
RMF Smart Client Component
The RMF Smart Client Component is installed on the Smart Client Machine (SC1).
Follow this section if your Primary Milestone Management Server is clustered or has Management Server Failover. Note that clustering is intra-site.
For an Independent architecture, clustered mode with less than 500 cameras, deploy the following components.
Note: All RMF components are installed only on Site 1.
RMF Service Components
The following Service components are installed on the Management Servers M1 and M2:
RMF SmartSync Service
RMF Alarm Service
RMF Configurator
Milestone Management Client
For more information on the RMF Services installation, refer to the following sections:
For additional information on the Milestone XProtect Management Client, refer to the Milestone XProtect documentation.
For an Independent architecture, clustered mode with more than 500 cameras, the RMF services components must be deployed on a dedicated RMF server (DRMF). This server must have the exact machine specifications as the Milestone Management Server. The DRMF server can be clustered to ensure high availability.
RMF Service Components
The following Service components are installed on the Dedicated RMF Server (DRMF):
RMF SmartSync Service
RMF Alarm Service
RMF Configurator
Milestone Management Client
For more information on the installation procedures of these components, refer to the following sections:
For additional information on the Milestone XProtect Management Client, refer to the Milestone XProtect documentation.
Follow this section if your Primary Milestone Management Server is not Clustered and does not have Management Server Failover.
If your Single Site Milestone Management Server is not Clustered and does not have Management Server Failover, follow this section.


Follow the steps to uninstall RMF.
The following RMF uninstallation procedures are explained in this section:
Follow these steps to activate RMF licenses at locations without internet connectivity.
Perform the following steps in sequence for RMF offline license activation:
RMF Services (Manual Installation)
RMF Services (Silent Installation)
Post Installation Procedure (RMF Services)
RMF Client (Manual Installation)
RMF Client (Silent Installation)
Post Installation Procedure (RMF Smart Client)
RMF Services (Manual Installation)
RMF Services (Silent Installation)
Post Installation Procedure (RMF Services)
RMF Smart Client (Manual Installation)
RMF Smart Client (Silent Installation)
Post Installation Procedure (RMF Smart Client)

RMF Service Components
The following Service components are installed on the Management Server M1:
RMF SmartSync Service
RMF Alarm Service
RMF Configurator
Milestone Management Client
For more information on the RMF Services installation, refer to the following sections:
RMF Services (Manual Installation)
RMF Services (Silent Installation)
Post-Installation Procedure (RMF Services)
For additional information on the Milestone XProtect Management Client, refer to the Milestone XProtect documentation.
For an independent architecture in a non-clustered mode with more than 500 cameras, the RMF services components must be deployed on a dedicated RMF server (DRMF). This server must have the exact machine specifications as the Milestone Management Server. The DRMF server can be clustered to ensure high availability.
RMF Service Components
The following Service components are installed on the Dedicated RMF Server (DRMF):
RMF SmartSync Service
RMF Alarm Service
RMF Configurator
Milestone Management Client
For more information on the RMF Services installation, refer to the following sections:
RMF Services (Manual Installation)
RMF Services (Silent Installation)
Post-Installation Procedure (RMF Services)
For additional information on the Milestone XProtect Management Client, refer to the Milestone XProtect documentation.
RMF SmartSync Service
RMF Alarm Service
RMF Configurator
Milestone Management Client
For more information on the RMF Services installation, refer to the following sections:
RMF Services (Manual Installation)
RMF Services (Silent Installation)
Post Installation Procedure (RMF Services)
Milestone Management Client
Please refer to the Milestone XProtect documentation for more information on the Milestone XProtect Management Client.
RMF Smart Client Component
The RMF Smart Client Component is installed on the Smart Client Machine (SC1).
For more information on the RMF Smart Client installation, refer to the following sections:
RMF Smart Client (Manual Installation)
RMF Smart Client (Silent Installation)
Post Installation Procedure (RMF Smart Client)
For a Single-Site architecture and non-clustered mode with more than 500 cameras, the RMF services components must be deployed on a Dedicated RMF Server (DRMF). This server must have the same machine specifications as the Milestone Management Server and can be clustered to ensure high availability.
RMF Service Components
The following Service components are installed on the Dedicated RMF Server (DRMF):
RMF SmartSync Service
RMF Alarm Service
RMF Configurator
Milestone Management Client
For more information on the RMF Services installation, refer to the following sections:
RMF Services (Manual Installation)
RMF Services (Silent Installation)
Post Installation Procedure (RMF Services)
If you would like more information on the Milestone XProtect Management Client, please refer to the Milestone XProtect documentation.
RMF Smart Client Component
The RMF Smart Client Component is installed on the Smart Client Machine (SC1).
For more information on the RMF Smart Client installation, refer to the following sections:
RMF Smart Client (Manual Installation)
RMF Smart Client (Silent Installation)
Post Installation Procedure (RMF Smart Client)
RMF Services (Manual Installation)
RMF Services (Silent Installation)
Post-Installation Procedure (RMF Services)
RMF Smart Client (Manual Installation)
RMF Smart Client (Silent Installation)
Post-Installation Procedure (RMF Smart Client)
RMF Services (Manual Installation)
RMF Services (Silent Installation)
Post Installation Procedure (RMF Services)
RMF Smart Client (Manual Installation)
RMF Smart Client (Silent Installation)
Post Installation Procedure (RMF Smart Client)
RMF Services (Manual Installation)
RMF Services (Silent Installation)
Post Installation Procedure (RMF Services)
RMF Services (Manual Installation)
RMF Services (Silent Installation)
Post Installation Procedure (RMF Services)


Post-Installation procedure of RMF Client Components
Perform the following post-installation steps to verify that the RMF Client components are successfully installed.
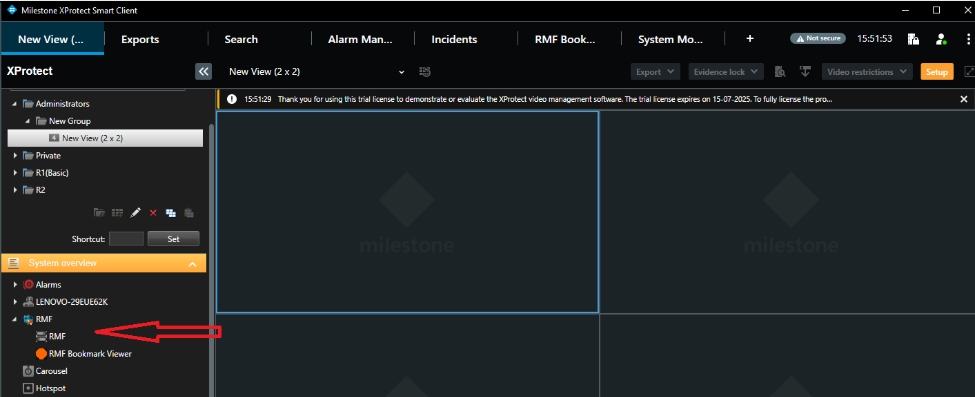
Launch the Milestone XProtect Smart Client on the machine where the RMF Smart Client package is installed and sign in to the application.
Verify that the newly installed plugin appears under the MIP SDK Tools tree in the Smart Client application.
RMF Silent uninstallation procedure.
Perform the following steps to uninstall RMF:
Start the "Command Prompt" with administrator privileges.
Execute the following command:
RMF_Installer.exe /exenoui /qn /x
Backup or Restore
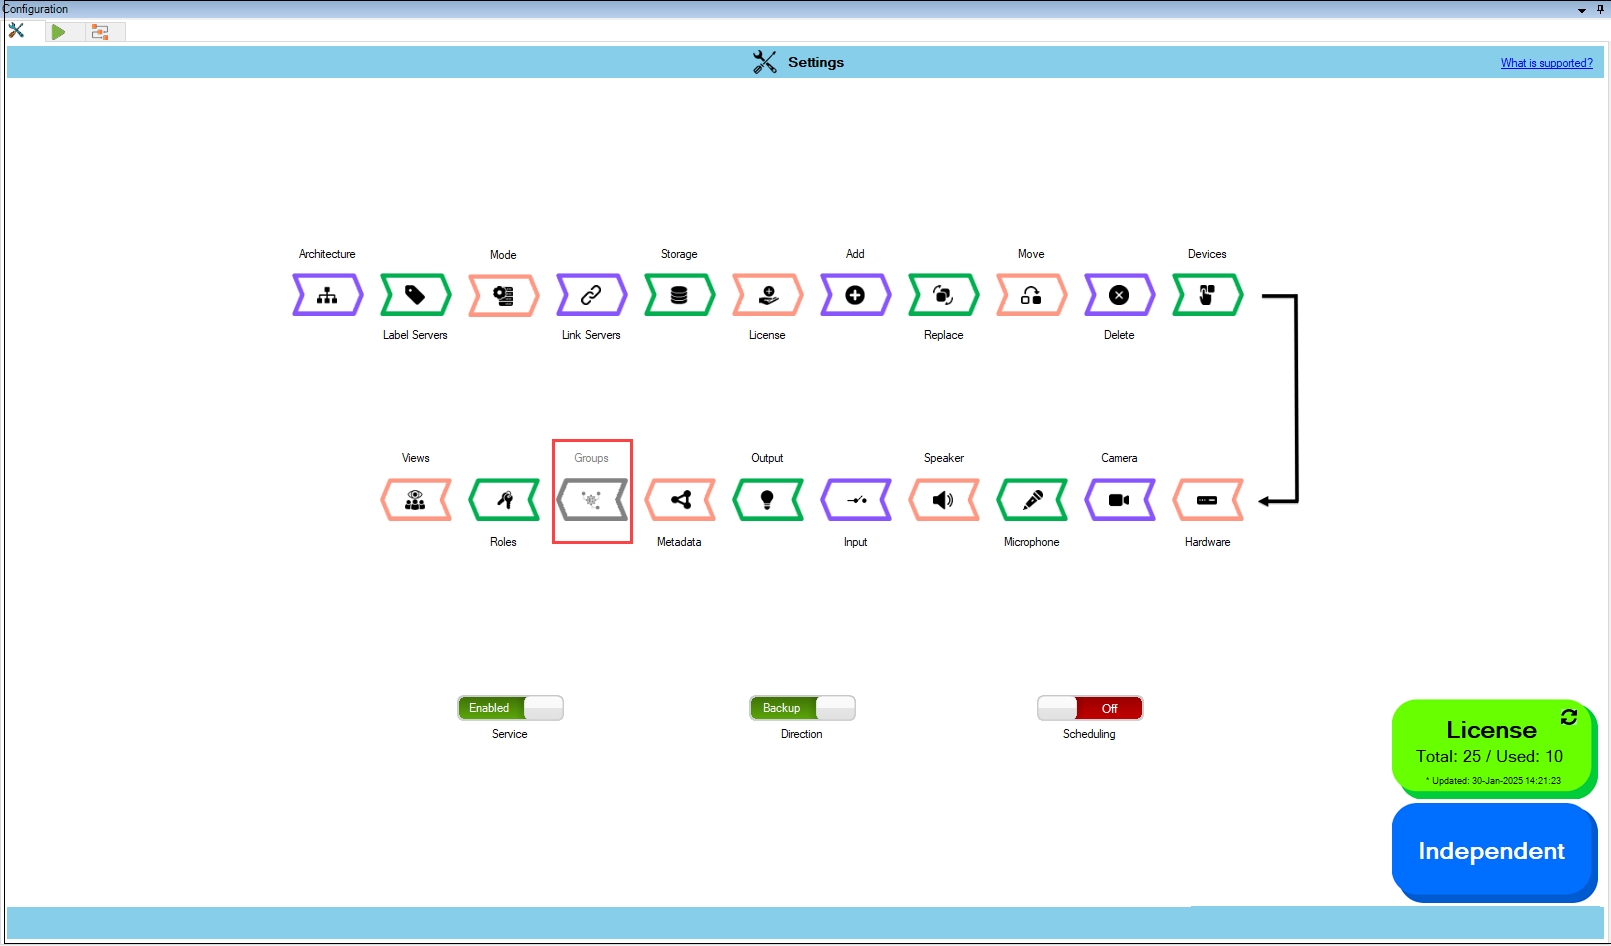
RMF enables bi-directional synchronization based on the Direction setting, allowing users to automatically back up configurations to the redundant site or easily restore configurations from it.
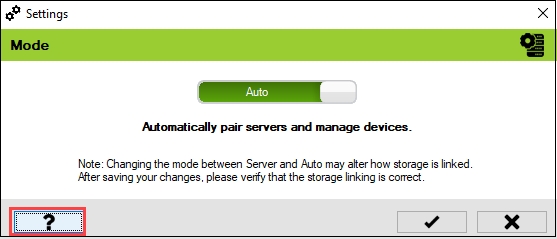
Settings for the SmartSync service can be configured from its system tray icon. Subsequent sections provide more information about various options.
Start the SmartSync Service.
This option starts the SmartSync Service.
Select Start from the SmartSync Service Settings.
For more information on how to enable the SmartSync Service, refer to the section: Enable the SmartSync Service
Post-Installation procedure of RMF Services and UI
Perform the following post-installation steps to verify that the RMF Services and UI are successfully installed.
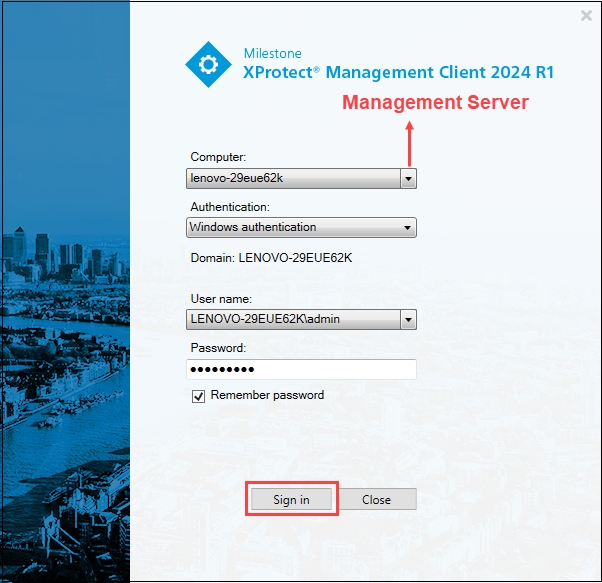
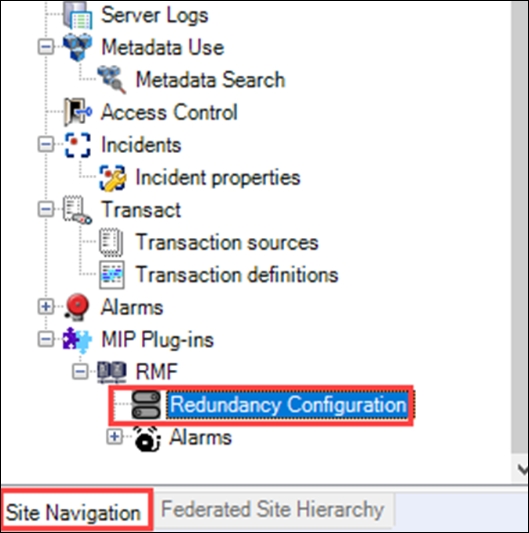
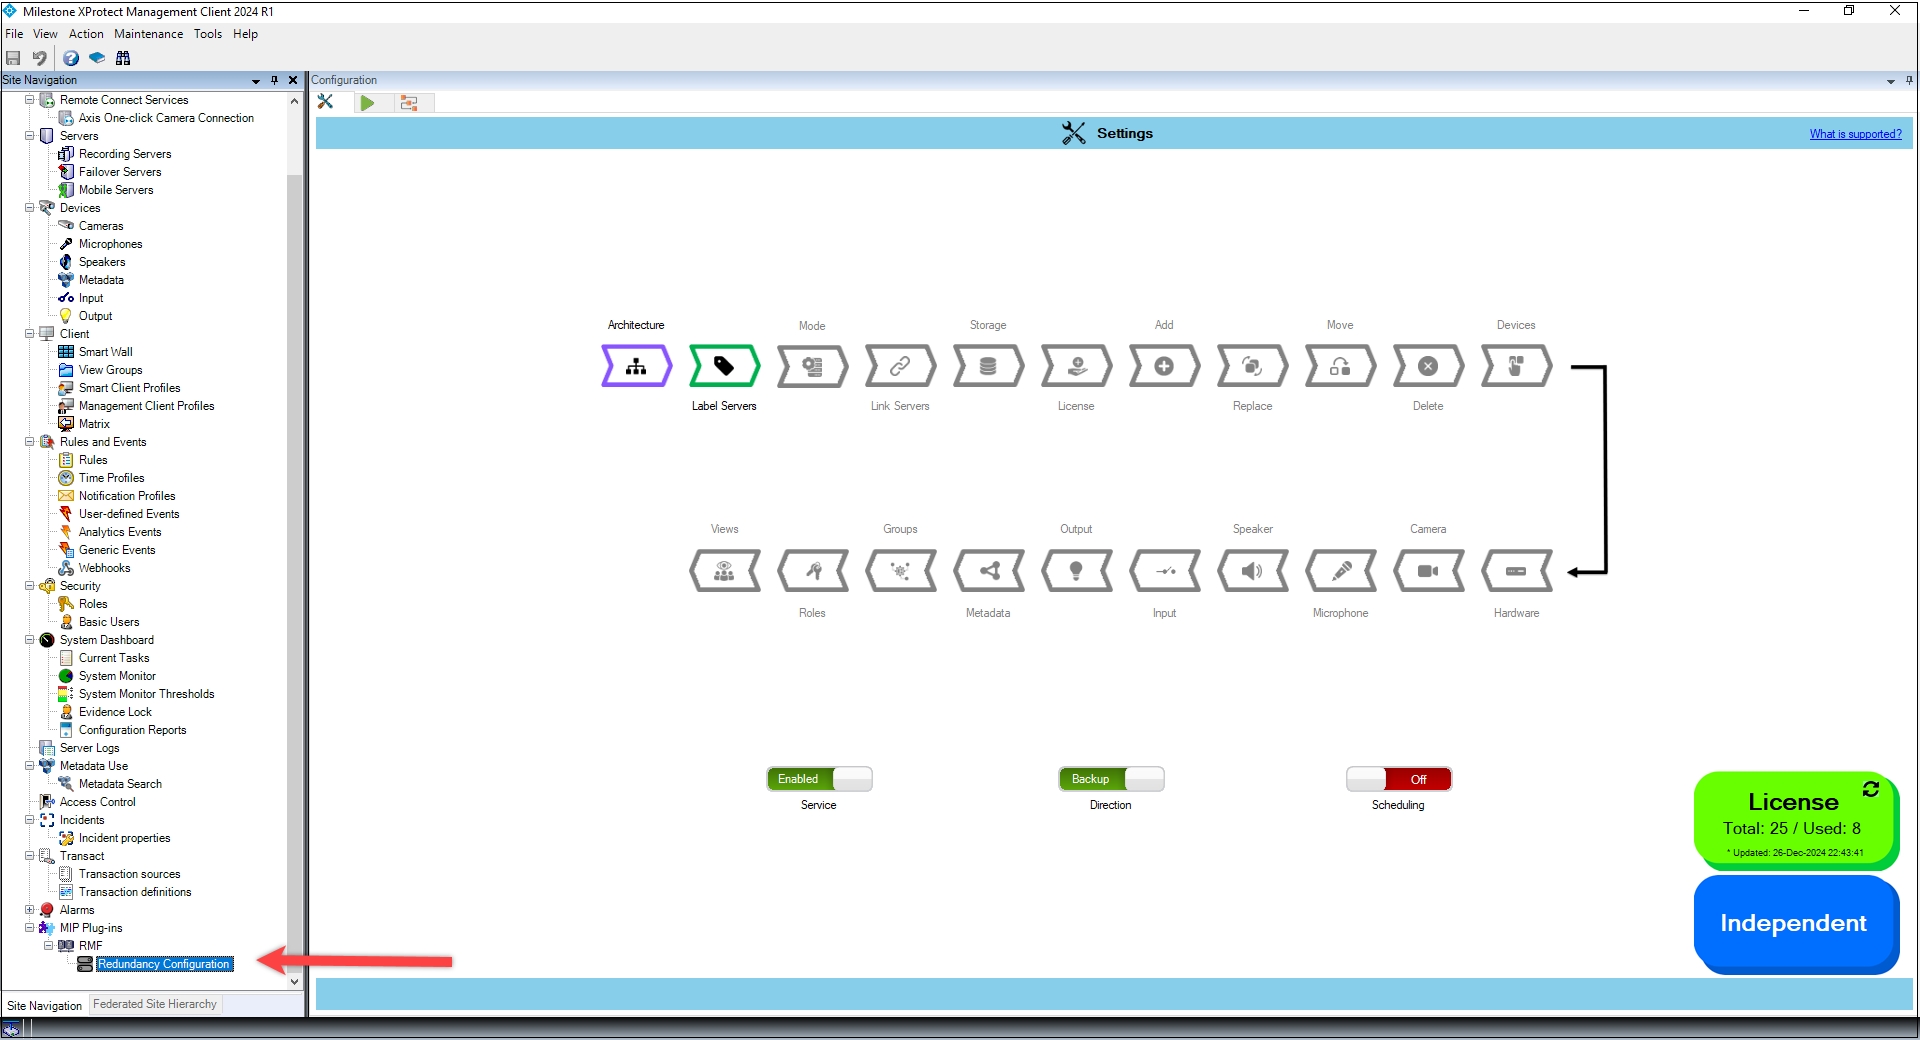
Launch the XProtect Management Client on the machine where the RMF Services are installed and sign in to the application.
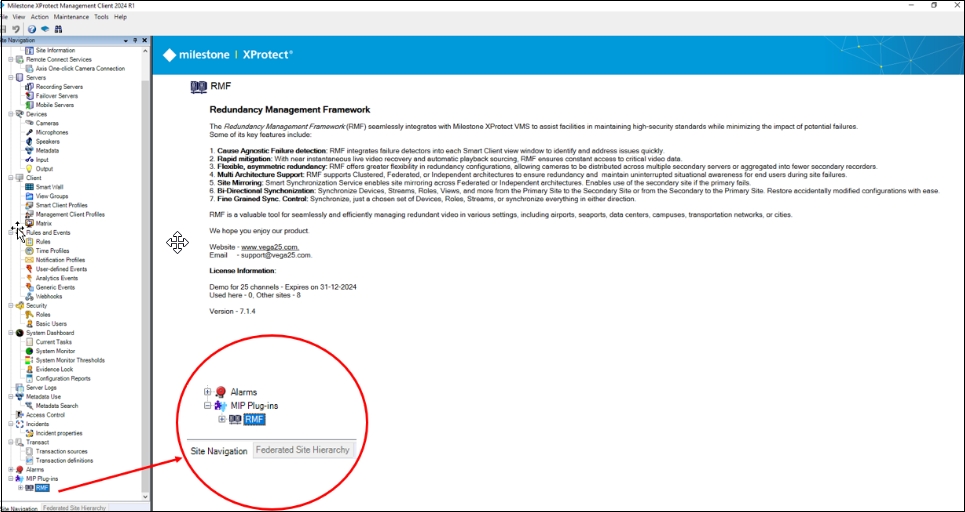
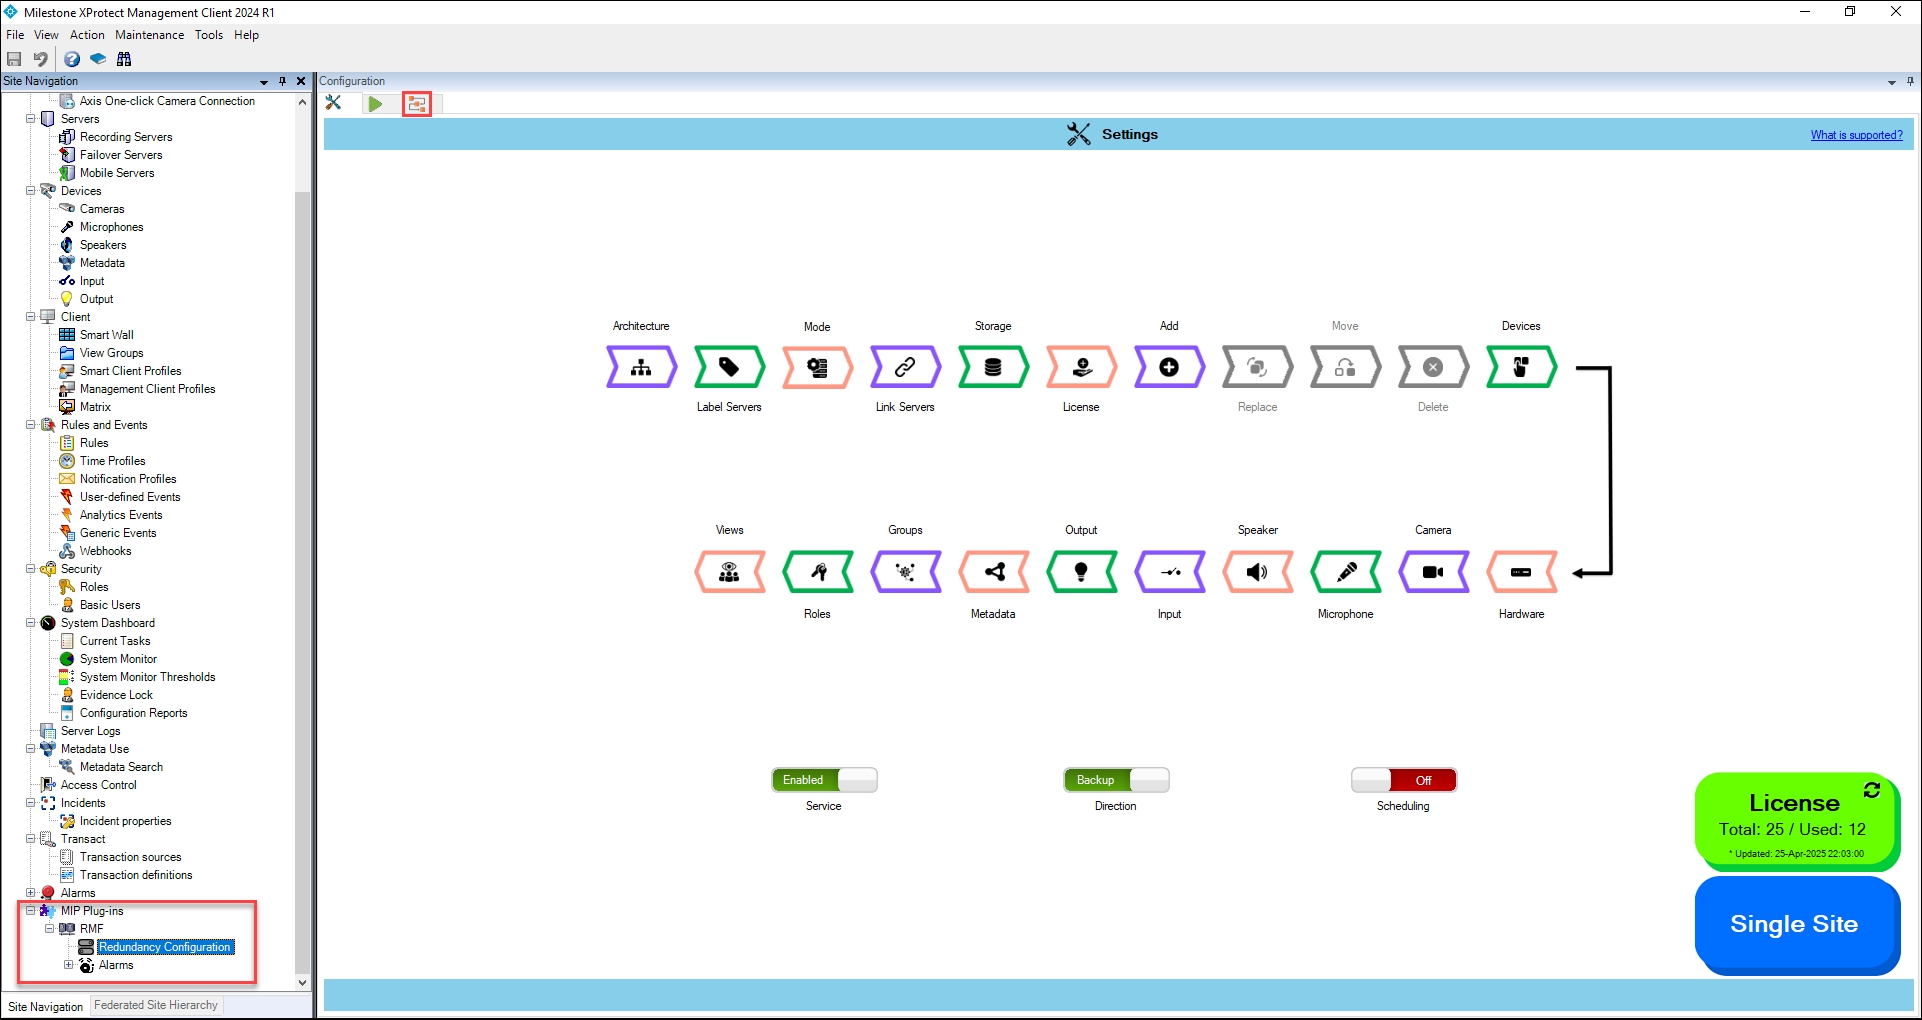
After signing in, verify that the RMF is visible in the screen's bottom left corner under the MIP Plugins tree view.
Expand the RMF Expand button to view the Redundancy Configuration.
Stop the SmartSync Service.
This option stops the execution of SmartSync Service.
Select Stop from the SmartSync Service Settings.
To access the Run tab, do the following steps.
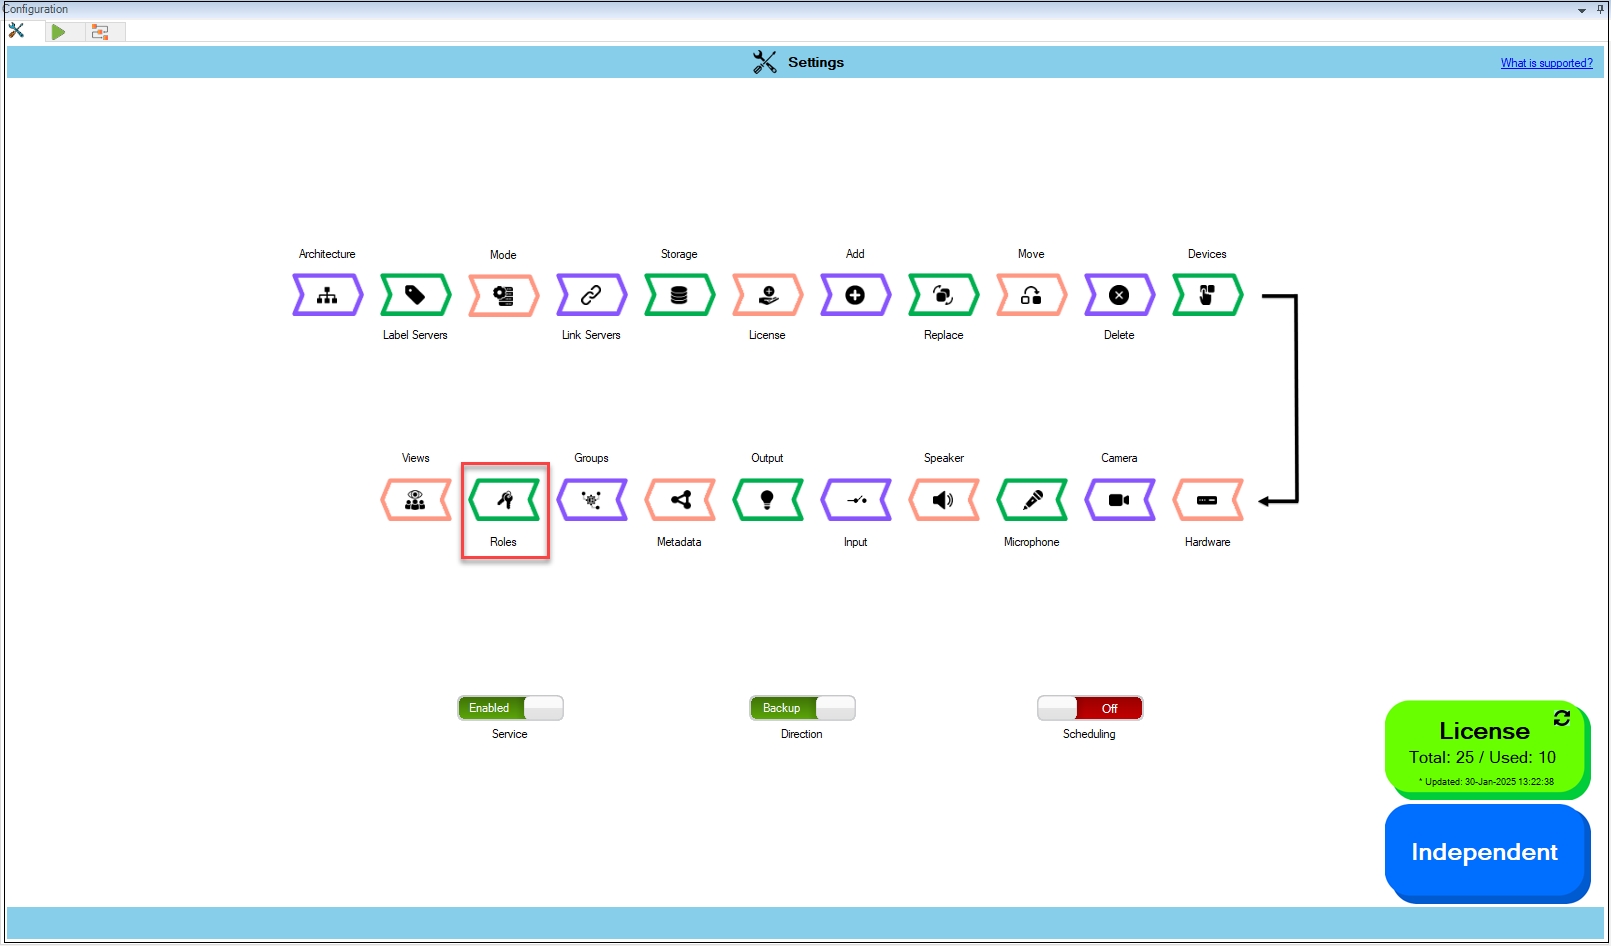
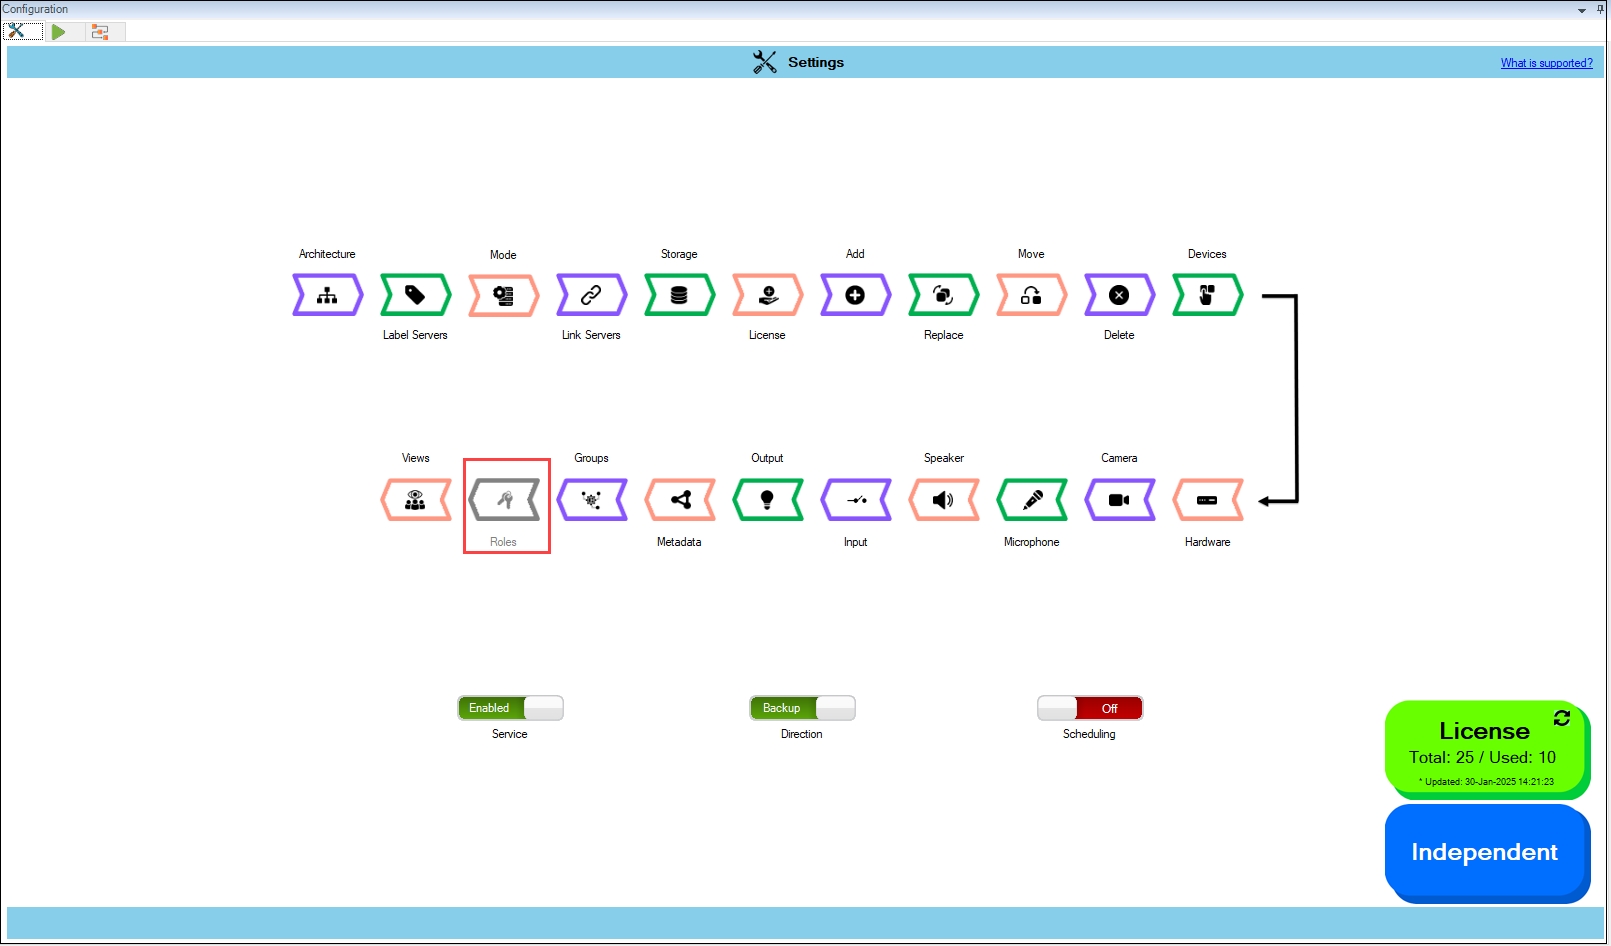
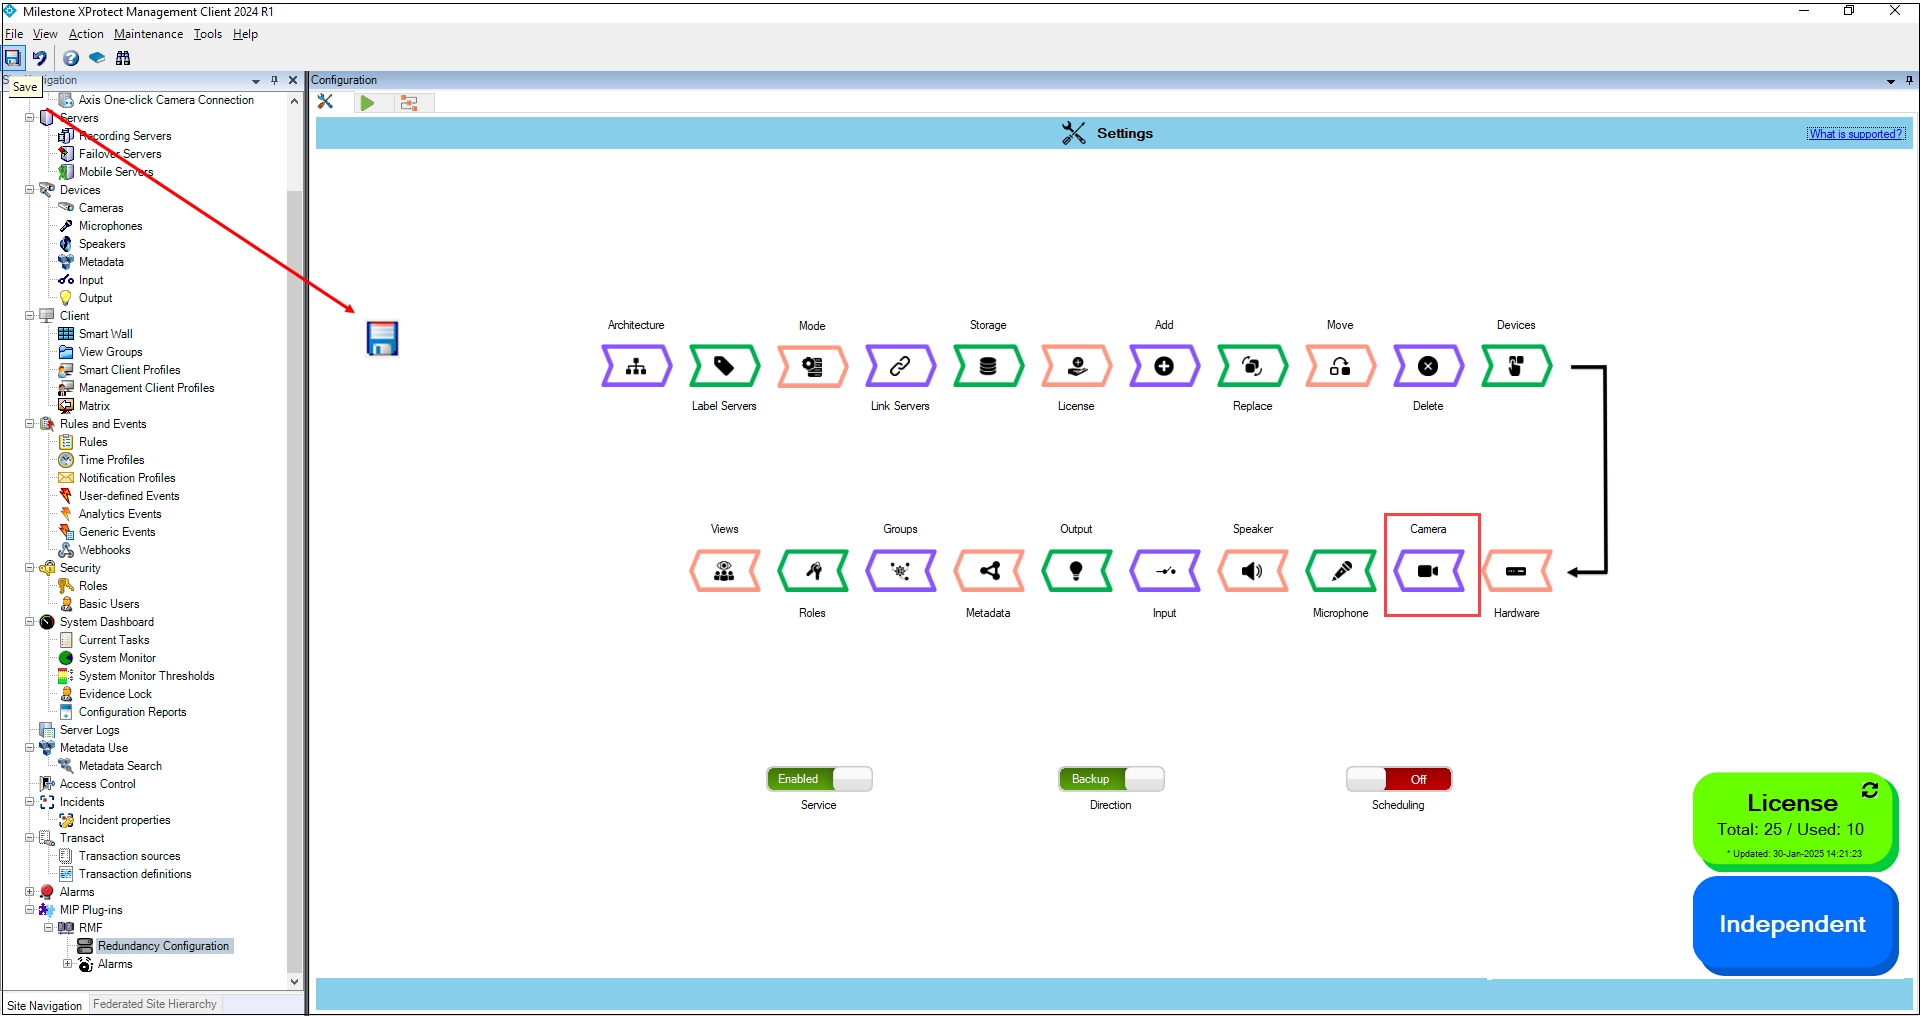
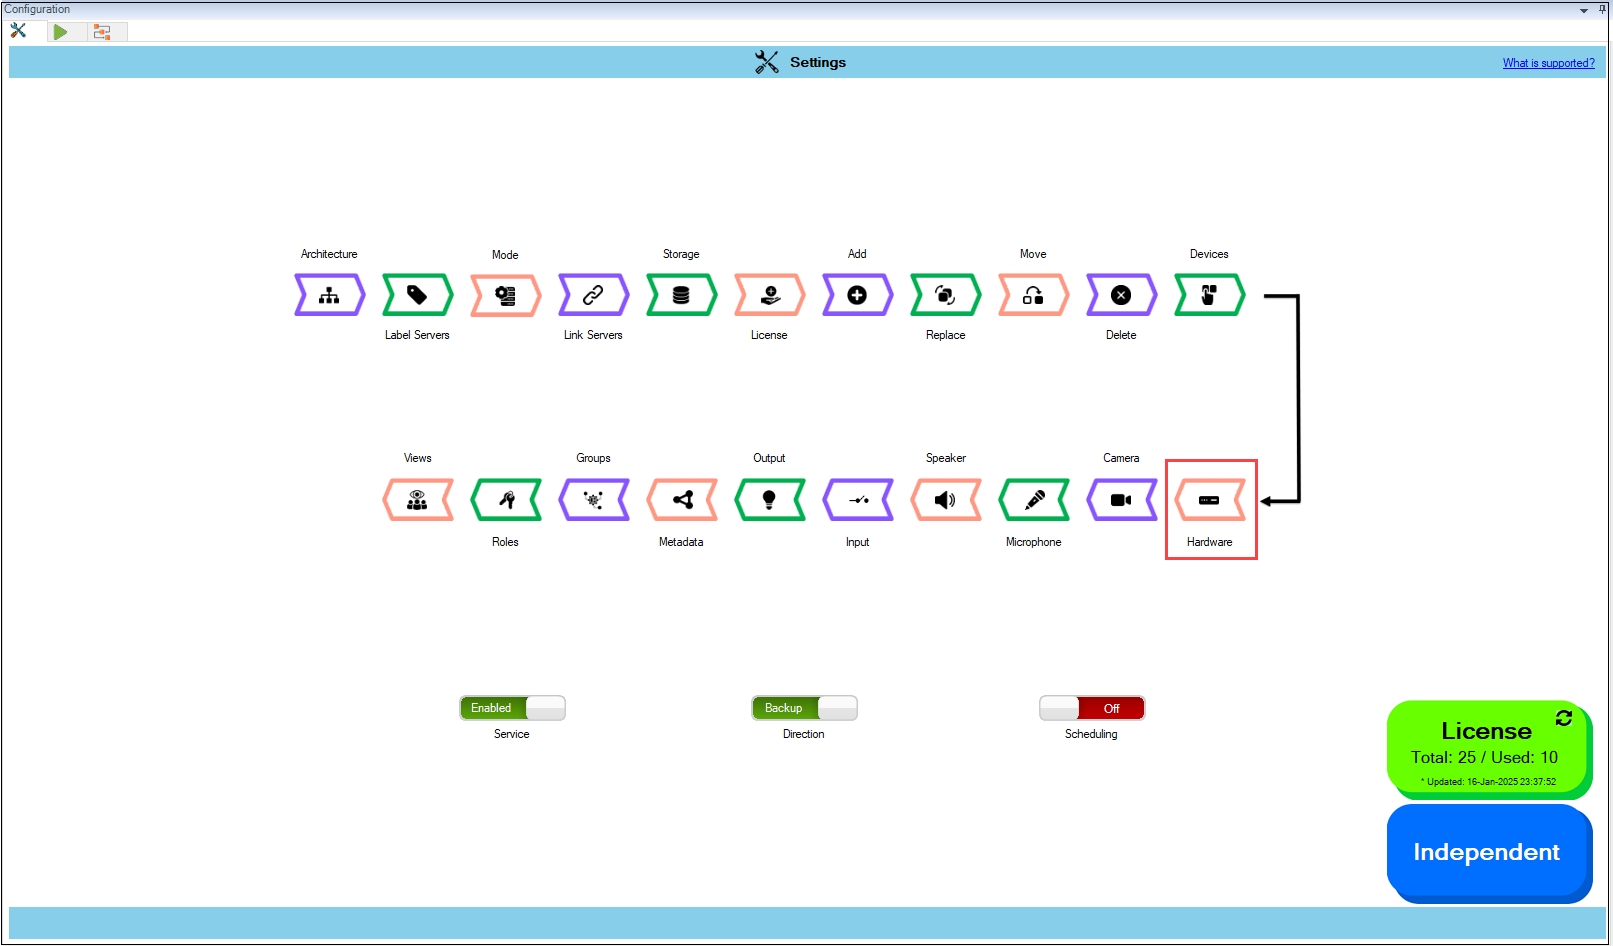
Open the Milestone XProtect Management Client.
Navigate to MIP Plug-ins > RMF > Redundancy Configuration.
Follow the steps to export license for activation.
Perform the following steps to export the license for activation:
Ensure the RMF is visible under the Installed Products section.
Select Activate License Manually → Offline.
Set Synchronization Parameters in the RMF Config dashboard.
Open the Milestone XProtect Management Client.
Navigate to MIP Plug-ins > RMF > Redundancy Configuration.
We should see the Config dashboard on the right pane.
Turn On the SmartSync Service.
The RMF SmartSync Service is the workhorse that synchronizes control information in an active-active architecture.
Enable the SmartSync Service by moving the toggle button to show 'Enabled.'
After enabling, wait a few seconds and verify that the SmartSync service System Tray icon shows a green dot. The following SmartSync settings are available from the System tray.
Displays the log details.
This option opens the log information for the present day.
Select Show Log from the SmartSync Service settings.
Log in to SmartSync Service.
One-Click Swap Across Redundant Recorders
When a camera reaches end-of-life, Milestone XProtect allows you to swap it out in place, ensuring all views, rules, and permissions remain intact. In an active-active environment, you would typically have to redo that swap on every redundant recorder. RMF’s Replace Camera feature does it for you automatically:
Backup mode: Replacing a camera on the Primary recorder instantly triggers the same replacement on the linked Secondary
Schedule the synchronization service to run autonomously
The Scheduling feature in the RMF SmartSync service, located within the Redundancy Configuration module, enables users to automate synchronization processes at predefined intervals. By enabling scheduling, administrators can ensure seamless data consistency across linked servers without manual intervention. This enhances system reliability and ensures redundancy is maintained efficiently.
To turn off scheduling in RMF SmartSync Service, follow these steps to prevent automated synchronization and scheduled executions.
Open the Milestone XProtect Management Client.
Navigate to MIP Plug-ins > RMF > Redundancy Configuration.
Follow the steps to import activated license.
Perform the following steps to import the activated license:
Select Activate License Manually → Offline in the Management Client.
Select Import Activated License.
Follow these steps to activate RMF when internet is available at the site.
Please send your XProtect SLC (Software License Code) to [email protected] and wait for an email from Vega confirming the license activation.
Step Result: The following screen appears.
Save the License Request File (.Irq) to a location on the local drive.
Log in to your Milestone Customer Dashboard portal.
Click the Activate.Irq file tab in the portal.
Click the 'Select .Irq' file button, select the exported '.Irq' file from the saved path, and click Upload.
Wait for Milestone to email the activated file to you.
Then follow the steps in Import Activated Licenseto activate RMF Licenses.
Following are some of the settings that can be configured on SmartSync Service:
Change of login credentials
To set the SmartSync Service Logon settings, perform the following steps:
Select the Set Service Logon Settings option.
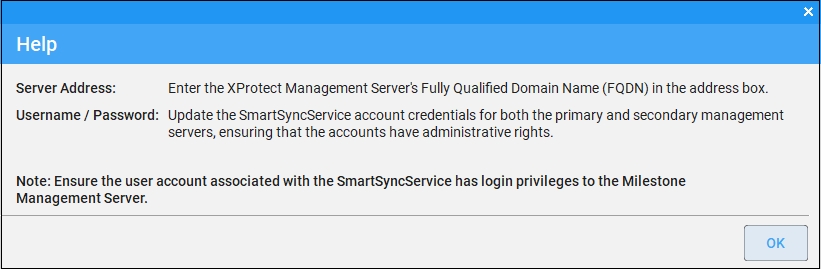
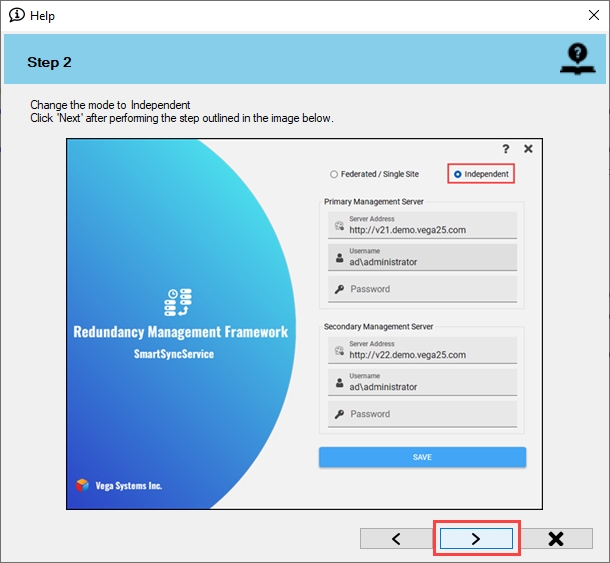
If your XProtect deployment is Federated or a Single Site, select Federated/Single Site; one of these, enter the credentials and click Save.
Otherwise, if you have independent XProtect deployments that you wish to synchronize, select Independent, enter the credentials, and click Save.
Click the Help icon to view the Help information.
Click the Help icon to view the Help information.
Click OK on the confirmatory dialog box—the SmartSync service restarts.
Restore mode: While you are running from the DR site, a replacement made on the Secondary is pushed back to its Primary counterpart.
No manual duplication, no missed mappings—just a seamless hand-off to the new hardware on both sides of the redundant pair.
The feature is limited to RMF-licensed cameras.
Click Replace.
Step Result: The Replace Settings dialog box appears. The Replace Camera toggle button is turned off by default.
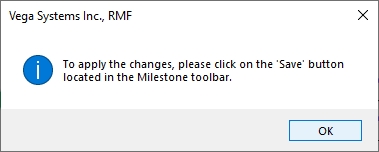
Move the toggle button to enable and click the Save icon.
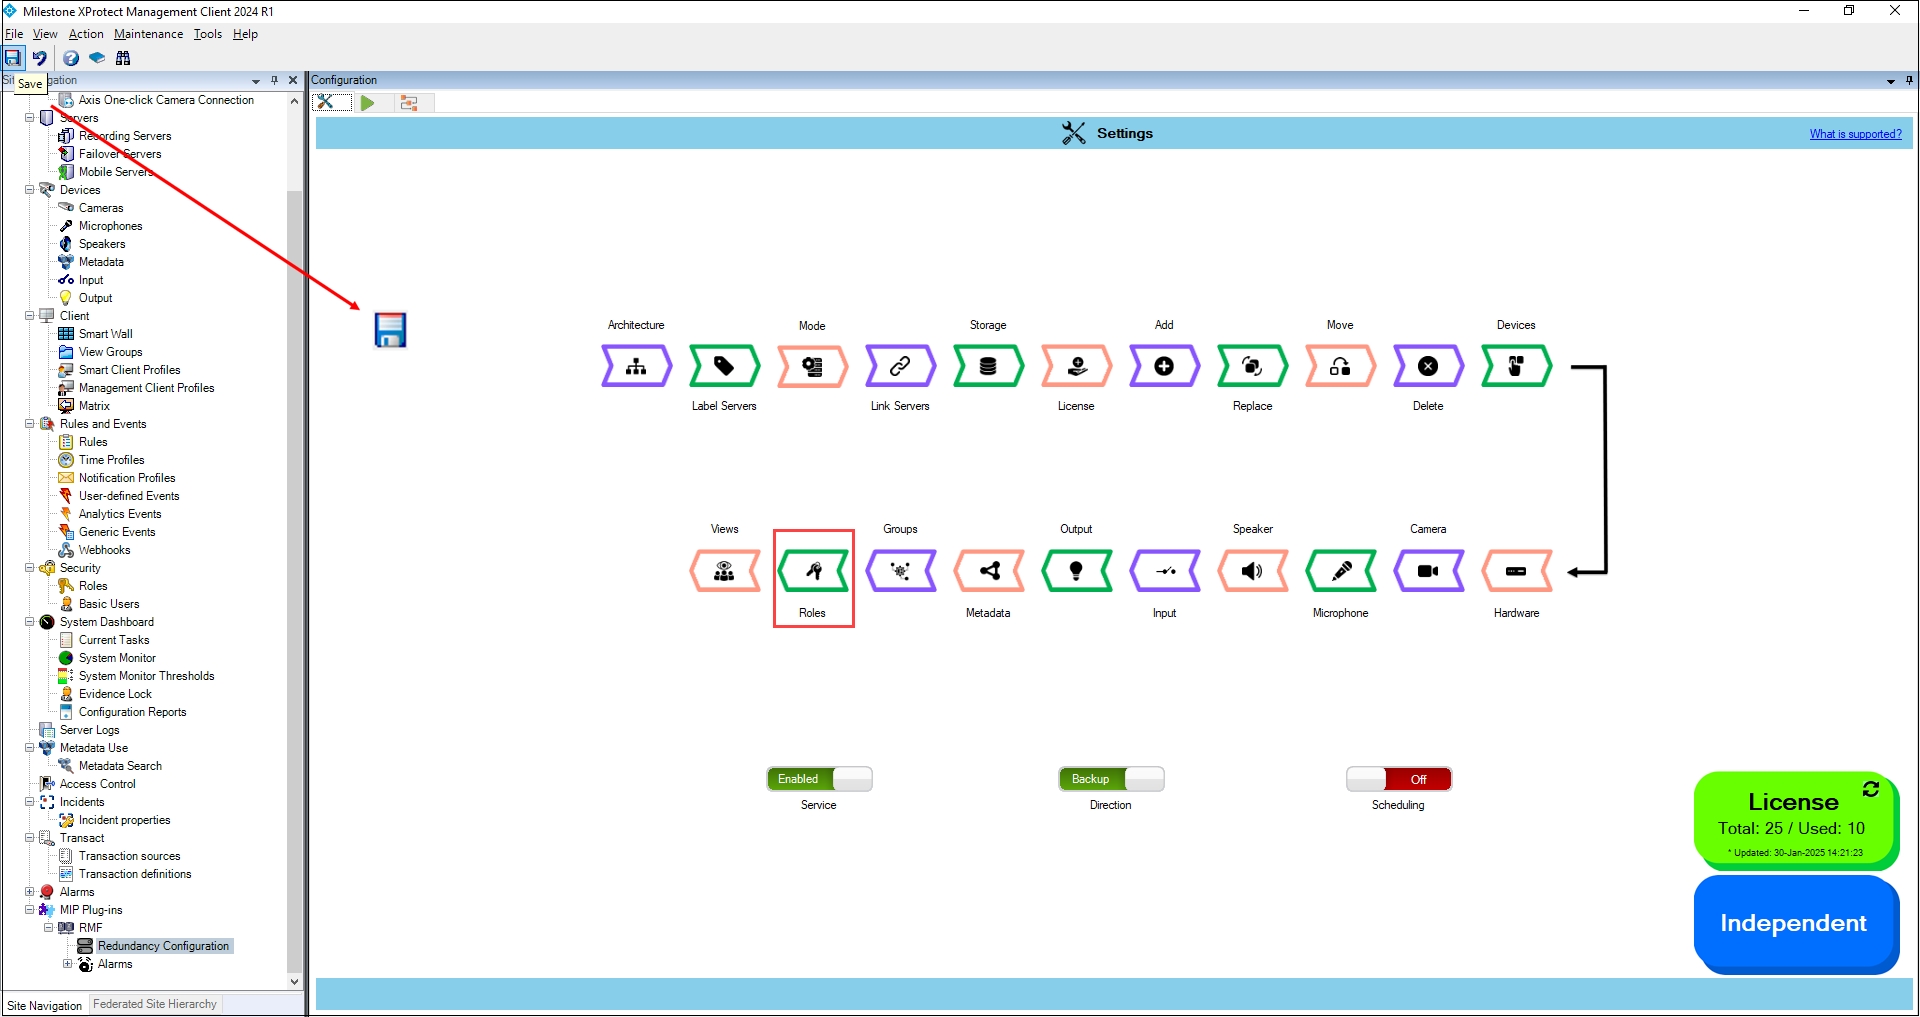
Click Save in the Milestone toolbar to save the changes.
Click the Scheduling radio button to turn it OFF ().
Click the Save button in the top-left corner of the page to apply scheduling settings.
Ensure that RMF is visible under the Installed Products section.
Perform the following steps for RMF online license activation:
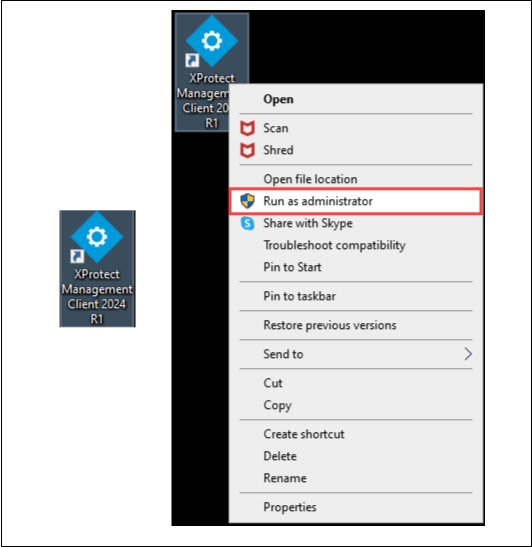
Launch the Milestone XProtect Management Client application by selecting Run as administrator.
Log in to the Management Server as a domain user with administrator privileges.
Navigate to Site Navigation → License Information.
Select Online from the Activate License Manually drop-down.
Enter the username and password credentials in the Activate Online dialog box and click OK.
Step Result: The license is activated.
Ensure that the RMF license is visible under the Installed Products section.


This section describes the Silent installation procedure of RMF Smart Client.
Execute the following commands on the command prompt.
Complete all the steps as described in the Pre-Installation section.
Navigate to the location where the RMF_Installer.exe is available.
Start the "Command Prompt" with administrator privileges and navigate to the location where the setup is available.
Execute the following commands to install RMF:
a. Without RMF Bookmark Tab in the Smart Client:
b. With RMF Bookmark Tab in the Smart Client:
Switch to Restore Mode.
RMF offers a Restore Mode, in which the RMF SmartSync service copies changes from the secondary site to the primary site. The Restore Mode is a convenient feature that can save administrators time in various scenarios, such as:
Administrators can restore deleted devices, roles, views, and groups on the primary site if accidentally deleted.
Admin can quickly fix misconfigurations on the primary site.
In cases where XProtect is Federated or Independent, and the primary site has been offline, users may have made changes directly on the secondary site. Restore Mode allows the administrator to restore those changes from the secondary site to the primary, ensuring flexibility in management.
To switch to Restore mode, perform the following steps:
Move the Direction toggle button at the bottom to display blue.
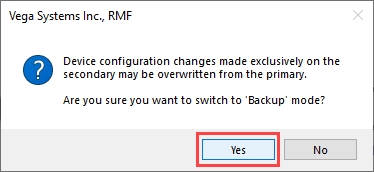
Click Yes when the following pop-up screen appears.
Warning: During the first synchronization run in Restore mode, configurations on the primary site that have not been backed up to the secondary site will be overwritten by the secondary site's settings. For example, if synchronization is scheduled to occur once daily, and the user switches to Restore mode after one of these cycles, any changes made on the primary site between cycles—such as modifying streaming parameters, altering views, device groups, or roles on RMF licensed cameras—will be replaced by the configurations from the secondary site.
As a precaution, all RMF-licensed devices are unselected by default each time the user moves to Restore mode. Users must manually select the devices they wish to synchronize when switching to Restore mode.
Click OK when the confirmatory pop-up screen appears.
Click Save in the Milestone toolbar to save the changes.
Click the Next arrow button on the screen that appears.
Click the Next arrow button on the screen that appears.
Click the Finish button to acknowledge.
Precision Synchronization for Microphone Settings.
Use this option to synchronize Microphone settings between Primary and Redundant sites.
The scope of action is limited to RMF-licensed devices selected in the section. The direction of synchronization depends on the direction setting. See . If no devices are selected in the Device Selection block, this option is disabled.
To enable microphone settings synchronization, perform the following steps:
Click Microphone.
Enable the Overall Microphone Settings Sync to enable all the individual microphone
settings. Enable/Disable different sub-settings as needed.
To retain the settings, click the Check Mark button.
Click Save in the Milestone toolbar to save the changes.
To turn off the Microphone settings synchronization, perform the following steps:
Click Microphone.
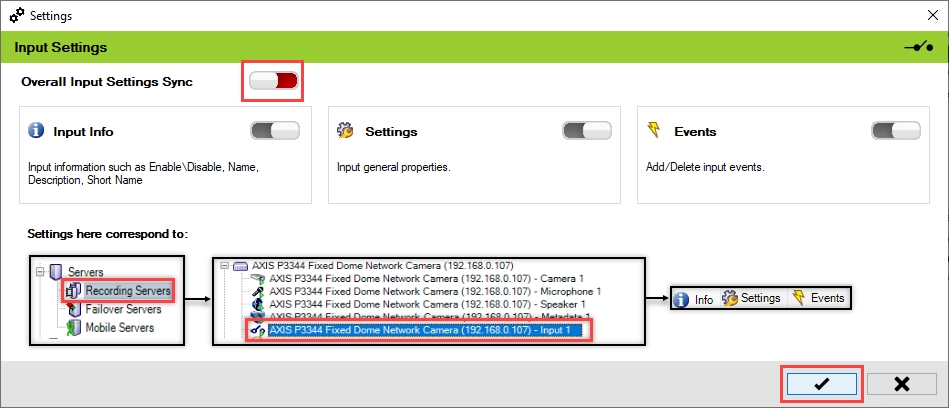
To turn off the synchronization of the microphone settings, move the toggle button to display red and click the Save icon.
Click Save in the Milestone toolbar to save the changes.
Step Result: The Microphone option is disabled.
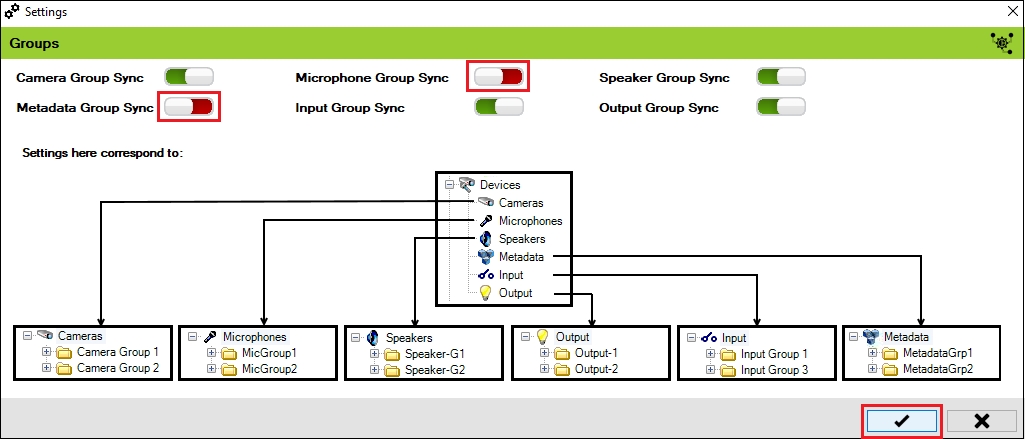
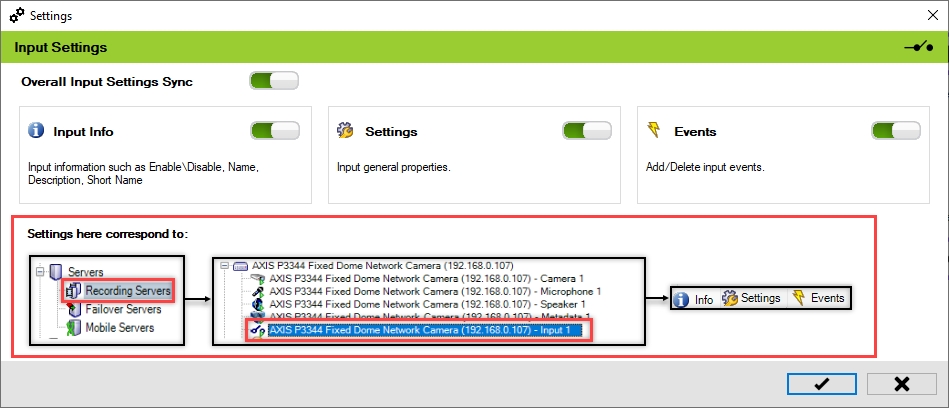
Precision Synchronization for Speaker Settings
Use this option to synchronize Speaker settings between the Primary and Redundant sites.
The scope is limited to RMF-licensed devices selected by the block and to the features listed under the "Settings here correspond to" section in the picture below. The direction of synchronization depends on the direction setting. See . If no devices are selected in the Device Selection block, this option is disabled.
To enable and synchronize the speaker settings, perform the following steps:
Click Speaker.
Enable the Overall Speaker Settings Sync to enable all the individual speaker
settings. Enable/Disable different sub-settings as needed.
To retain the settings, click the Check Mark button.
Click Save in the Milestone toolbar to save the changes.
To turn off the Speaker settings synchronization, perform the following steps:
Click Speaker.
To turn off the synchronization of the microphone settings, move the toggle button to display red and click the Save icon.
Click Save in the Milestone toolbar to save the changes.
Step Result: The Speaker settings option is disabled.
Keep Both Sides Tidy Automatically
Available in both Auto (Pair Servers) and Manual (Map Cameras) modes, the Delete Camera block ensures that device removals are mirrored across your redundant estate:
Backup mode: Drop a camera from a Primary, and the same device is removed from its linked Secondary, releasing the RMF licence.
Restore mode: Deleting the camera on the Secondary erases it from its one-to-one paired Primary as soon as the Primary reconnects.
No orphaned devices, no wasted licences, and no manual clean-up.
The feature is limited to RMF-licensed cameras.
Click the Delete block.
Step Result: The Delete Settings dialog box appears.
Move the toggle button to enable and click the Save icon.
Click Save in the Milestone toolbar to save the changes.
Automatic Provisioning in active-active setups
The Add Cameras option saves you from double-entry work in active-active deployments. When it is enabled (and Mode = Auto):
Licensing check: The copy goes through only if there are free RMF licences available.
Visibility reminder: The Add Cameras block is shown only in Auto mode. When the system is in Manual (Map Cameras) mode, the block is completely hidden, and administrators must add devices separately on each recorder.
Click on Add.
Step Result: The Add Settings dialog box appears. The Add Camera toggle button is enabled by default.
Click the Save icon.
Click Save in the Milestone toolbar to save your changes.
Sync Recorder-to-Recorder Shuffles
When administrators redistribute cameras—say to load-balance traffic, decommission legacy hardware, or tidy up the estate—they typically drag each device from one primary recorder to another. In an active-active setup, if the same move must also occur on the redundant recorders, the Move Camera block automates that follow-up step:
Backup mode: A camera moved between Primary recorders is moved in lock-step between their linked Secondary recorders.
Restore mode: While the DR site is live, any changes made to a secondary are reflected to its one-to-one-linked Primary.
Visibility: The Move Camera block appears only when Mode = Auto; in Manual (Map Cameras) mode, you relocate devices on each recorder yourself.
The feature is limited to RMF-licensed cameras.
Click Move.
Step Result: The Move Settings dialog box appears. By default, the Move Camera toggle button is disabled.
Move the toggle button to enable and click the Save icon.
Click Save in the Milestone toolbar to save the changes.
Removes the SmartSync Service.
This option removes the SmartSync Service from the system tray.
Click Exit from the SmartSync Service settings.
Deletes the log details.
This option deletes the log files.
Select Clear Log from the SmartSync Service settings.
Click the Clear Log drop-down to view the following options:
Today—Deletes log for the current day.
b. Past day—Deletes log from the previous day.
c. All—Deletes the entire log history.
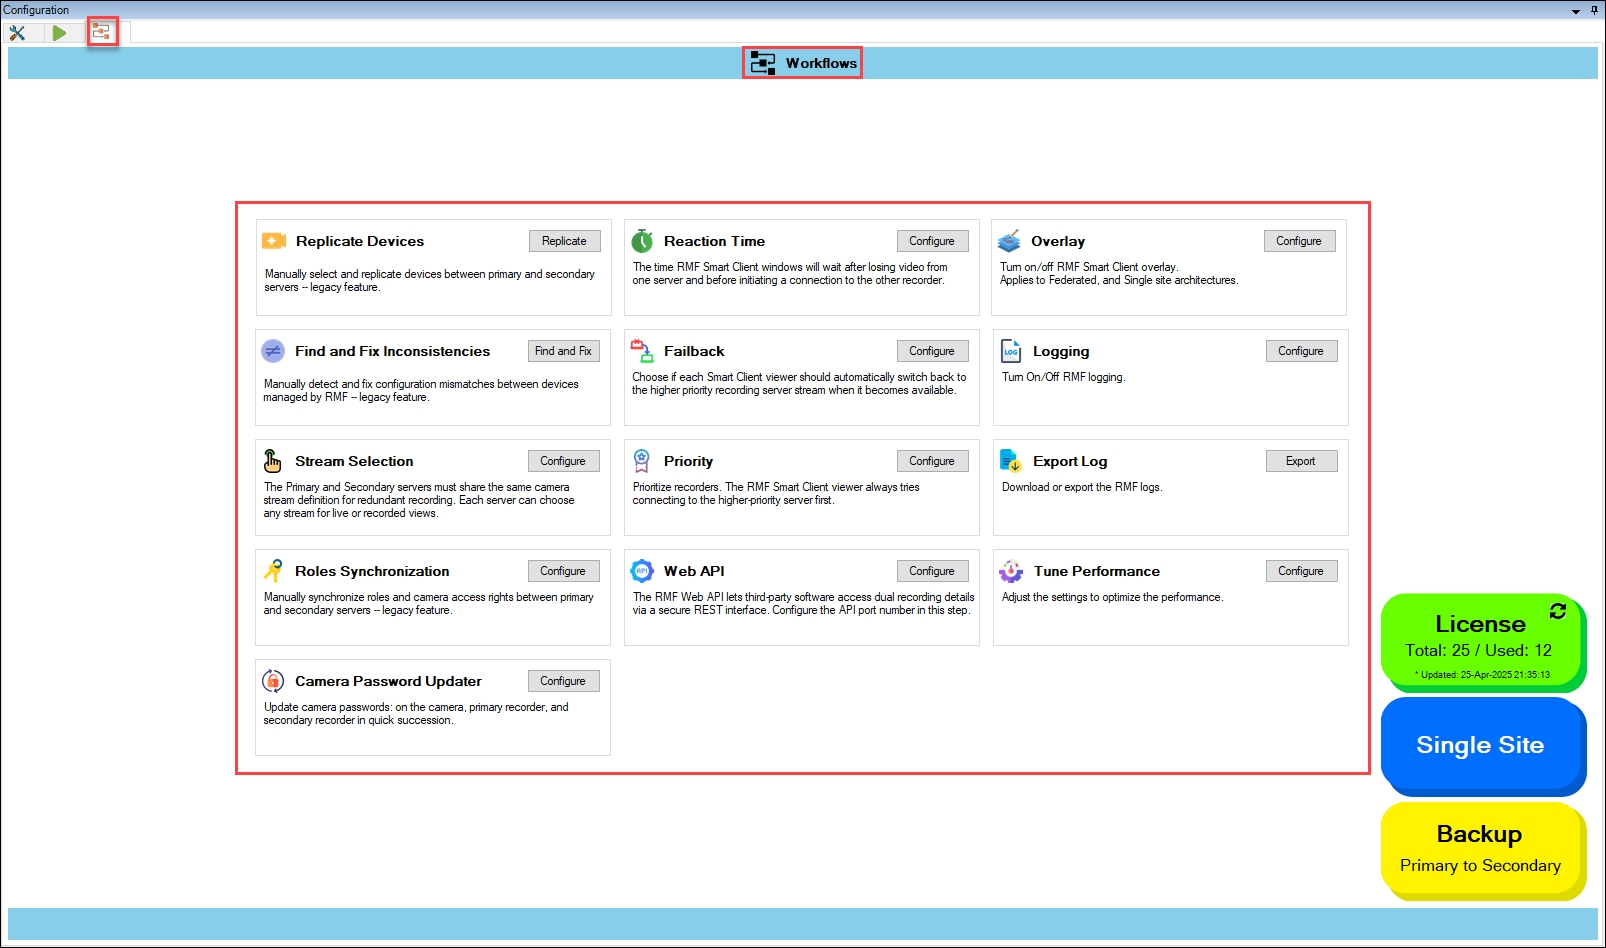
User driven find and fix of inconsistencies
Enables users to manually detect and correct configuration mismatches between primary and secondary data centers. It scans devices managed by RMF to identify and resolve inconsistencies.
When the synchronization service is in Backup Mode, this tool detects inconsistencies and synchronizes them from the primary data center to the secondary data center. Refer to to enable the backup mode.
When the synchronization service is in Restore Mode, this tool detects inconsistencies and synchronizes them from the secondary data center to the primary data center. To enable the restore mode, refer to
Provides granular control to review and apply only selected changes.
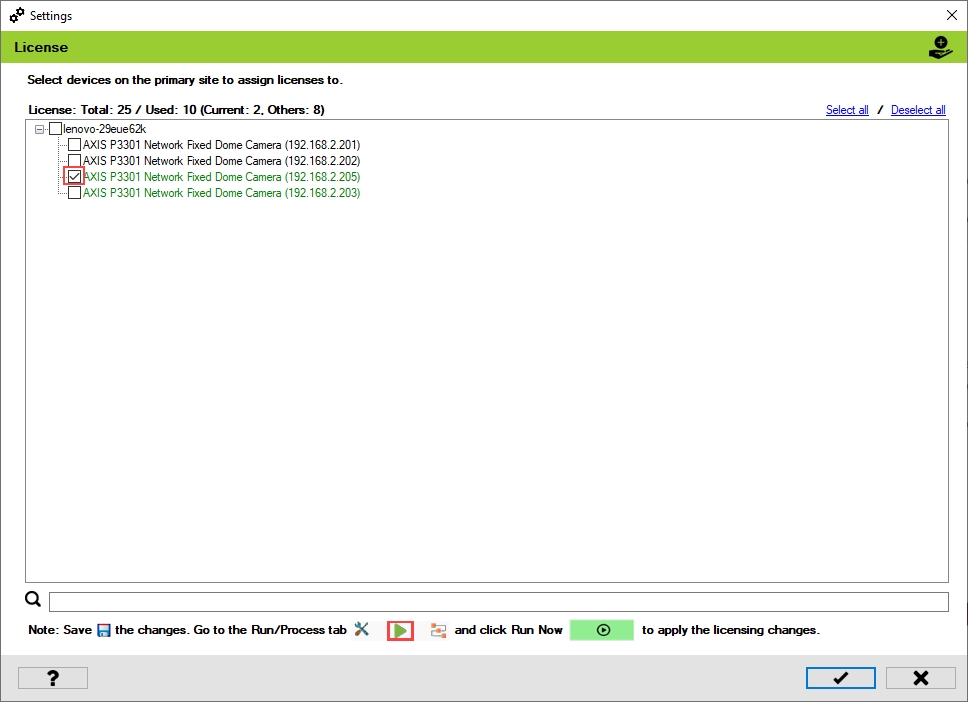
Run the synchronization service manually for the first time to assign licenses and copy cameras
Once you have completed each configuration block—Mode Selection, Server Labeling, Server Linking (or Map Cameras in Manual mode), Storage Linking, Add Cameras (if in Auto Mode), and License Management—run Synchronize once to copy every device to its designated secondary recorder and allocate the required RMF licences.
Tip: If you are in Auto mode, switch on 'Add Cameras' before you sync. Any camera that exists on the Primary but not yet on the Secondary will be cloned automatically, as long as a spare RMF license is available. Cameras that already exist on both sites are simply licensed.
To run the service for the first time, go to the Run tab.
Click on the green 'Play' button to start a synchronization run.
Wait for the process to finish.
Once the initial synchronization is complete, the license count in the top bar will be updated to reflect the number of RMF licenses that have been consumed.
Return to the Settings tab and continue with the subsequent configuration.
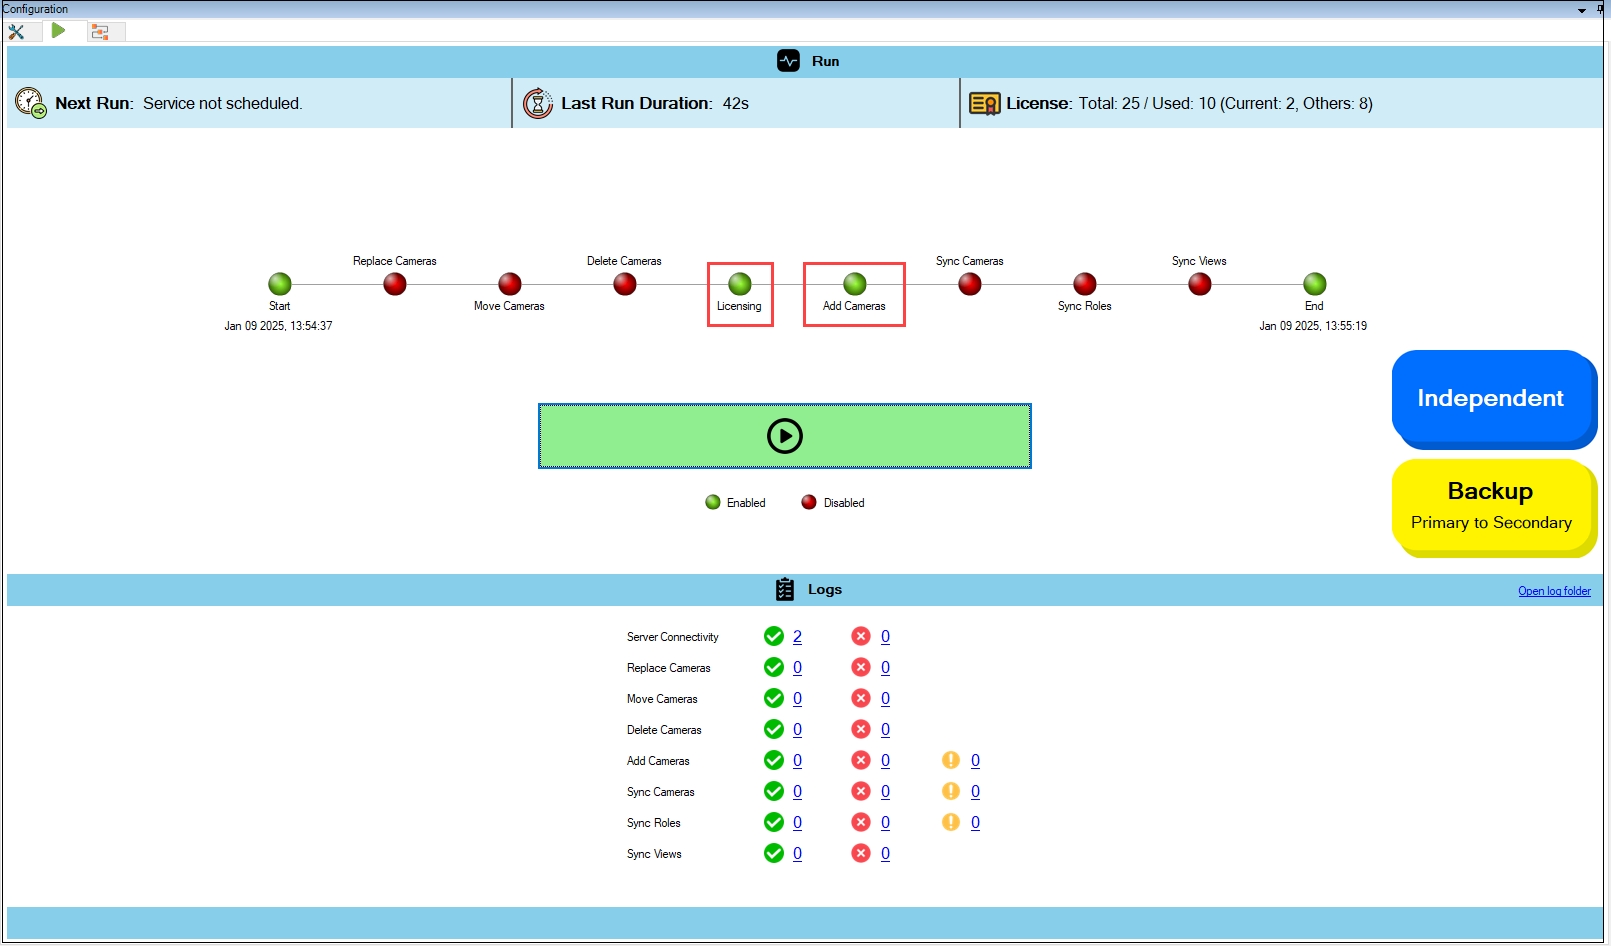
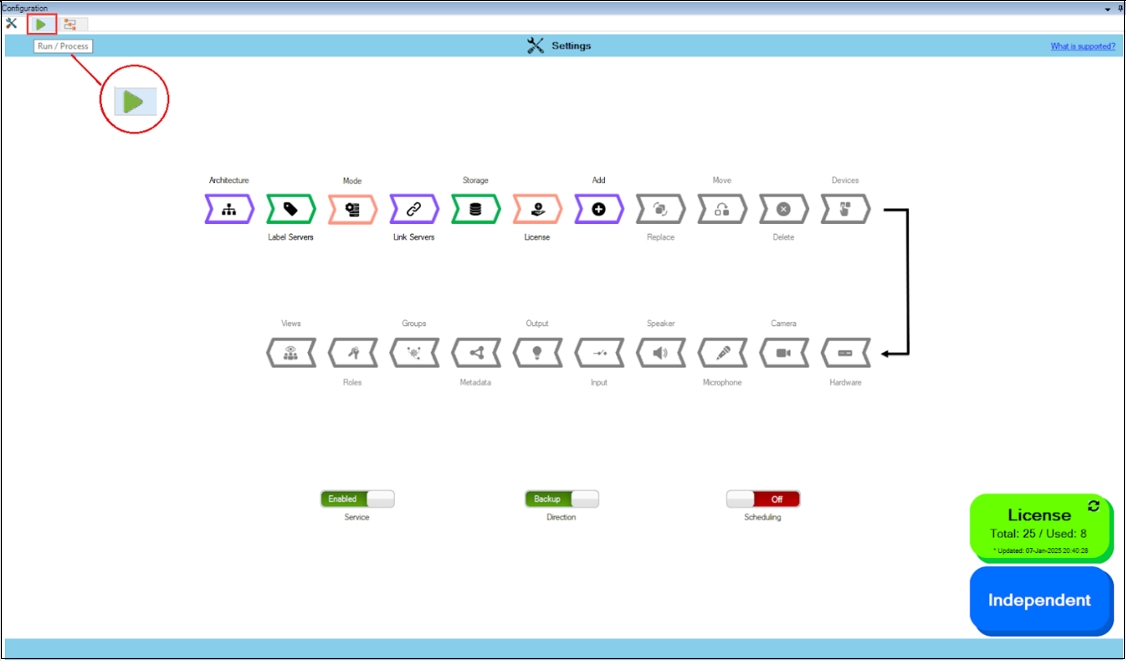
Monitor Synchronization runs, and start manual runs in the Run/Process Dashboard
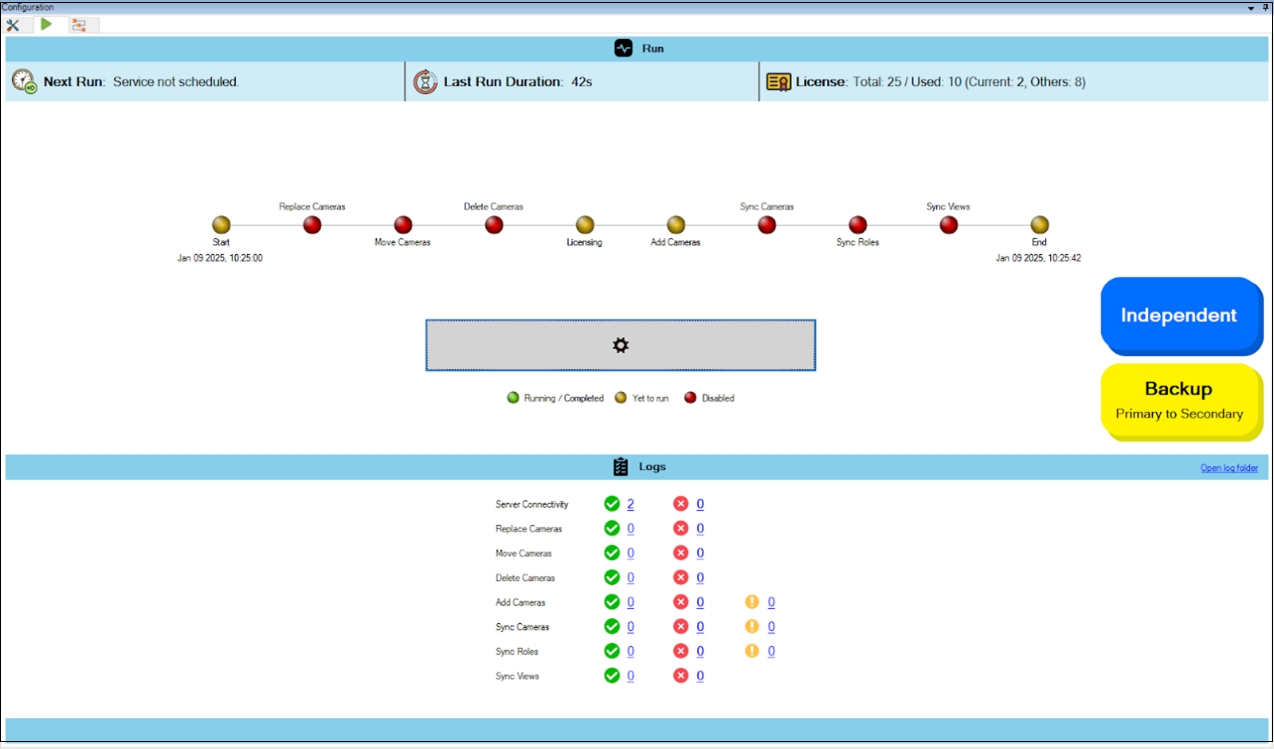
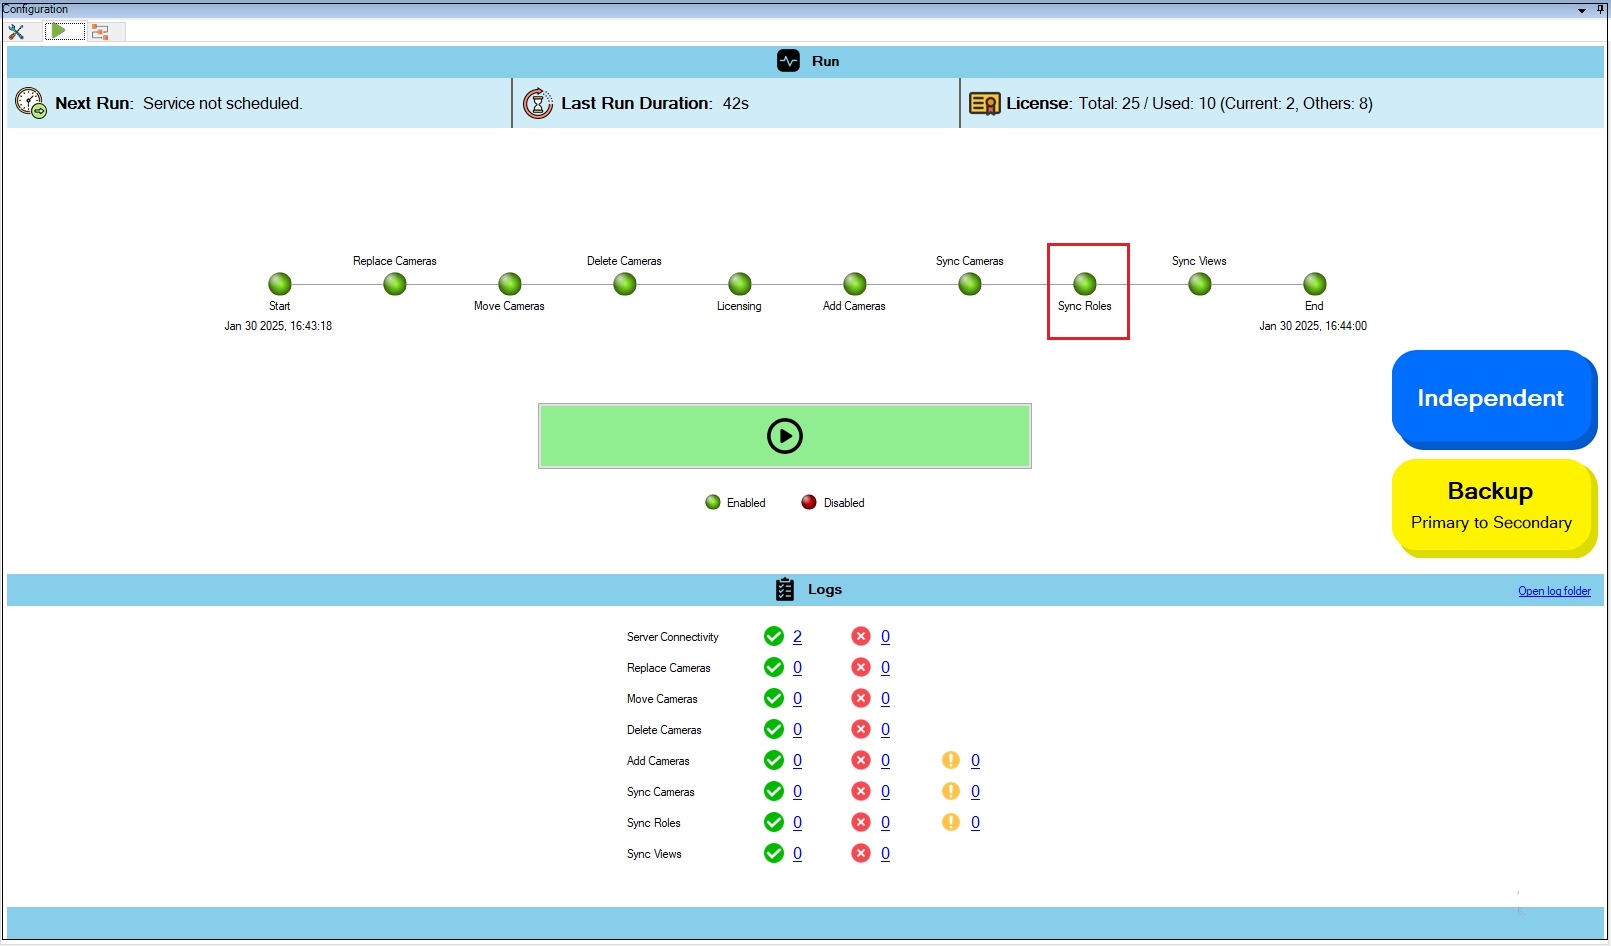
The Run/Process () monitoring tab in RMF Configuration displays a Monitoring Dashboard with a step-by-step execution timeline of the synchronization process. The interface provides real-time status updates, including the next scheduled run, the duration of the most recent run, and licensing usage information. Administrators can manually trigger the sync process using the Run button. Execution logs categorize operations as successful, failed, or warning alerts.
The system supports manual and scheduled runs, dynamically updating the page in real-time during scheduled executions. Manual runs provide flexibility by allowing users to initiate the process immediately without waiting for a scheduled sync or to trigger an on-demand sync even when scheduling is enabled, but an immediate update is needed. This ensures users have control over execution, whether they prefer automated scheduling or require manual intervention.
The Run/Process tab provides essential status information, including:
Scheduled and Manual Execution
Next Run ().
Last Run Duration ().
Process Workflow Visualization ().
Easy stream selections at the primary and secondary data centers
This tool enables the user to select video streams from each camera to transmit to each data center. While primary and secondary data centers must utilize identical camera stream definitions to support redundant recording, each can independently determine which stream to use for live view and playback. This tool streamlines the process of selecting streams.
Utilize this tool to achieve asymmetric redundancy by selecting different streams from the same camera in the primary and secondary data centers.
If different streams are chosen here, turn off stream synchronization in the camera section of the configuration page.
Quick Copy of Devices from Primary to Secondary and vice-versa
It enables users to manually select and replicate cameras between primary and secondary data centers. It also identifies devices present in one data center but absent from the other and provides a drag-and-drop interface for assigning and syncing them.
Enables selective replication of specific devices.
Follow this section if your deployment has a single database. Note that clustered, failover or other HA databases are considered a single database.
Perform the following steps for a Single Site architecture:
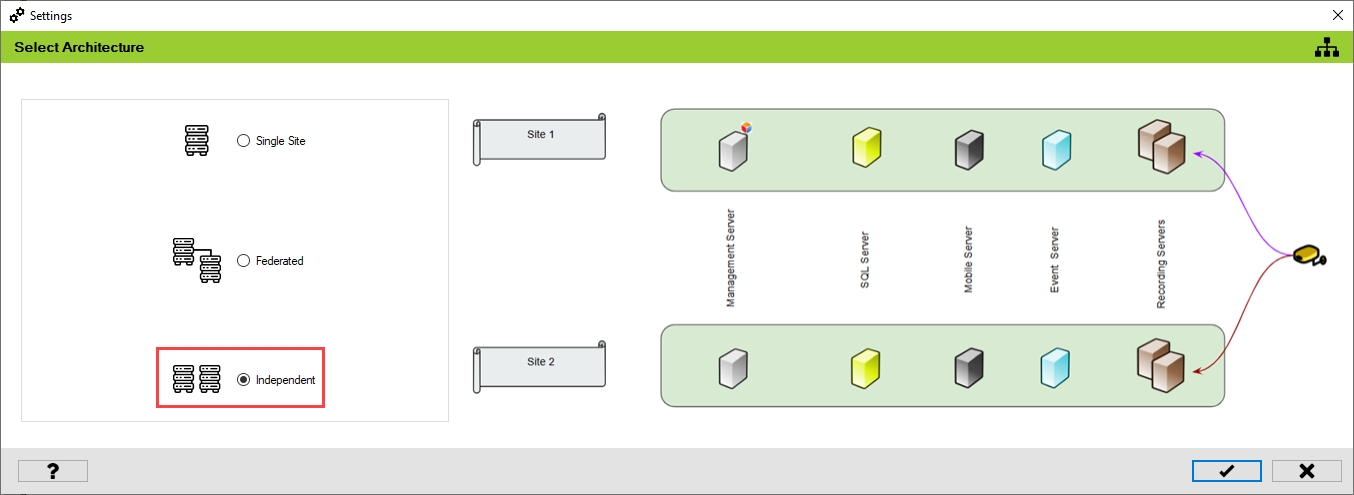
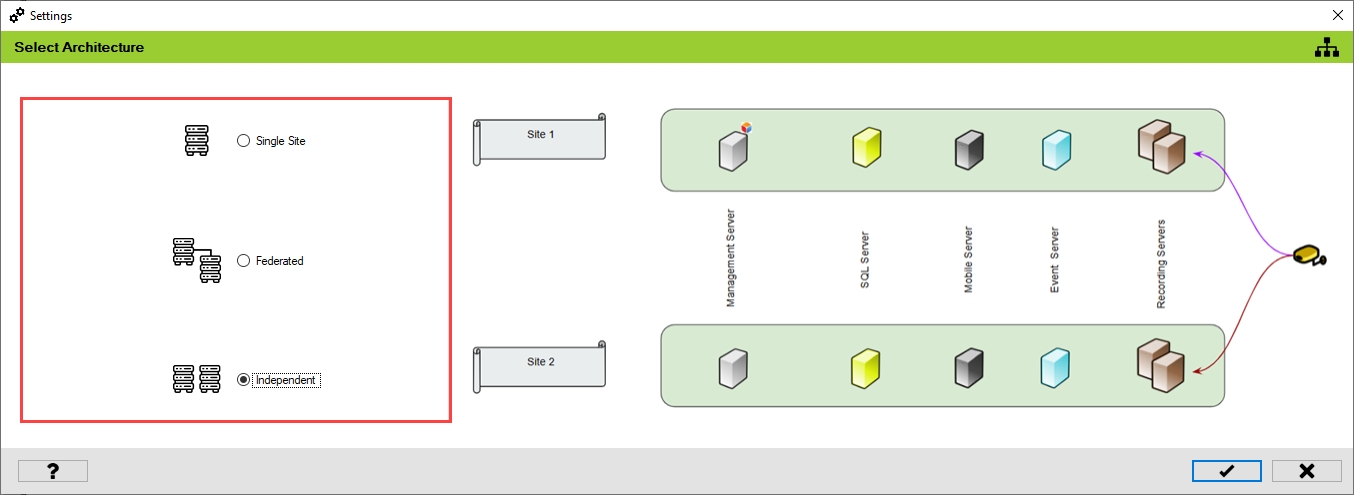
Select the Single Site architecture option.
For First-time configuration, the following screen will appear.
Freely associate devices in primary recorders with secondary recorders in any user defined manner
This block appears when Mode Selection () is set to Manual (Map Cameras) and allows you to decide, one device at a time, where each camera stream will be protected. Instead of pairing whole recorders, you drag and drop (or multi-select) cameras from the Primary Cameras list into one or more Secondary Recorders.
Create and Maintain RMF and Secondary-only views
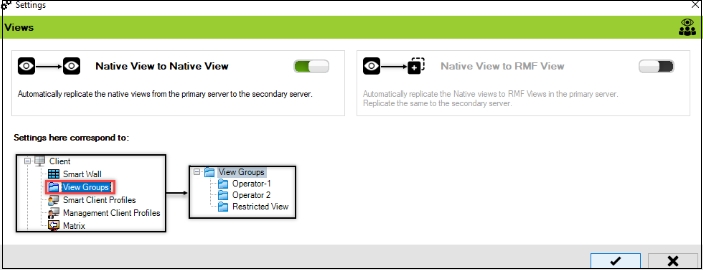
In both Single-Site and Federated architectures, Smart Client users benefit from stream-level failover when viewing video within RMF views. This block, View Synchronization, automatically creates and maintains these RMF views to mirror their corresponding native views. Additionally, this feature generates and maintains a set of Secondary camera views that mirror the primary views across all architectures—Single Site, Federation, and Independent. As a result, if a Smart Client user logs into the secondary management server, they will see the same views as they would if they logged into the primary management server.
This option saves admin users time in duplicate view maintenance.

License Information ().
Execution Logs ().
Status Indicators ().
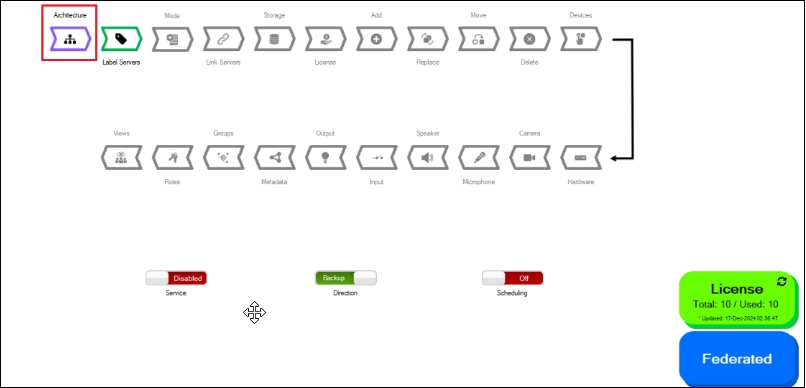
For subsequent architectural changes, click the Architecture button on the following screen.
For more information, click the Help icon.
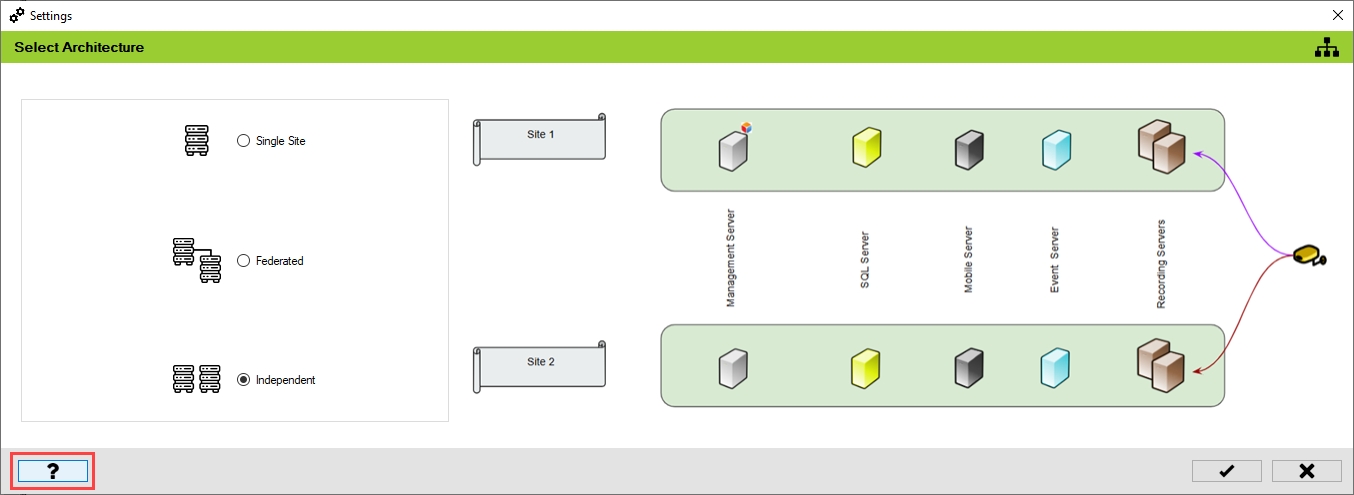
Choose the architecture that represents the XProtect deployment at the site. In this scenario, select Single Site.
Click the tick mark at the bottom of the screen to save the architecture.
Click Yes to confirm.
Click the Save icon in the top left corner of the Milestone toolbar to apply the changes.
Step 1: Navigate to System Tray -> Right-click SmartSyncService -> Set Service Logon Settings.
Step 2: Select Federated/Single Site.
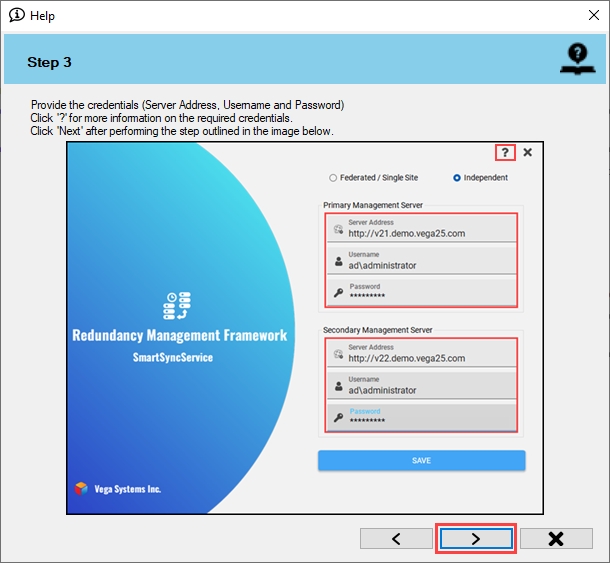
Step 3: Provide the credentials. Click the Help icon for more information.
Step 4: Click Save to save the configuration.
Click OK.
Click OK.
Verify that the Single Site architecture type has been configured successfully. The selected architecture will be displayed at the bottom right.
Complete Mode Selection- selected to the Manual mode.
The workflow provides complete flexibility to distribute primary cameras on secondary servers in any manner.
To enable and synchronize the Metadata settings, perform the following steps:
Click Metadata.
Enable the Overall Metadata Settings Sync to enable all the individual device metadata
settings. Enable/Disable different sub-settings as needed.
To retain the settings, click the Check Mark button.
Click Save in the Milestone toolbar to save the changes.
To turn off the metadata settings synchronization, perform the following steps:
Click Metadata.
To turn off the synchronization of the metadata settings, move the toggle button to display
red and click the Save icon.
Click Save in the Milestone toolbar to save the changes.
Step Result: The Metadata settings option is disabled.
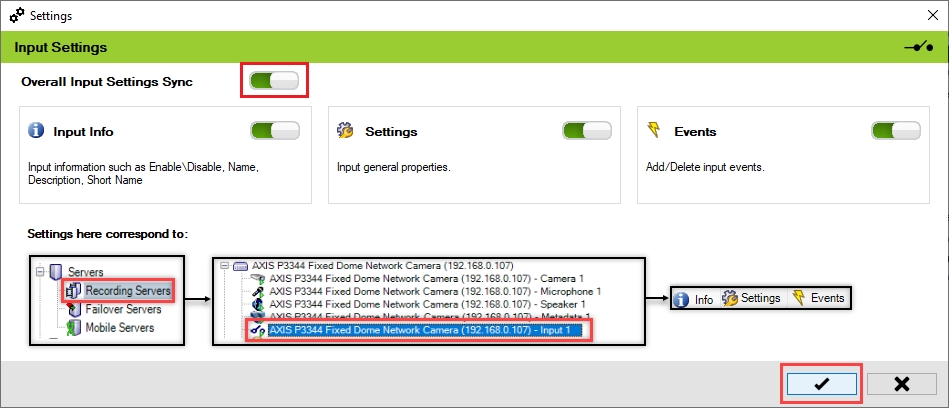
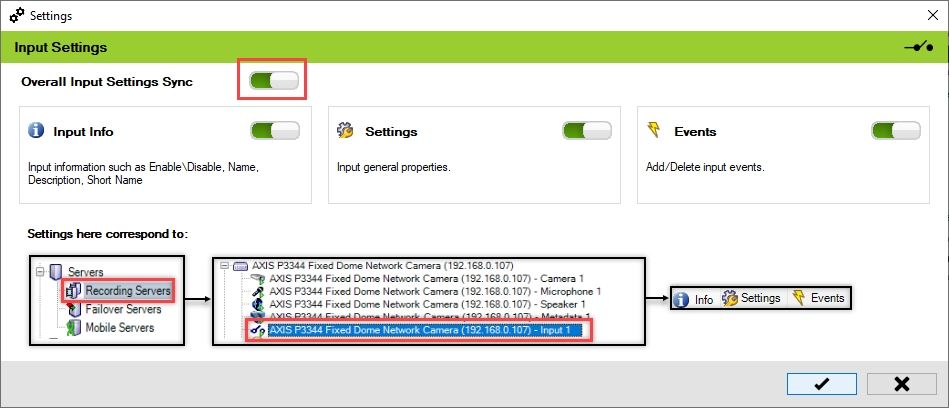
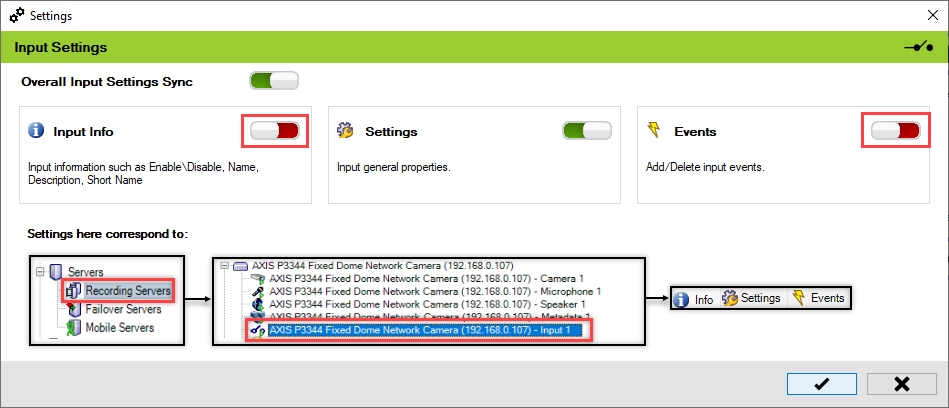
The scope is limited to RMF-licensed devices selected by the Device Selection block and encompasses the features listed under the "Settings here correspond to" section in the picture below. The direction of synchronization depends on the direction setting. See Set Synchronization Direction.
The synchronization process varies based on the architecture type:
Independent and Federated Architecture: View layouts and views are automatically synchronized from the Primary server to the Secondary server.
Single Site Architecture: A set of views with cameras only from secondary recorders is created and maintained.
This option automatically creates RMF views for the existing Native views, eliminating the need to manually create the RMF views.
This feature is only applicable to Federated and Single Site Architectures. It is disabled in Independent Architecture because stream-level failover is not supported.
To enable Native to Native view, perform the following steps:
Click Views.
Step Result: The following Settings screen appears.
Enable the view toggle buttons as needed and click the Save button.
Click Save in the Milestone toolbar to save the changes.
To disable Native to Native view synchronization:
Move the toggle button to display red and click the Save button.
Click Save in the Milestone toolbar to save the changes.
RMF_Installer.exe /exenoui /qn INSTALL_TYPE=SCRMF_Installer.exe /exenoui /qn INSTALL_TYPE=SC INSTALL_TYPE_SUB_BM=1Backup mode (normal day-to-day)
Any camera added to a Primary recorder is auto-created on its linked Secondary—same name, channel, and asscociated storage profile.
All Auto-linked pairs, whether 1-to-1 or many-to-few.
Restore mode (running from the DR site)
A camera added on the Secondary is auto-created back on its Primary, but only when that pair is a 1-to-1 link.
Use this to keep the systems symmetrical while the primary is rebuilding.


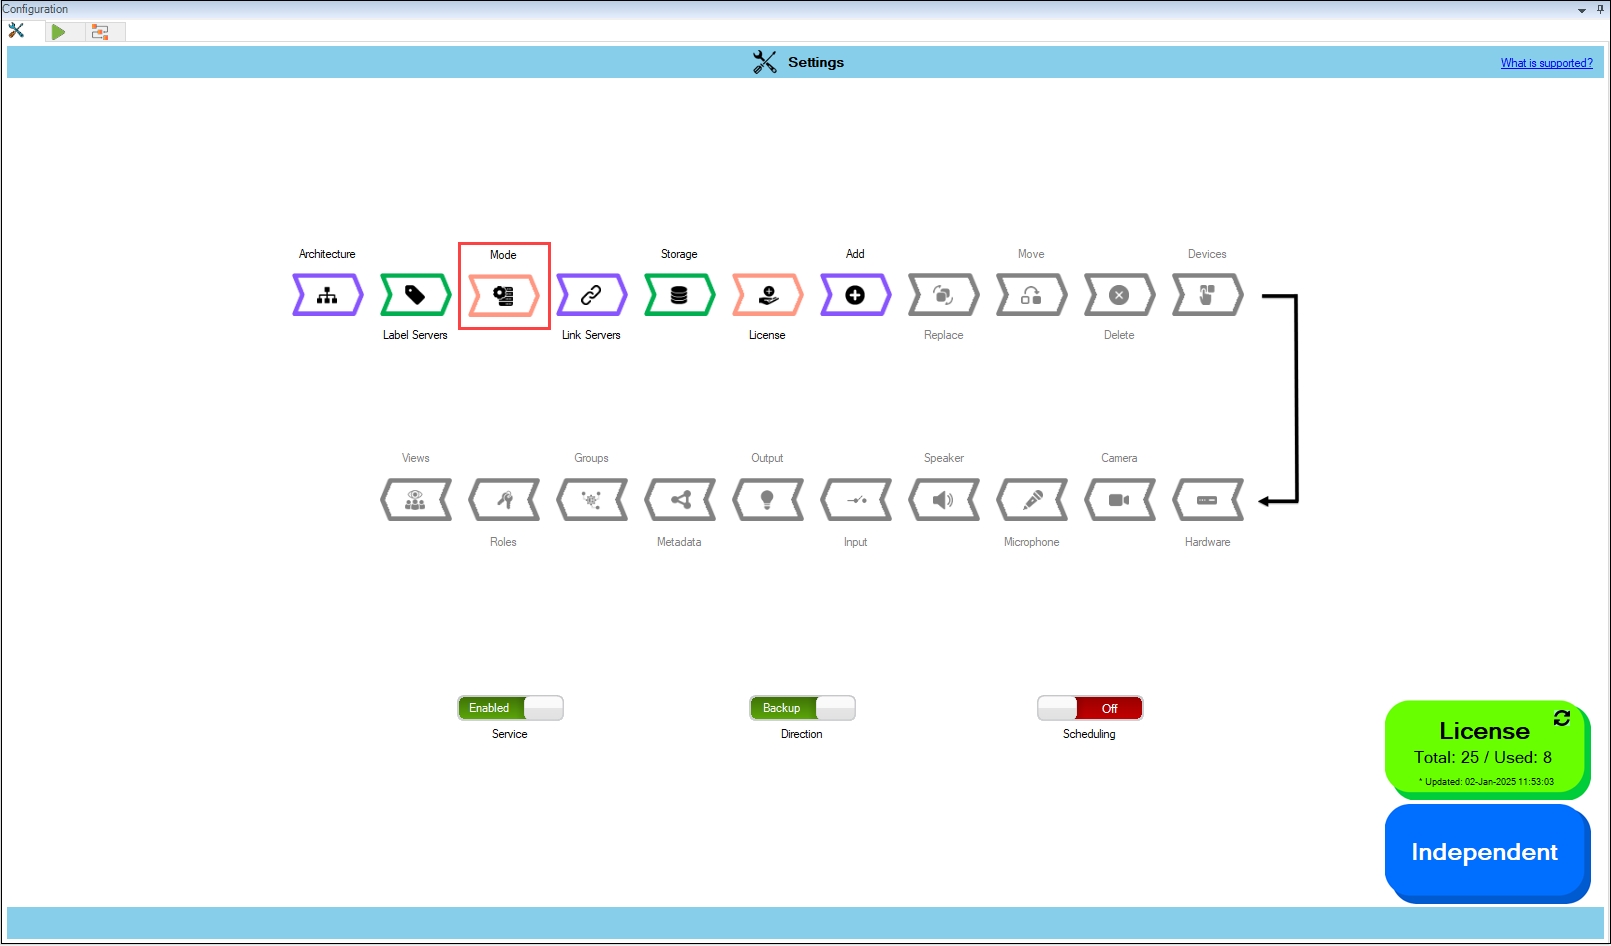
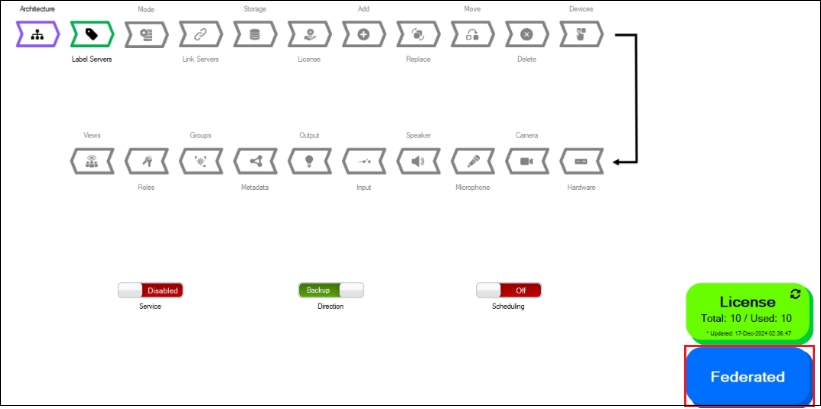
Set parameters for the SmartSync service
Label the recorders as Primary or Secondary.
Before RMF can do anything, it needs to identify which recorders are the primaries (the “live” capture points) and which are the secondaries (the backups). During the Server Labeling step, you tag each recorder as either Primary or Secondary. RMF then builds its device list exclusively from these labeled servers; anything left untagged is treated as out of scope, and its cameras never appear in the UI or participate in synchronization or failover. In short, no label, no redundancy—so be sure every recorder that should participate is labeled before you move on to pairing.
Complete
Follow these steps to label the servers.
Select Label Servers.
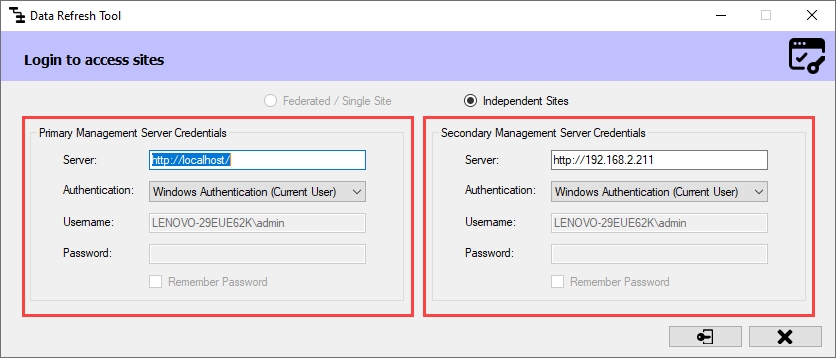
Step Result: The Data Refresh Tool Dialog box appears.
a. For an Independent architecture, the following screen appears:
Click Connect at the bottom right corner of the screen to continue.
b. For Federated/Single Site, the following screen appears:
Click Connect at the bottom right of the screen to continue.
Step Result: The Unlabeled Servers section lists all the recording servers on both primary and secondary sites.
For more details, click the Help icon in the bottom left corner.
Label at least one server as Primary and another server as Secondary.
Click the tick mark at the bottom of the screen to save the changes.
5. Click Save in the Milestone toolbar to save the changes.
Follow these instructions if your XProtect site is Federated and the parent site is the primary site and the child site is the secondary site or vice-versa.
Perform the following steps for a Federated architecture:
Select the Federated architecture option.
For First-time configuration, the following screen will appear.
For subsequent architectural changes, click the Architecture button on the following screen.
For more information, click the Help icon.
Choose the architecture that represents the XProtect deployment at the site. In this scenario, select Federated.
Click the tick mark at the bottom of the screen to save the architecture.
Click Yes to confirm.
Click the Save icon in the top left corner of the Milestone toolbar to apply the changes.
Step 1: Navigate to System Tray -> Right-click SmartSyncService -> Set Service Logon Settings.
Step 2: Select Federated/Single Site.
Step 3: Provide the credentials. Click the Help icon for more information.
Step 4: Click Save to save the configuration.
Click OK.
Click OK.
Verify that the Federated architecture type is configured successfully. The selected architecture will be displayed on the bottom right.
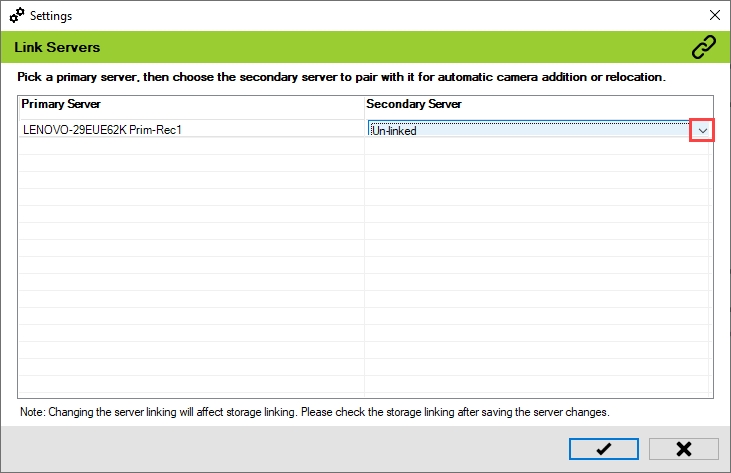
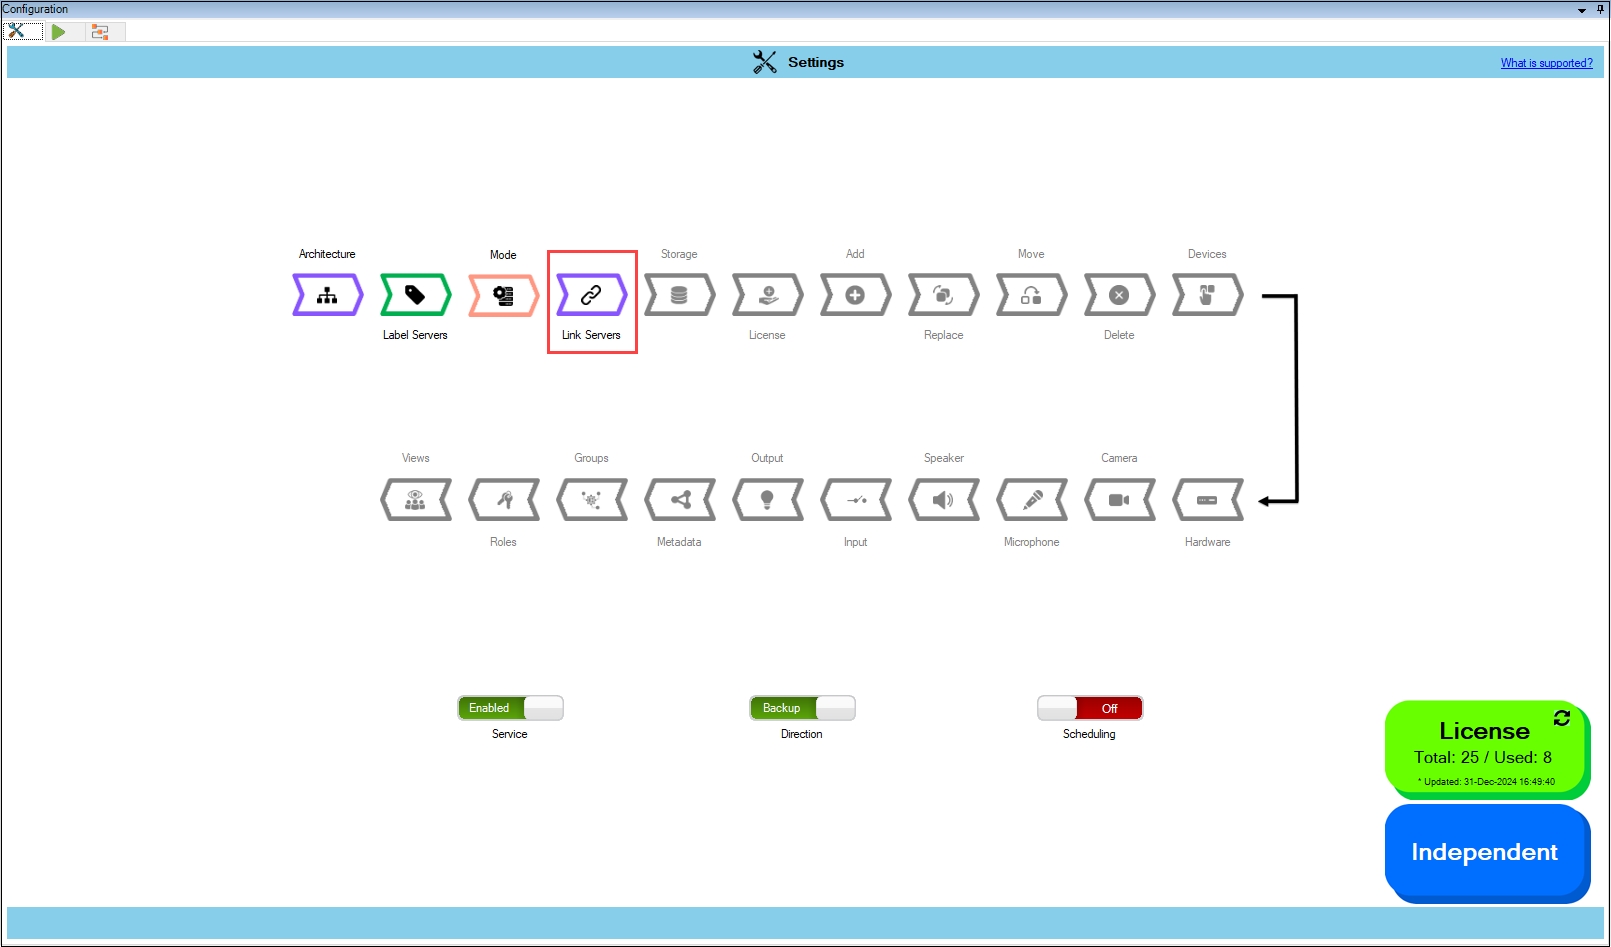
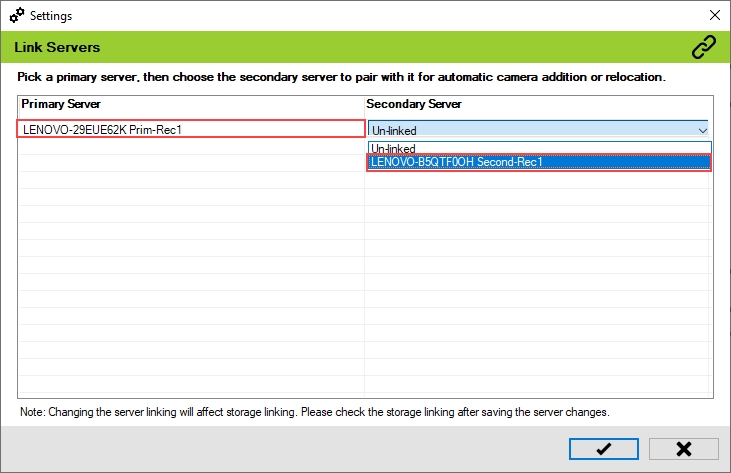
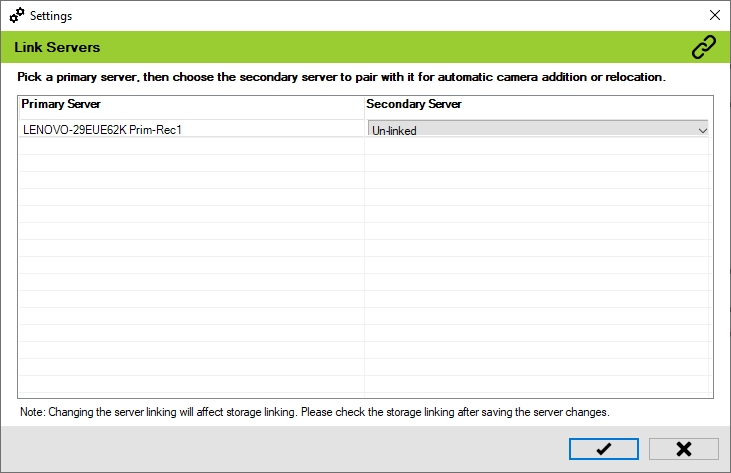
Pair Primary and Secondary recording servers.
The Server Linking step is where you specify which Primary recording server will fail over to which Secondary recording server.
Note: This block appears only when Mode = Auto (Pair Servers, Auto-manage Devices). In Manual (Map Cameras) Mode, there is no fixed server-to-server pairing, so this block is hidden. Use the page to assign redundancy instead.
Complete
Perform the following steps to link the Primary and Secondary servers.
Select Link Servers.
Step Result: The Data Refresh Tool Dialog box appears.
a. For an Independent architecture, the following screen appears:
Click Connect at the bottom right corner of the screen to continue.
b. For Federated/Single Site, the following screen appears:
Click Connect at the bottom right of the screen to continue.
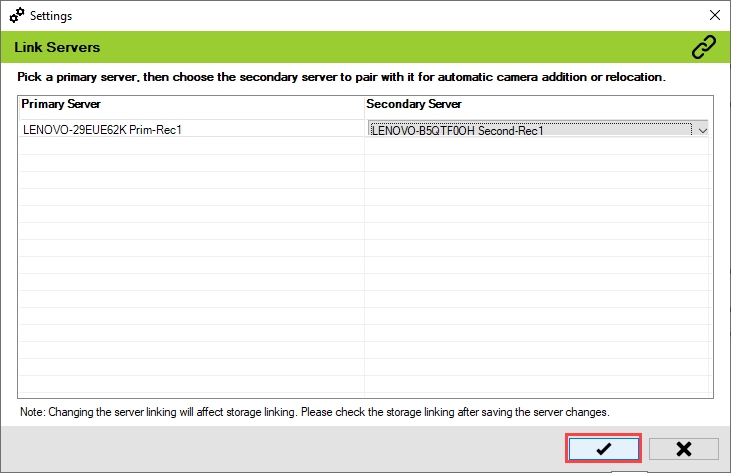
Step Result: The Link Servers screen appears.
Click the drop-down under the Secondary Server section to view the list of Secondary servers.
Select the Secondary server to link to the relevant Primary server.
Note: RMF supports Asymmetric Server Linking, enabling multiple Primary recording servers to be associated with a single Secondary recording server. RMF automatically synchronizes and updates cameras between Primary servers and linked Secondary servers. See:
Click the tick mark at the bottom of the screen to save the changes.
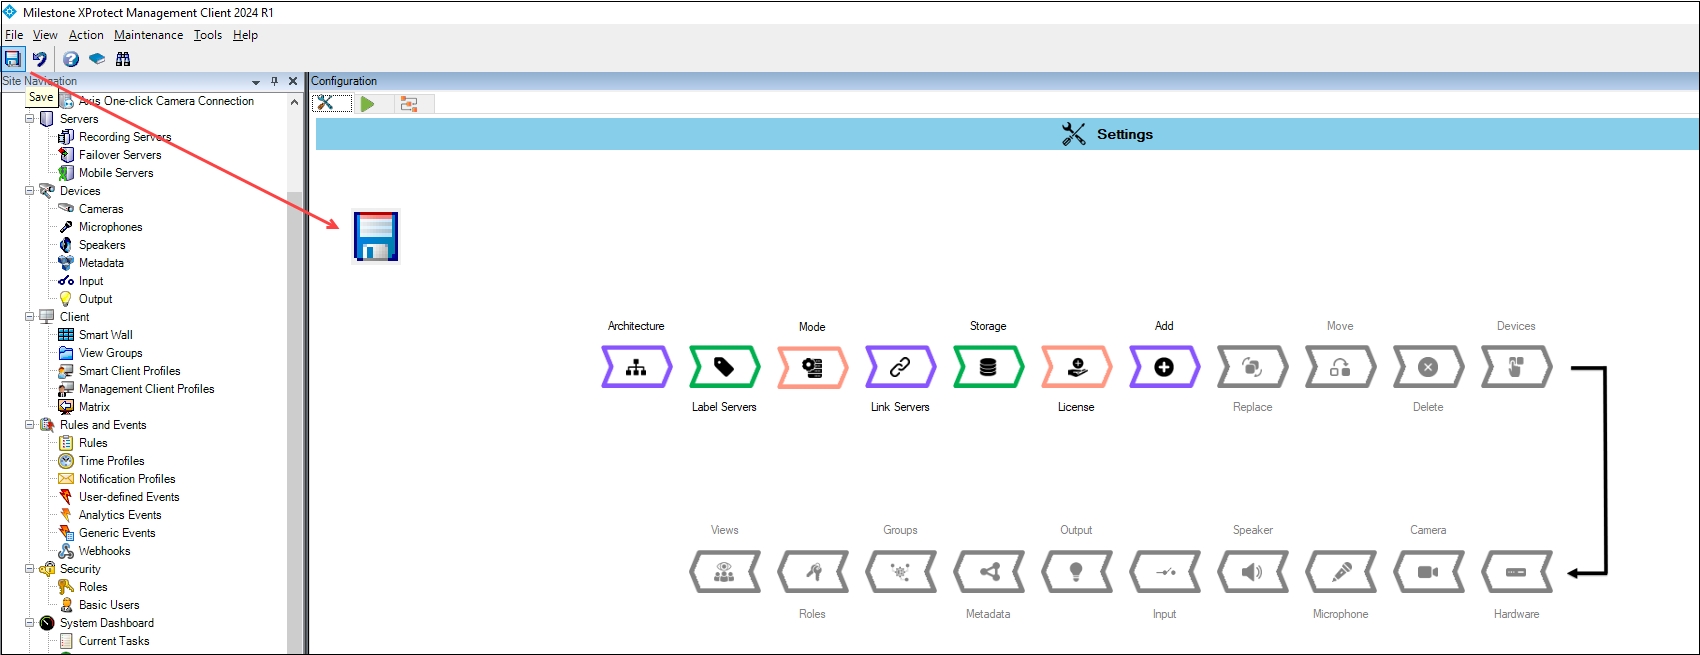
Click Save in the Milestone toolbar to save the changes.
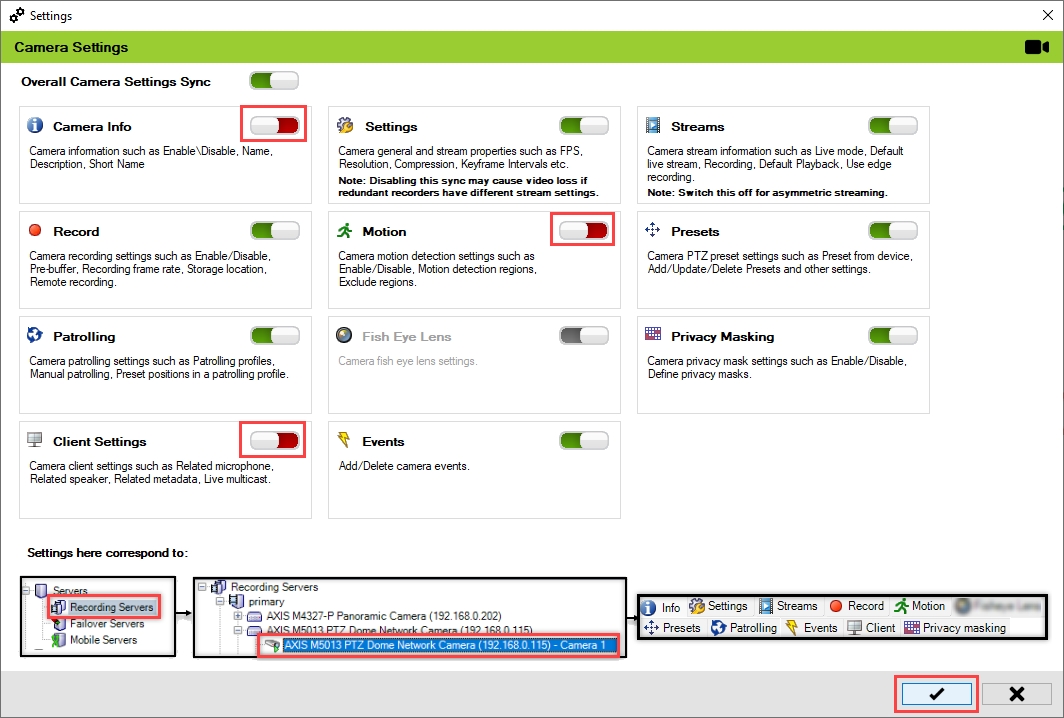
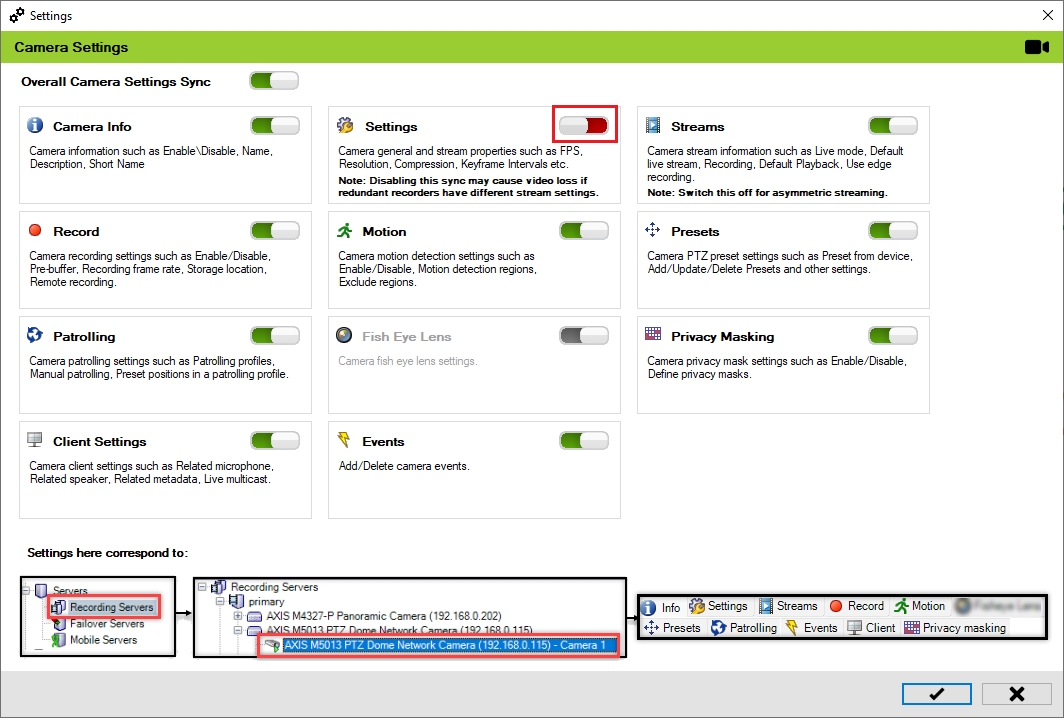
Synchronize camera level settings provided by Milestone XProtect.
Each hardware device in Milestone can support multiple cameras. Each camera contains many parameters related to stream definitions, PTZ presets, Patrolling, Privacy Masking, and more. This block determines which camera properties will be synchronized by RMF.
The settings apply to all cameras within and across all hardware devices.
The scope is limited to RMF-licensed devices selected by the block and to the features listed under the "Settings here correspond to" section in the picture below. The direction of synchronization depends on the direction setting. See . If no devices are selected in the Device Selection block, this option is disabled.
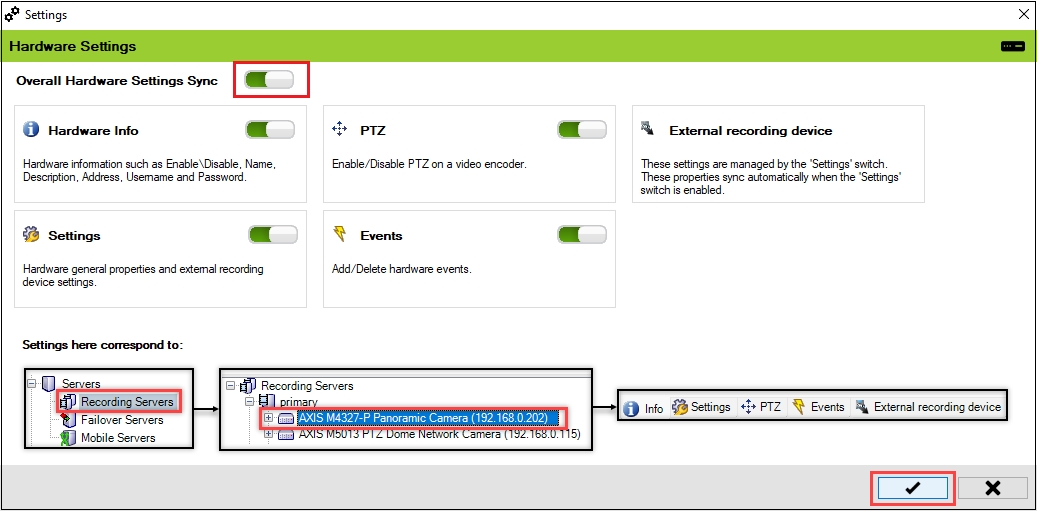
To enable and synchronize camera settings, follow these steps:
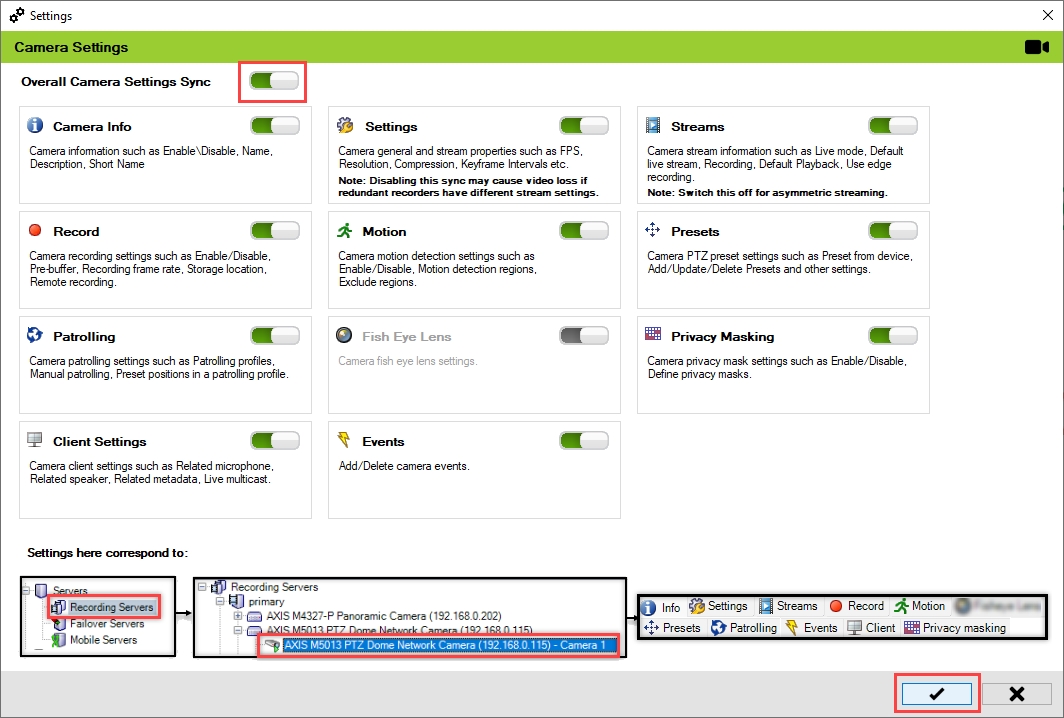
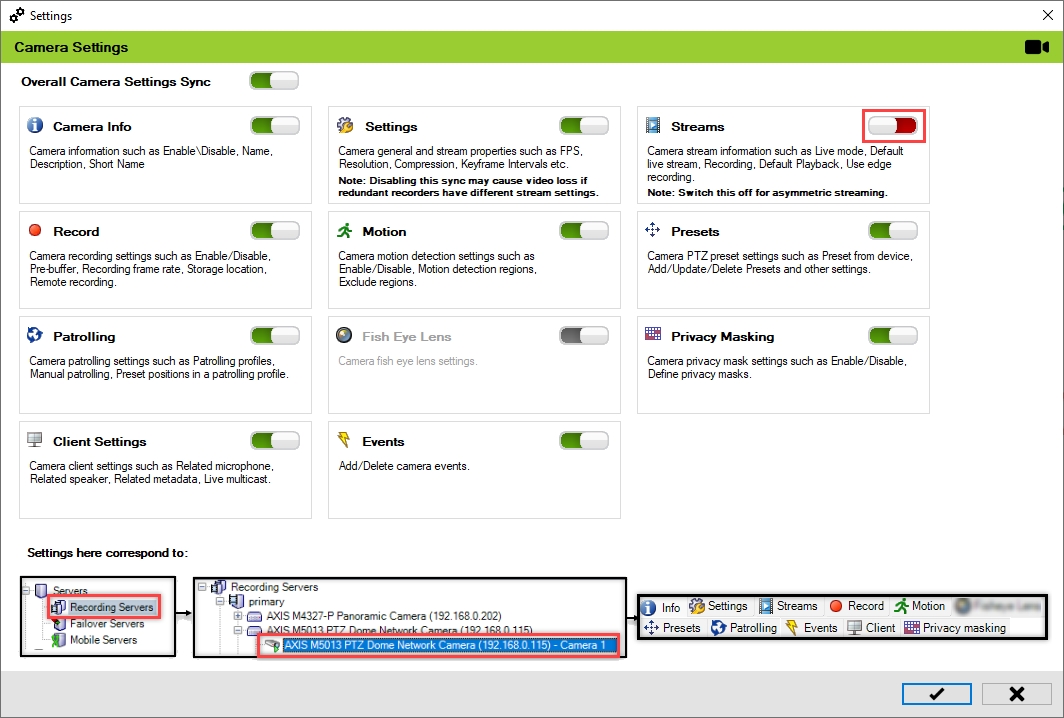
Click Camera.
Turn on the Overall Camera Settings Sync switch to activate all individual camera settings. You can enable or disable different sub-settings as needed.
Click the Check Mark button to save and exit.
Click Save in the Milestone toolbar to save the changes.
Important Notice
Turning off the Settings option may cause video loss if redundant recorders have different stream definitions. Each recorder recognizes a stream definition mismatch with the camera and will reprogram the camera. This can lead to the other recorder losing video, creating a ping-pong effect. Do not turn this off.
Stream Definition differs from Stream Selection. Each camera in a Milestone device has multiple stream definitions, which are the streaming profiles programmed into the camera.
The recorder selects streams from the stream definition list to use for either a live or recorded stream.
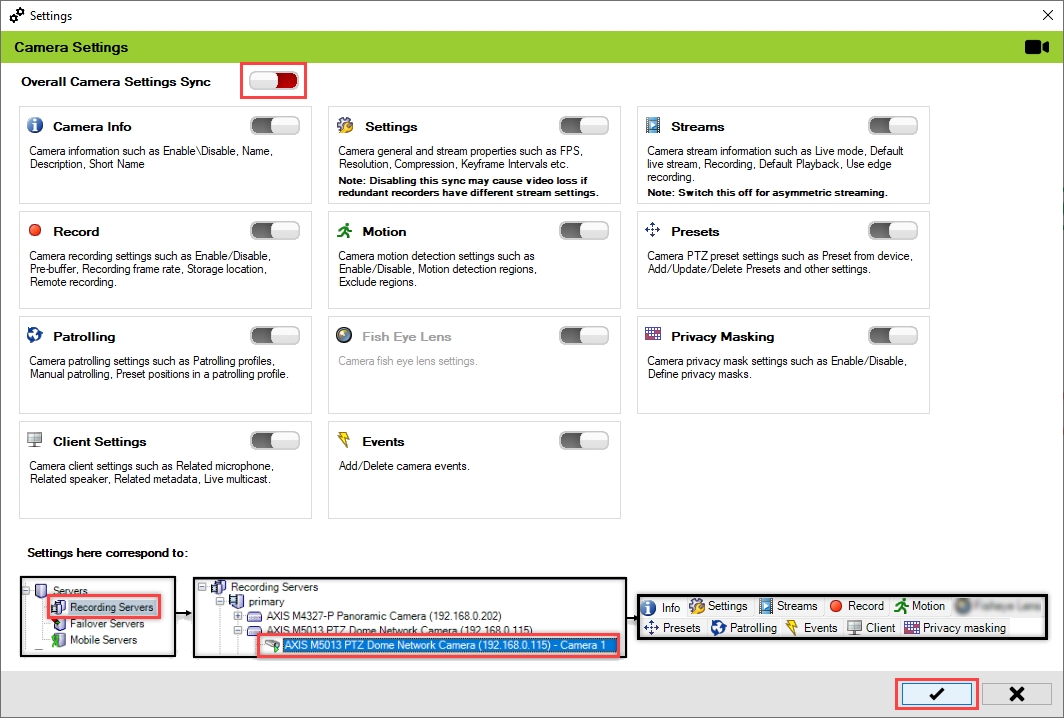
Asymmetric streaming allows a camera to transmit varying resolutions and frame rates to the Primary and Secondary Data Centers. System integrators can leverage this feature to create a redundancy strategy that fits their budget. For example, while the Primary Data Center may have 10 recorders, the Secondary Data Center might only have 5. However, the Secondary Data Center can still offer complete redundancy by housing more cameras per recorder than the Primary Data Center.
To enable asymmetric streaming, turn off the stream synchronization option shown below. When off, the primary and secondary recorders can choose different streams from the list of stream definitions for the camera.
Different streams must be chosen in the primary and secondary recorders, either through the tool provided by RMF, under the workflows tab, or directly within Milestone.
To turn off the camera settings synchronization, perform the following steps:
Click Camera.
Move the toggle button to display red and click the Save icon.
Click Save in the Milestone toolbar to save the changes.
Step Result: The Camera settings option is disabled.
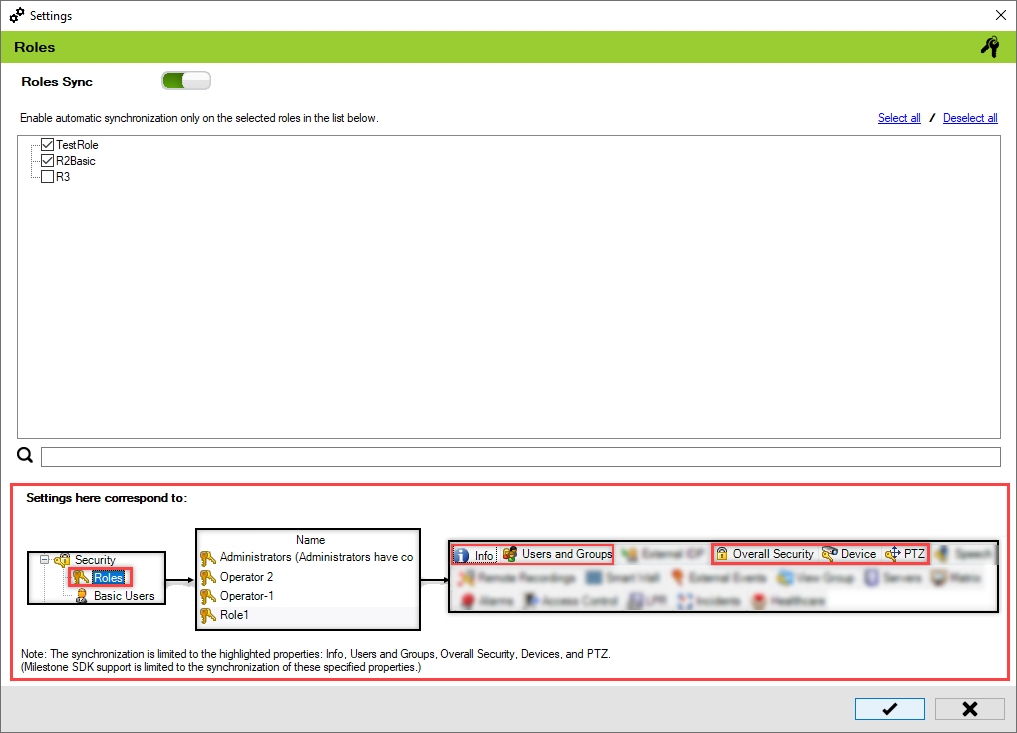
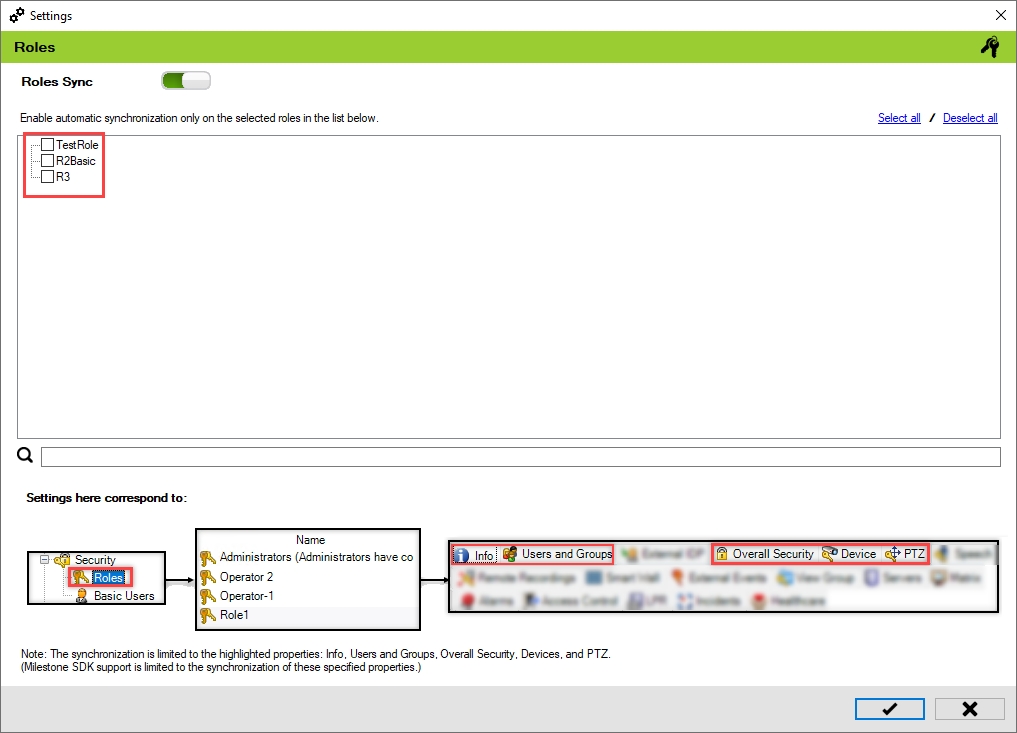
Mirror roles between primary and secondary sites.
In an active-active redundancy setup, modifying user access to a group of primary cameras requires the same changes to the corresponding secondary cameras. Additionally, in multi-database deployments, such as federated or independent sites, any additions or removals of users or changes to roles at one site must be mirrored at the other. Performing these actions manually can be tedious. The role synchronization feature helps automatically synchronize roles between primary and redundant sites.
The scope is limited to RMF-licensed devices selected by the block and encompasses the features listed under the "Settings here correspond to" section in the picture below. If no devices are selected, this block remains disabled. The direction of synchronization depends on the direction setting. See .
To enable Roles for synchronization, perform the following steps:
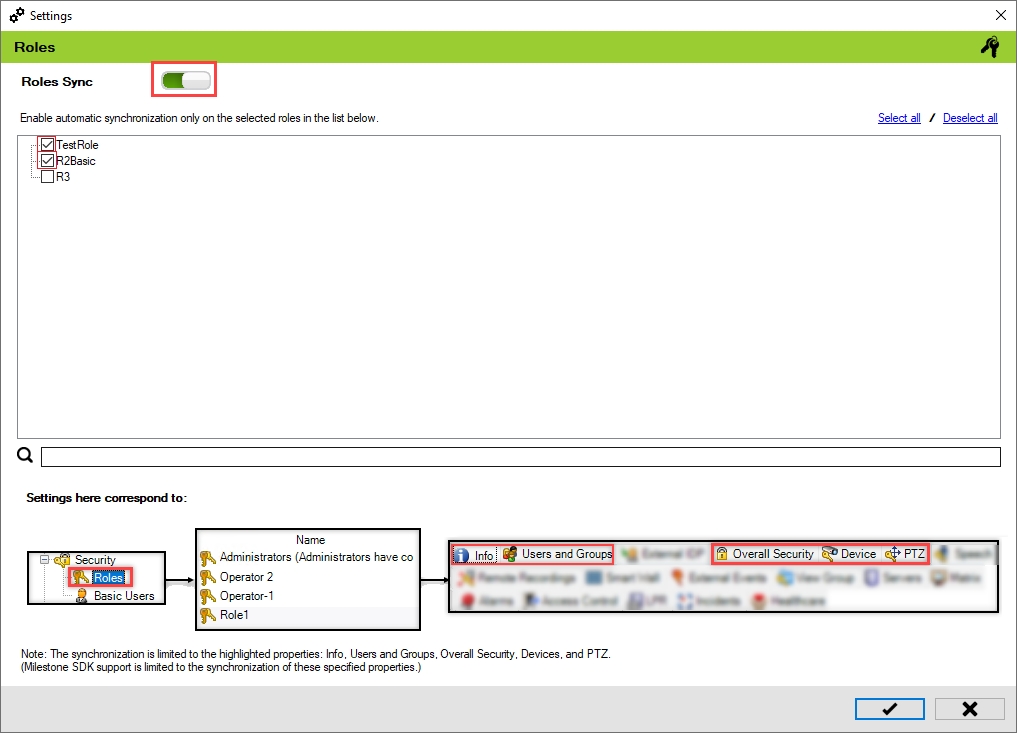
Click Roles.
Step Result: The Roles Settings screen appears. The Roles Sync toggle button is enabled by default. In Backup Mode, all the roles available on the Primary Site are listed. In Restore Mode, roles on the Secondary Site are listed.
Select the roles from the available list to enable automatic synchronization of the selected roles.
Warning: Due to MIP SDK/API limitations, selecting each additional role incurs constant performance overhead. For example, if synchronizing one role in a thousand-camera installation takes X minutes, then synchronizing two roles will take 2X minutes. This is true even if the first role manages all the cameras and the second role manages only one. Role synchronization is typically the most time-consuming part of the entire synchronization process. We await improvements to the MIP SDK that will allow the system to fetch only the cameras managed by each role, which should enhance performance.
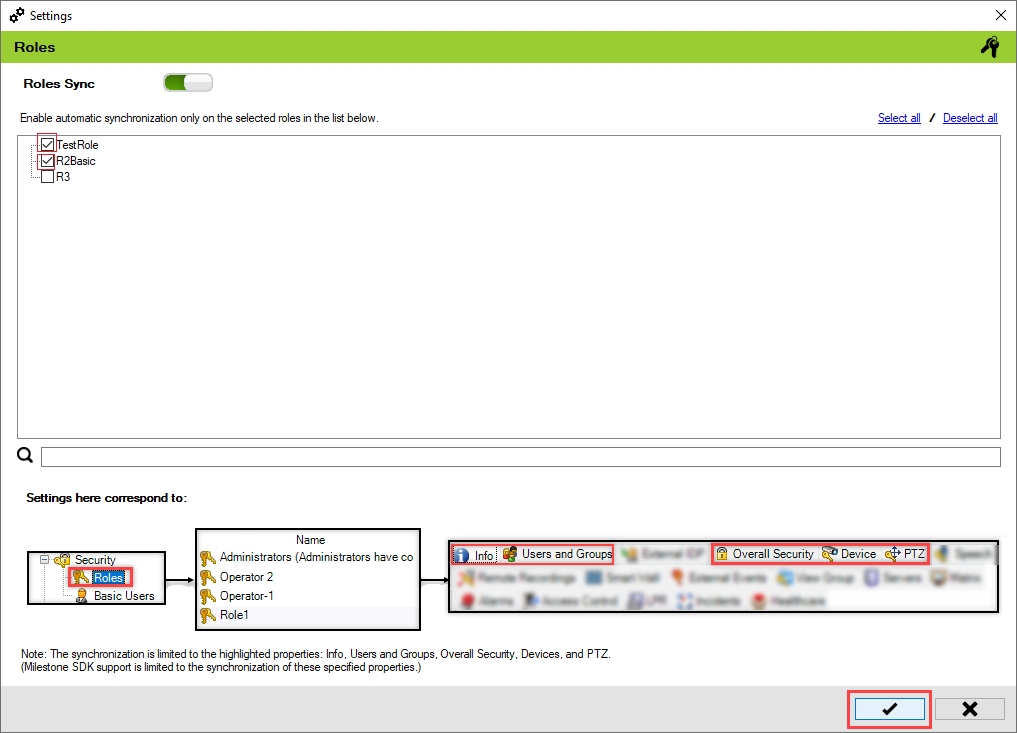
Click the 'Save' button to confirm and continue.
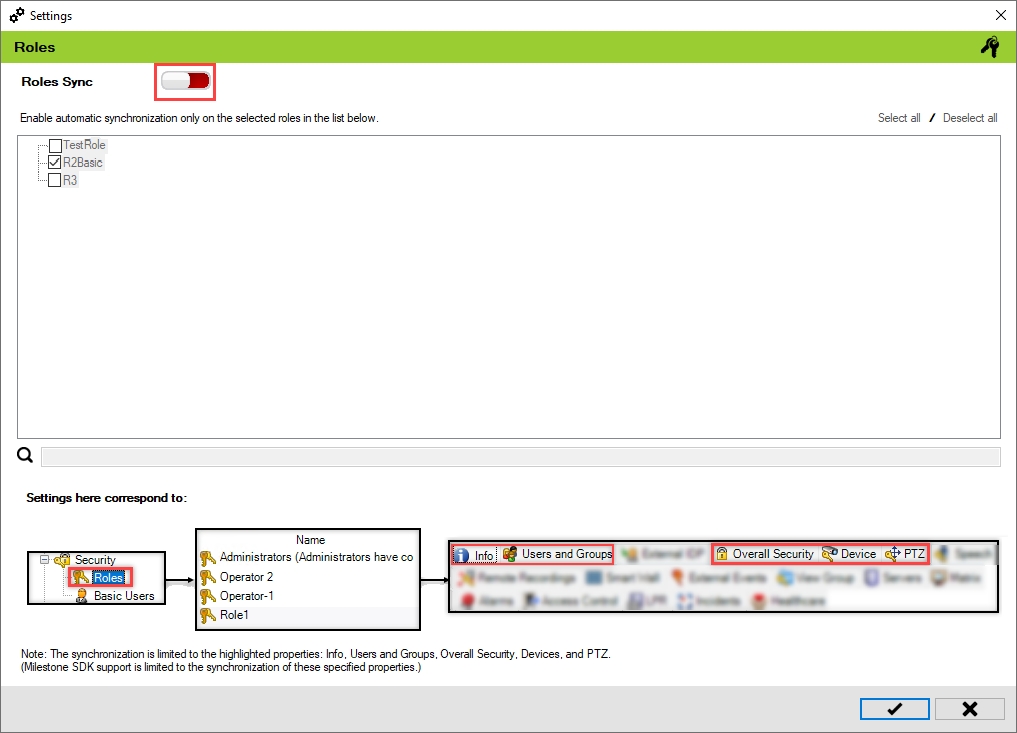
Click Save in the Milestone toolbar to save the changes.
Toggle the button to red to turn off overall role synchronization.
Step Result: The roles in the list are grayed out.
Click Save in the Milestone toolbar to save the changes.
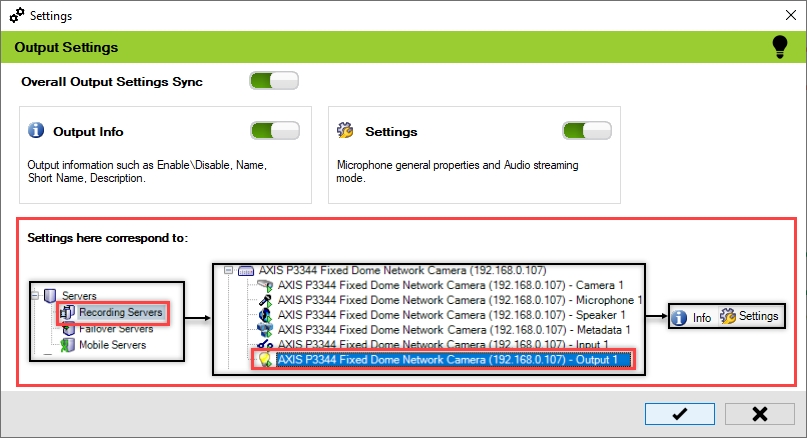
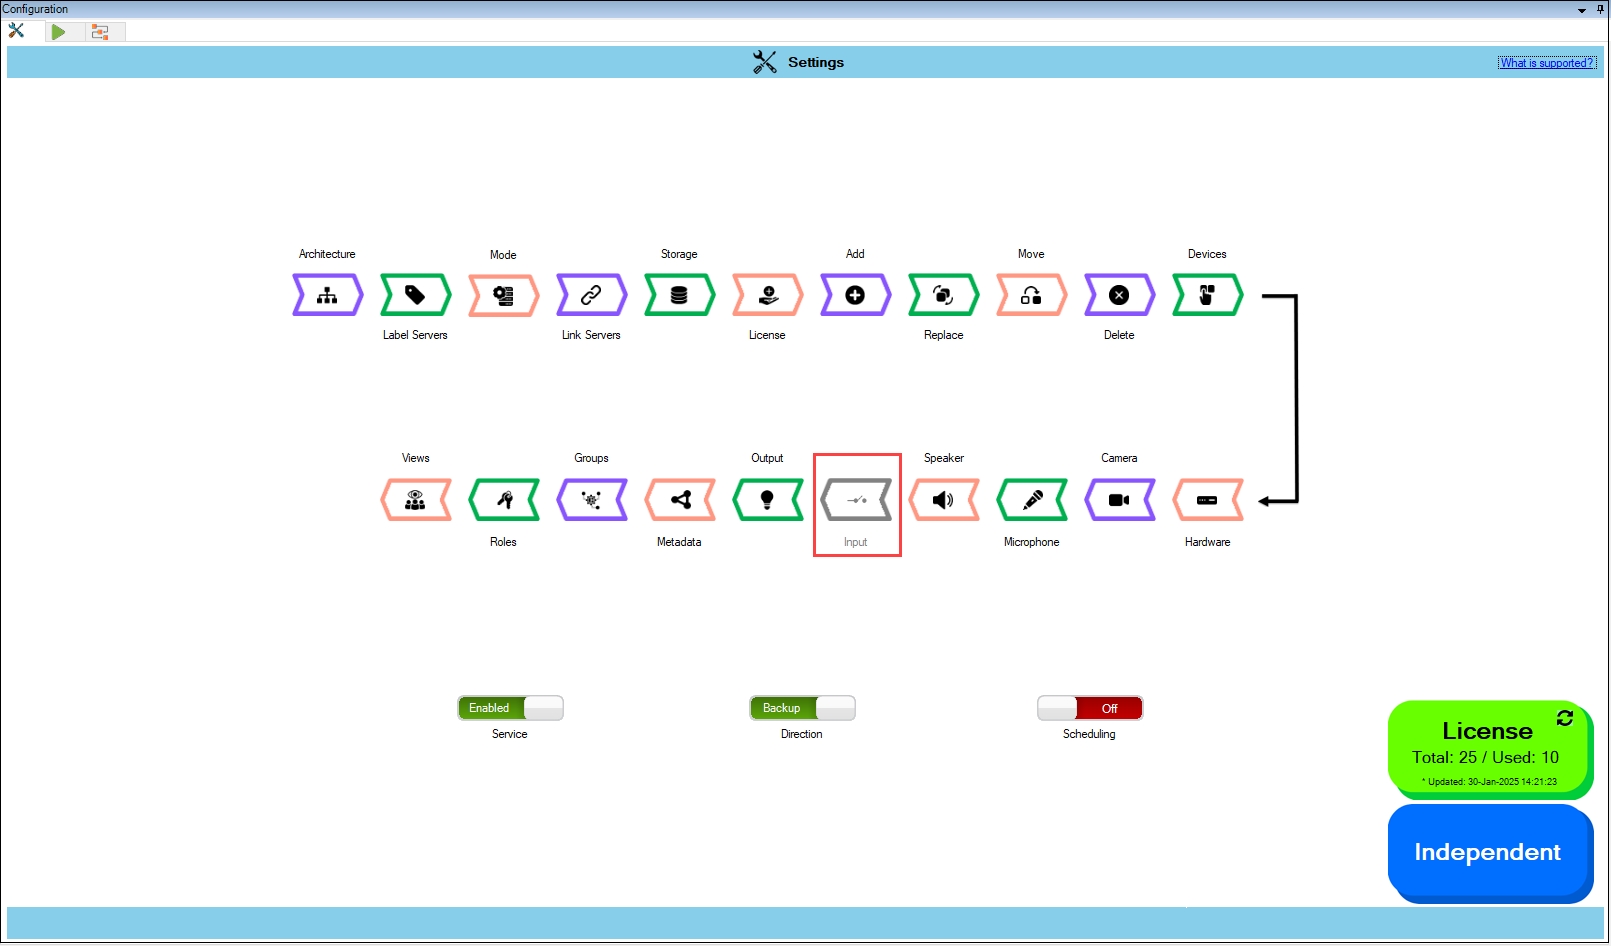
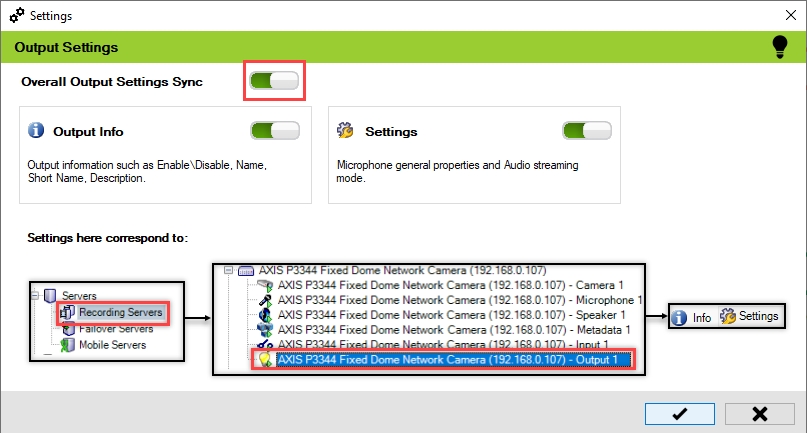
Precision Synchronization for Output Settings
Use this option to synchronize Speaker settings between the Primary and Redundant sites.
The scope is limited to RMF-licensed devices selected by the block and to the features listed under the "Settings here correspond to" section in the picture below. The direction of synchronization depends on the direction setting. See . If no devices are selected in the Device Selection block, this option is disabled.
To enable and synchronize the device output settings, perform the following steps:
Click Output.
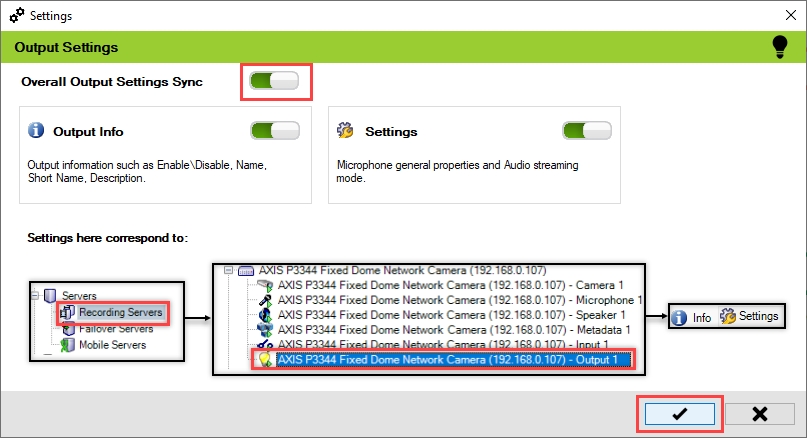
Enable the Overall Output Settings Sync to enable all the individual device output settings. Enable/Disable different sub-settings as needed.
To retain the settings, click the Check Mark button.
Click Save in the Milestone toolbar to save the changes.
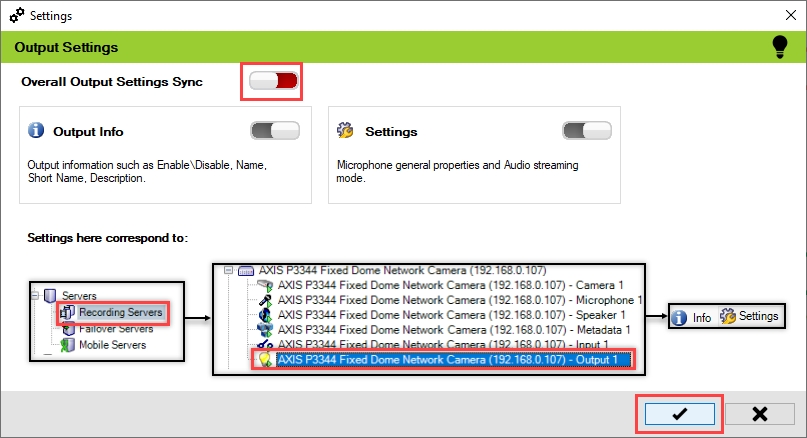
To disable and synchronize the device output settings, perform the following steps:
Click Output.
Enable the Overall Output Settings Sync to enable all the individual device output
settings. Enable/Disable different sub-settings as needed.
Click Save in the Milestone toolbar to save the changes.
Step Result: The Output settings option is disabled.
The Run/Process dashboard enables users to efficiently monitor sync processes.
Next Run shows the scheduled time for the system to execute the synchronization process automatically.
Last Run Duration displays the total time to complete the most recent synchronization operation.
The License utilization section displays the total number of RMF licenses purchased versus those currently in use. It also monitors license usage across multiple sites, ensuring optimal allocation of licenses. Additionally, the License Count indicates the total number of licenses used or available within the system, ensuring proper monitoring and compliance with licensing limits.
The process workflow visualization displays the stagewise status of the sync process.
When a synchronization run is not in progress, the color of the LED indicates whether a stage is enabled or not.
Enabled (green): Indicates that the process is running or scheduled to run as expected. Once the stage is successfully processed, the indicator will turn solid green.
Disabled (red): Indicates that the stage is disabled, preventing both scheduled and manual executions.
When a synchronization run is in progress, the color of the LED indicates the status of the execution of a particular stage.
Running/Completed:
When a stage is in progress, its indicator blinks green.
When a stage has been completed, its status indicator is solid green.
Yet to run: Yellow indicators signify stages that are enabled but have not yet started or completed processing.
The manual run button enables users to initiate a synchronization run on demand, bypassing the need to wait for the next scheduled run. This is useful when users prefer to launch a run manually rather than scheduling a sync, or when they have a planned sync but need to execute a run before the next scheduled time.
The Open Log Folder feature allows users to access the directory where execution logs are stored. This feature provides direct access to log files, allowing you to review detailed records of run activities, troubleshoot errors, and analyze system behavior. It helps in debugging issues by offering a comprehensive view of past executions.
Displays status logs for each process step, categorized into:
✅ Successful Operations (Green Checkmark): Clicking on the number next to this icon will open a notepad-style log displaying details of all completed operations.
❌ Failed Operations (Red X): Clicking next to this icon will open a notepad-style log with error messages and reasons for failure, helping users troubleshoot issues.
⚠️ Warnings (Yellow Exclamation Mark): Clicking next to this icon will open a notepad-style log highlighting potential issues or warnings that may not have caused failure but need attention.
This section describes the Silent installation procedure of RMF Services.
Execute the following commands on the Silent Installation of All-in-one Package type command prompt.
Complete all the steps as described in the Pre-Installation section.
Navigate to the location where the RMF_Installer.exe is available.
Start the "Command Prompt" with administrator privileges and navigate to the location where the setup is available.
Execute the following command:

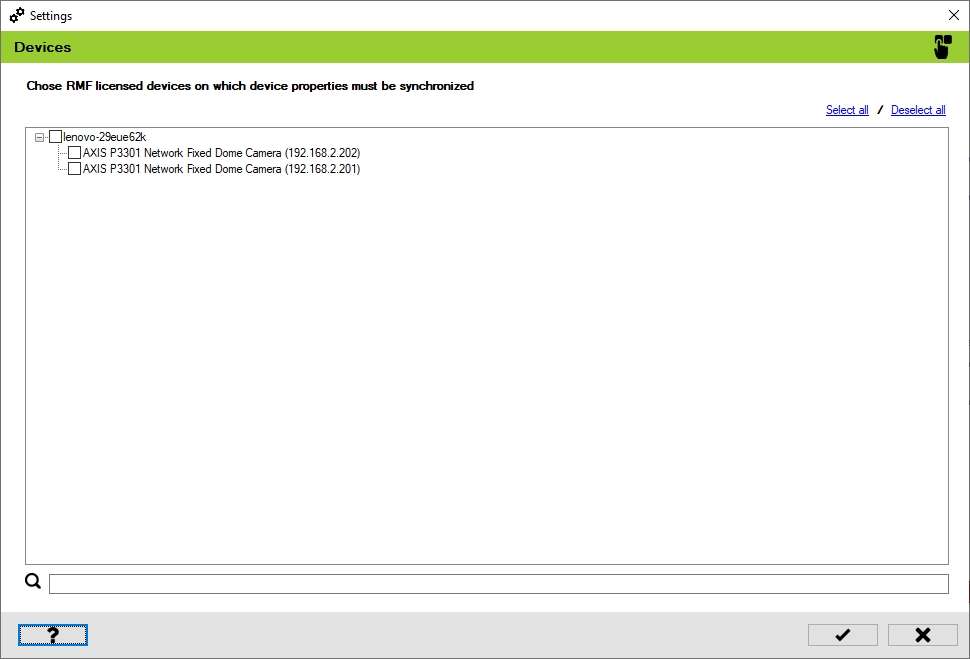
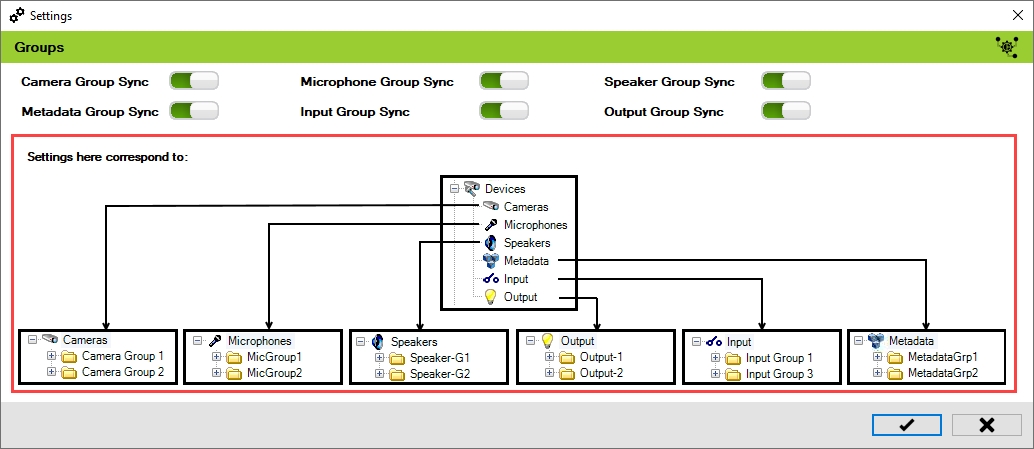
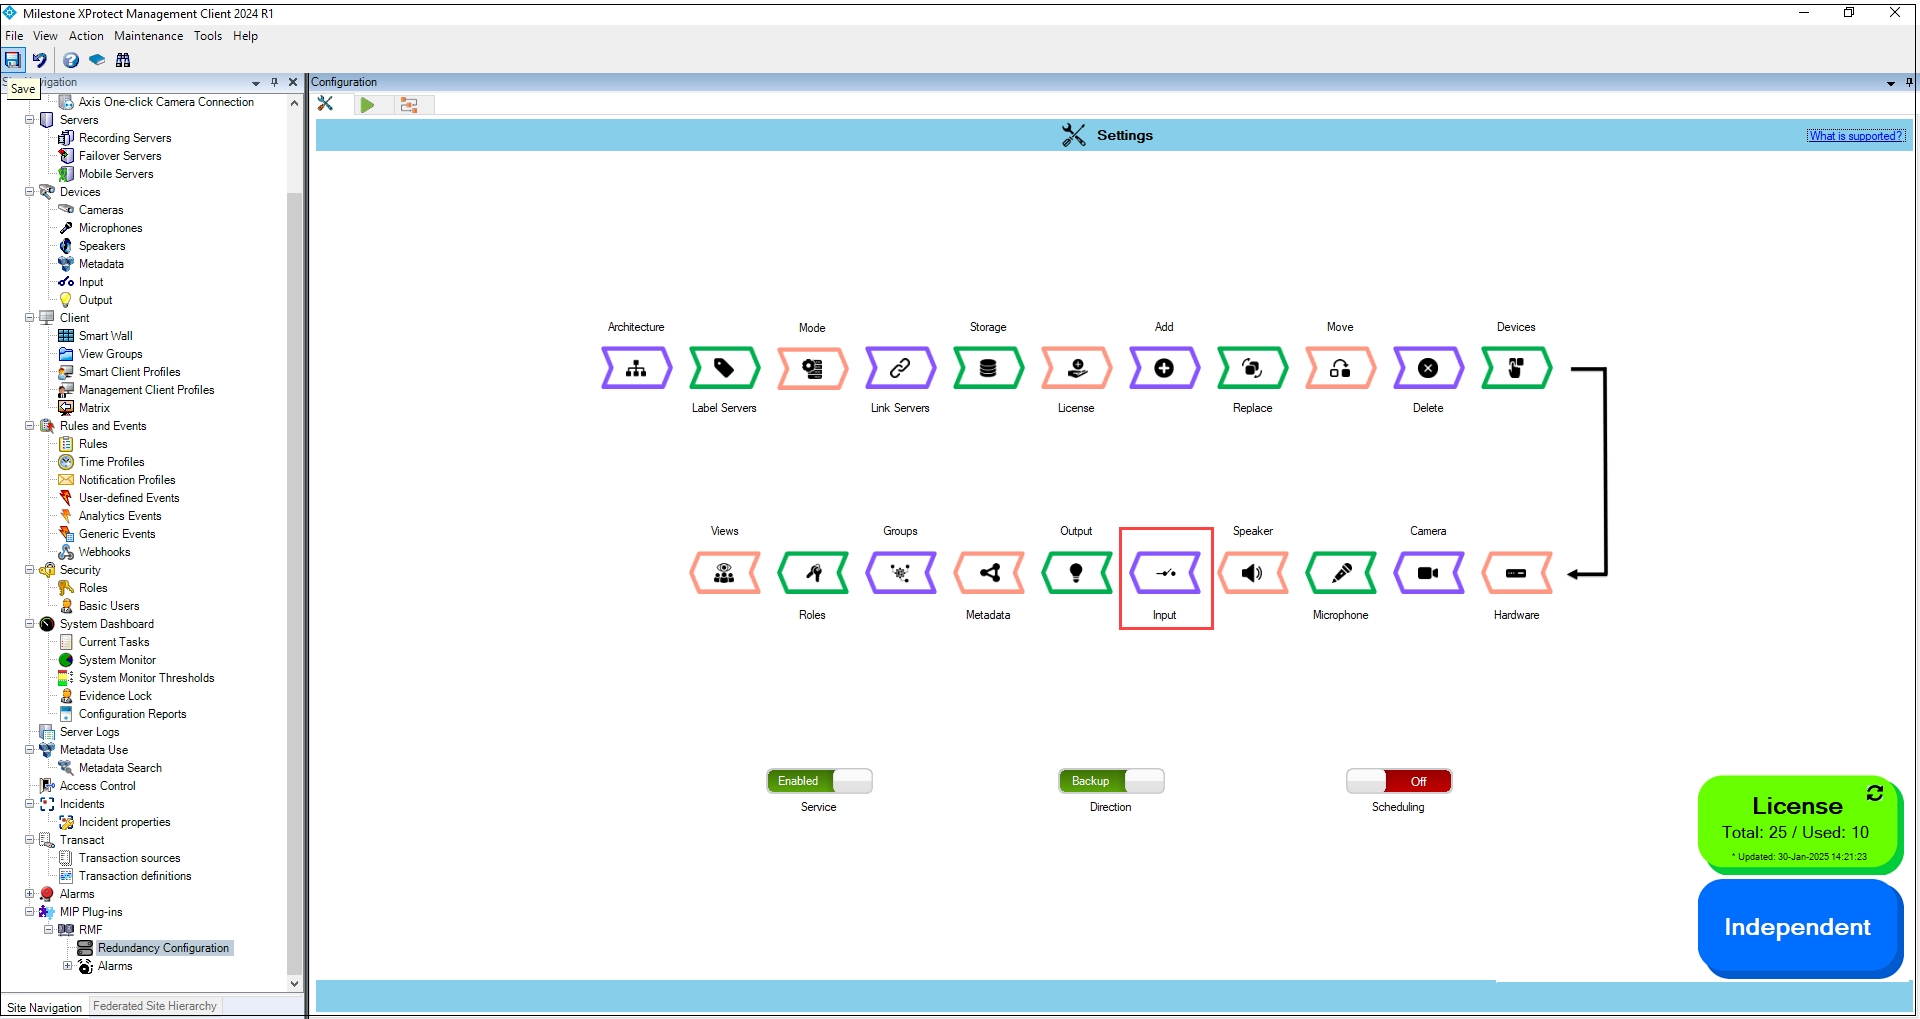
Select Devices to synchronize properties, groups, roles and views.
Tick ✓ only the cameras you want RMF to keep identical across sites; any camera you leave unchecked is ignored by every downstream block. After this coarse filter, later blocks—Device Properties, Roles, Views, Device Groups—provide fine-grained switches for each individual property, allowing you to build an exact, policy-driven sync recipe.
Think of Selective Sync as the “big gate” that decides which devices enter the sync pipeline; the blocks that follow let you fine-tune what about those devices stays mirrored, giving you layered, policy-level control over redundancy.
Follow the steps for Post-Installation procedure.
To verify that the RMF components are successfully installed, perform the following post-installation steps.
Restart the SmartSync Service
This option restarts the SmartSync Service.
Select Restart from the SmartSync Settings.
RMF Services and UI
RMF Client components


Server Linking
Storage Linking
Add Camera
First Synchronization Run
Replace Camera
Move Camera
Delete Camera
Device Selection
Synchronize Hardware
Synchronize Camera
Synchronize Microphone
Synchronize Speaker
Synchronize Input
Synchronize Output
Synchronize Metadata
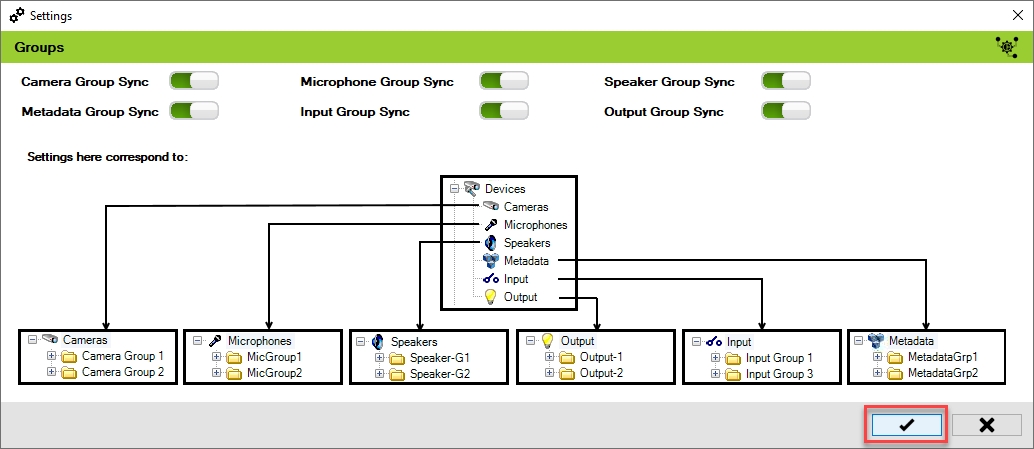
Synchronize Groups
Views
Accessing the Dashboard
SmartSync Service
Sync Direction
Architecture Selection
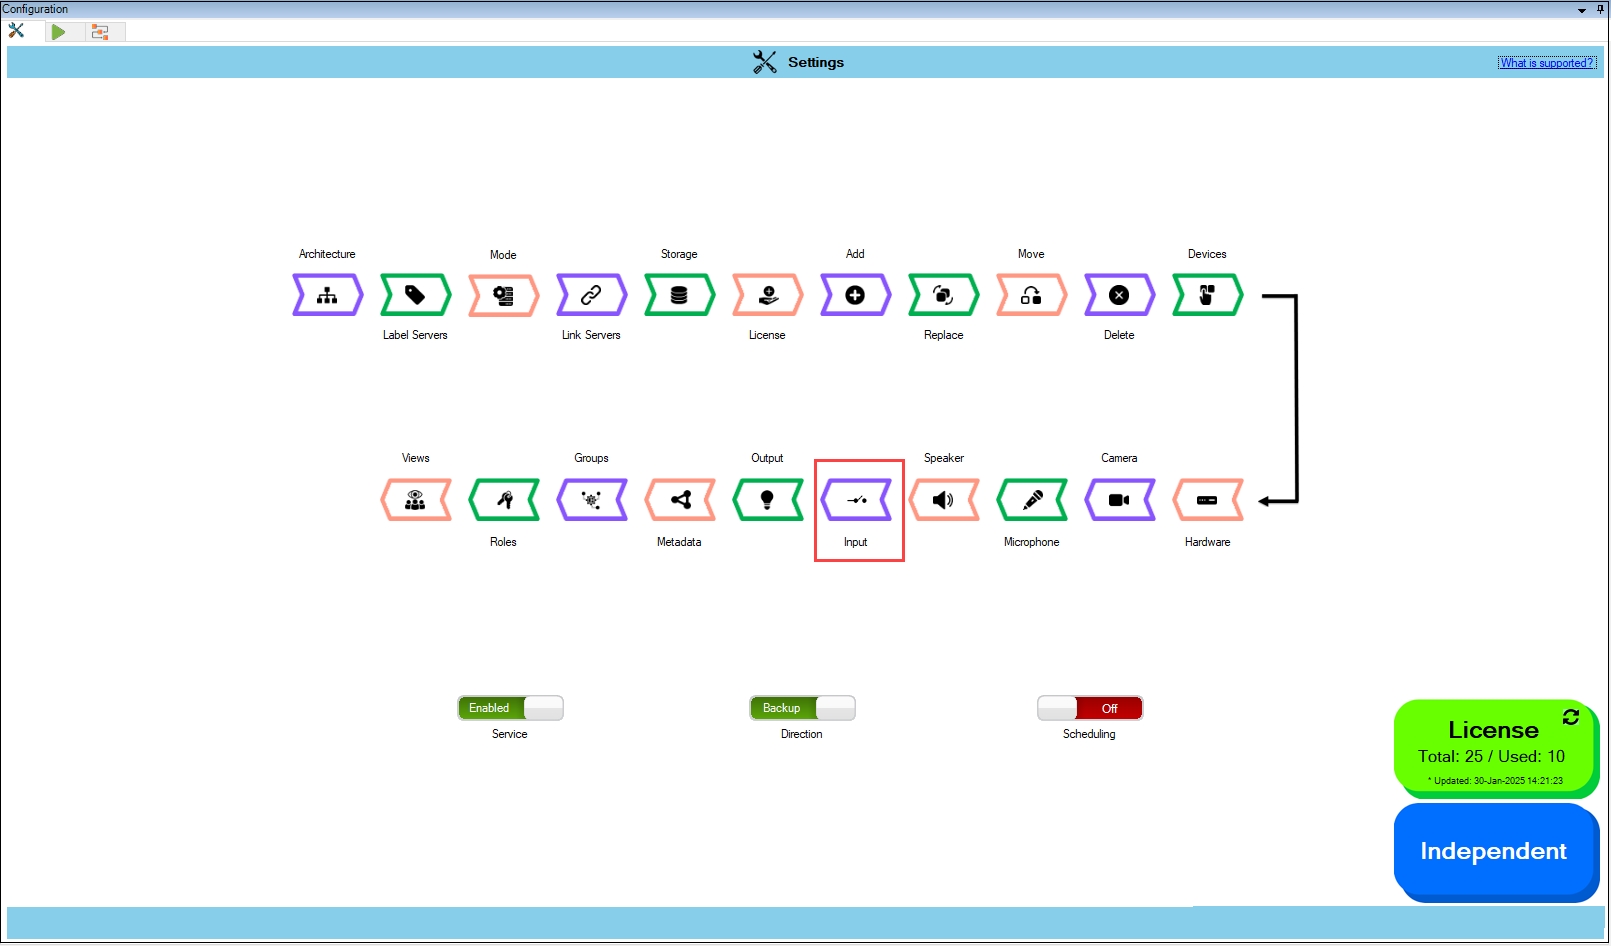
Server Labeling
Mode Selection
Device
PTZ
View Group
Disabled (red): Indicates that the stage is turned off, and synchronization for it will not be executed.

Multi-sensor / multi-stream cameras
Clone just the core streams to the secondary and keep the extra ones primary-only, staying within the camera’s stream limit without touching later property switches.
Restore Accidental Deletions
If a device is mistakenly removed from the primary, tick that device here, while in , and run Sync. RMF pulls its configuration back from the secondary without affecting other devices.
Test / maintenance devices
Exclude lab or in-repair devices upfront so they never consume storage or licenses on the DR site, saving you from having to turn off each property one by one later.
Temporary event cameras
Leave seasonal or event-only devices unsynced so you can stand them down at the primary without any DR clean-up.
The feature is limited to RMF-licensed devices. Unlicensed devices do not appear in this list.
Click Devices.
Step Result: The confirmatory dialog box appears. Select 'Refresh' to log in and retrieve the latest device list, or choose 'Cache' to continue configuration with the previously fetched device list. The Cache option saves time at large installations by using information stored from previous fetch cycles.
a. The following screen appears if Refresh is chosen while in independent architecture.
Click Connect at the bottom right corner of the screen to continue.
b. The following screen appears if Refresh is chosen in a Federated/Single Site.
2. Click Connect at the bottom right corner of the screen to continue.
Step Result: The Devices screen appears, listing all the RMF-licensed devices. Select the devices whose properties need to be synchronized.
Click the Help icon to view additional information.
Select the devices to synchronize the device properties.
Click Save to save the changes.
Step Result: If no devices were selected a priori, selecting at least one device will enable subsequent synchronization filter blocks.
Click Save in the Milestone toolbar to save the changes.
RMF_Installer.exe /exenoui /qn INSTALL_TYPE=MS INSTALL_TYPE_SUB_RMFAS=1


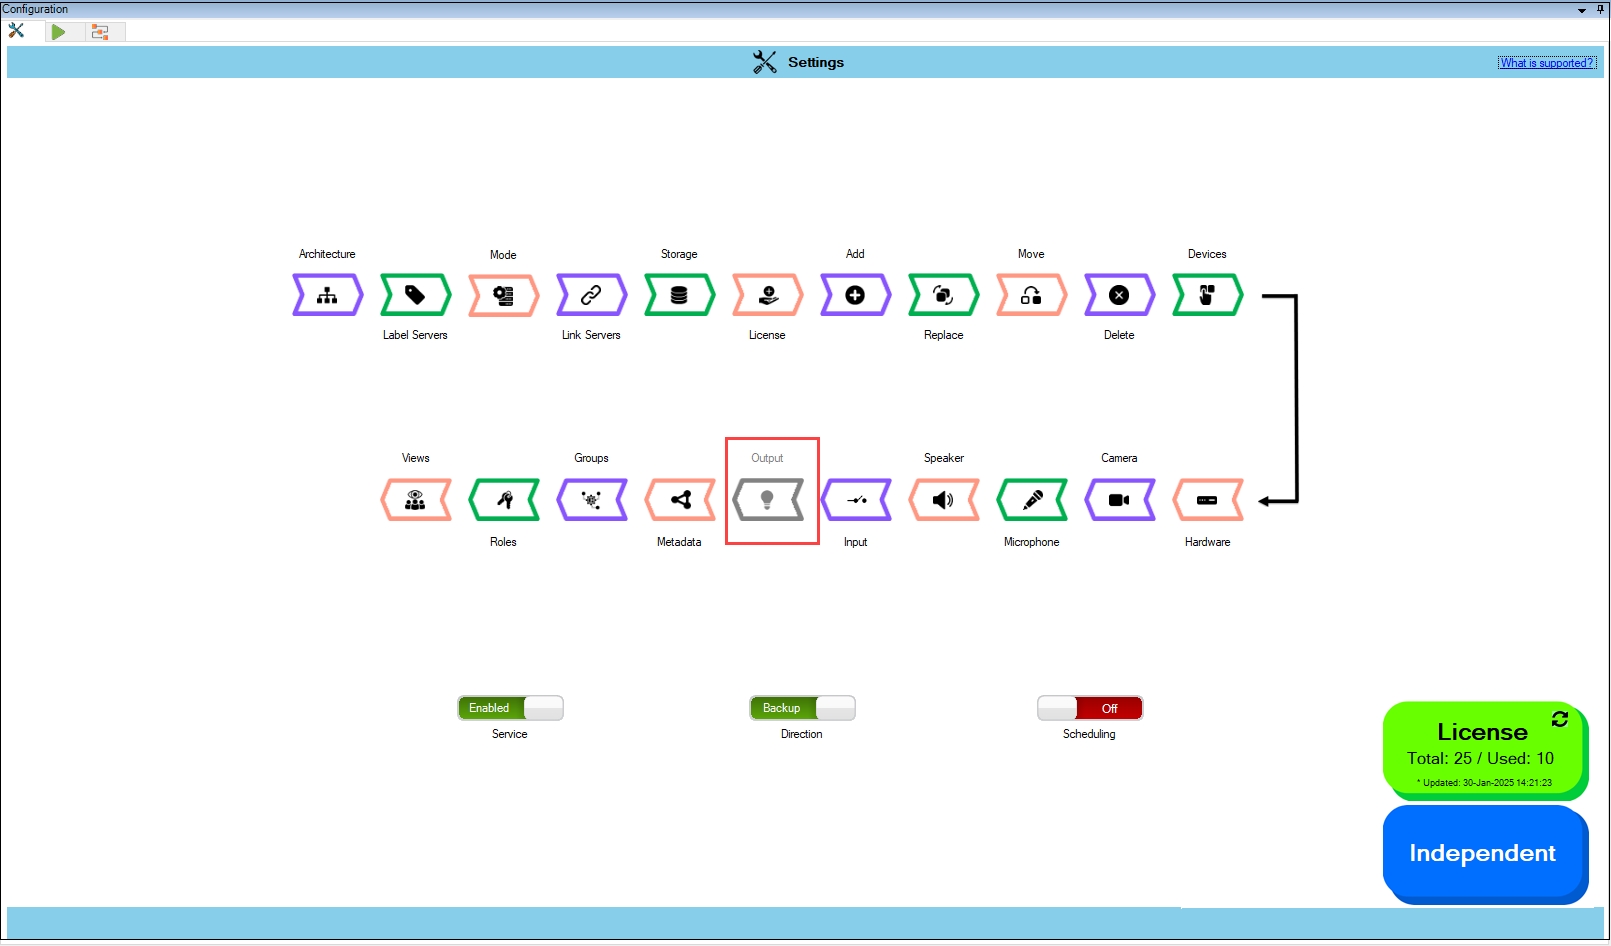
Managing your RMF Device Licenses
The License block is the control panel for your organisation’s pool of RMF licences. From here you can:
Assign licences – Allocate free licences to newly added cameras or other devices.
Release licences – Recover licences from devices that have been decommissioned or no longer need redundancy.
Re-balance licences – Shift licences between devices.
Note:
Device licenses are manually assignable only in the Back-Up mode.
Devices are auto-licensed in Restore mode if they are present on a secondary recorder and absent from the corresponding primary recorder, provided the mapping is one-to-one and licenses are available.
Complete .
Perform the following steps to assign licenses:
Click the License block.
Step Result: The confirmatory dialog box appears. Select Refresh to log in and retrieve the latest device list, or choose Cache to continue configuration with the previously fetched device list. The Cache option saves time at large installations.
a. If Refresh is chosen for an Independent architecture, the following screen appears:
Simply click Connect at the bottom right corner of the screen to continue.
b. If Refresh is chosen in a Federated/Single Site, the following screen appears:
Click Connect at the bottom right corner of the screen to continue.
Step Result: The License screen appears. It lists all devices available on the Primary server. The total number of RMF licenses purchased for the current Milestone Software License Code is the total license count.
Select devices on the Primary site to assign licenses. Click the Help icon for additional information.
The following are some license tasks that can be performed.
Assign License if Available
Do not Assign a License
Retain license
Release license
The camera name in black font denotes that it is unlicensed. Select the device check box to assign licenses to it.
Clearing the check box for a device shown in a black font will keep it unlicensed.
Maintaining a checked box for a device whose name is displayed in green font will keep the device licensed.
To release the license of an already licensed camera, clear its check box.
Click the Save icon to save the changes.
Click Save in the Milestone toolbar to save the changes.
To apply licensing changes immediately, click the Run/Process tab at the top left corner.
Click the Run Now icon to commit license changes immediately. Or, if the service is scheduled, the license changes are committed during its next run.
A process run begins with the following screen.
When the process is completed, all amber lights should be green, and one cannot see blinking LEDs.
The licenses for the selected cameras are allocated in the picture below. The green font denotes that the cameras are licensed.
Link the Primary and Secondary Storage profiles.
Use Storage Linking to inform RMF how the retention rules on each Primary recorder are translated to its Secondary. Here, you map every storage profile on a Primary (e.g., “30-Day Local”, “7-Day Edge”) to the profile that should be applied on the Secondary (e.g., “90-Day DR”, “14-Day Cloud”). When SmartSync later detects a new camera—or you switch an existing one—to a given profile on the Primary, it automatically assigns the camera to the corresponding profile on the Secondary.
If no mapping is defined, SmartSync falls back to the Secondary’s default storage profile, which may not provide the expected retention. Therefore, create explicit links first to ensure your long-term, short-term, and regulatory retention tiers are perfectly aligned.
In Manual Mode – Because cameras can be routed to multiple secondaries, RMF first compiles a table of every unique primary-to-secondary pairing created by your camera map. For each pairing, you must define how the primary’s storage profiles translate to the secondary’s profiles; if you leave a pairing blank, the secondary will use its default profile whenever a camera from that primary is synced.
Complete or
Perform the following steps to link the Storage profiles.
Click Storage.
Step Result: The Data Refresh Tool Dialog box appears.
a. For an Independent architecture, the following screen appears:
Click Connect at the bottom right corner of the screen to continue.
For Federated/Single Site, the following screen appears:
Click Connect at the bottom right of the screen to continue.
Step Result: The following screen appears.
Select one of the Primary and Secondary recorder pairs from the list of linked servers that were associated in the previous step.
Step Result: The selected server pair is listed under the Selected Pair section. Also, the list of Storage profiles for the selected Primary and Secondary server pairs is visible.
Click the Help icon to view additional information about Storage Linking.
Select one of the Storage Profiles under the Primary Server Storage.
Click the drop-down menu in the Secondary Server Storage section.
Select the relevant Secondary Storage Profile from the drop-down.
Click the tick mark at the bottom of the screen to save the changes.
8. Click Save in the Milestone toolbar to save the changes.
Enable the Scheduling feature in Redundancy Configuration for SmartSync Service to automate synchronization and ensure seamless data updates at predefined intervals.
Before enabling scheduling, ensure that the following prerequisites are met.
Architecture Selection - Define and configure the system architecture.
- Classify recorders on both sites as either primary or secondary.
- Establish connections between the servers within the RMF environment.
Once the prerequisites are completed, follow these steps to enable and configure scheduling:
Open the Milestone XProtect Management Client.
Navigate to MIP Plug-ins > RMF > Redundancy Configuration.
Locate the Scheduling radio button at the bottom right of the page. The scheduling feature is turned off () by default.
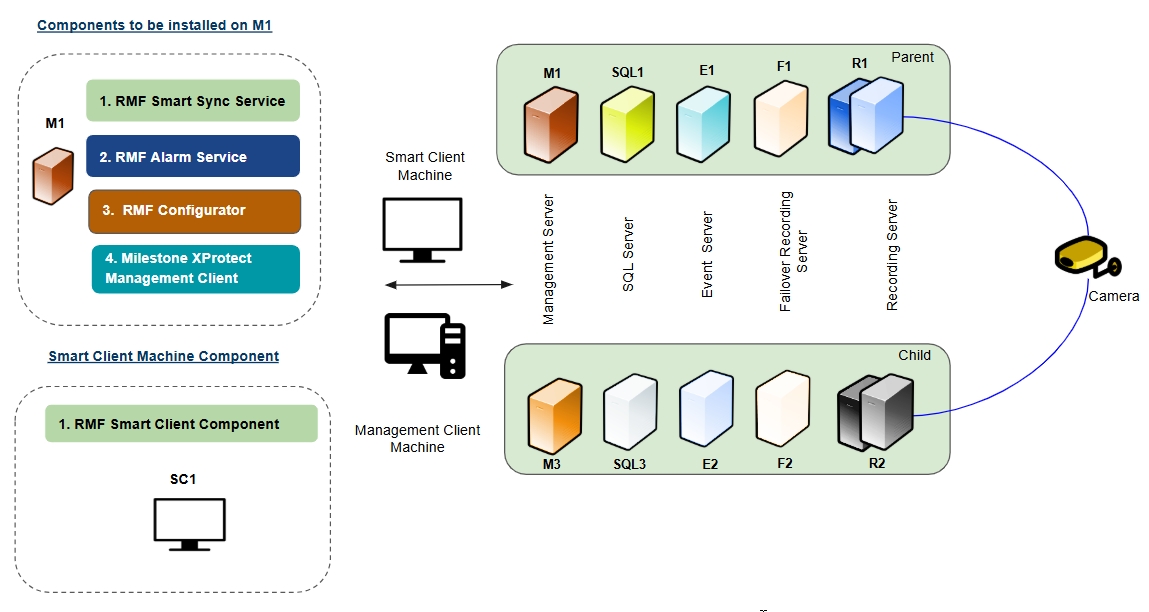
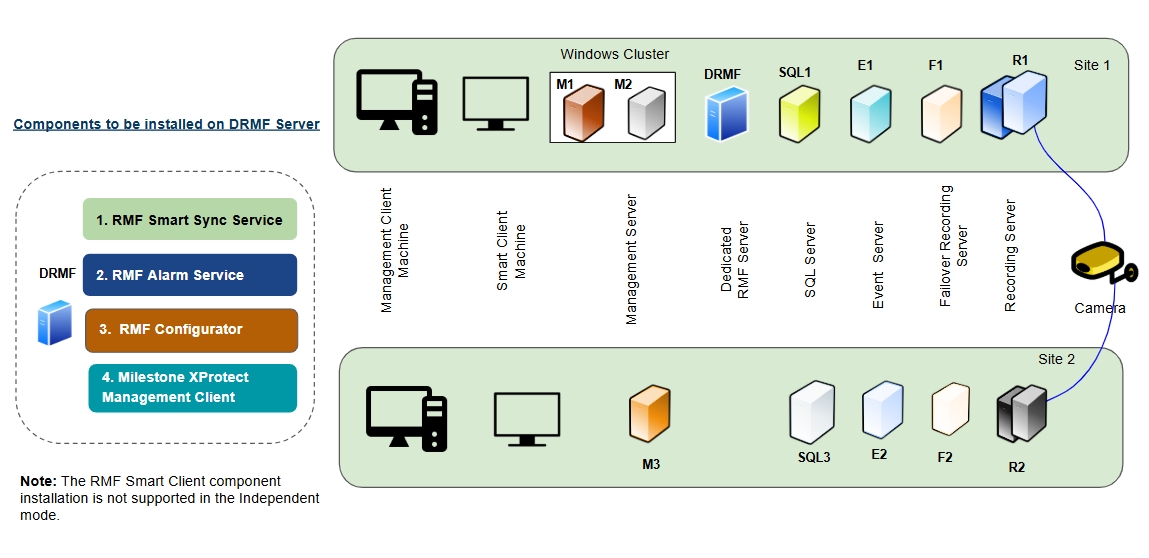
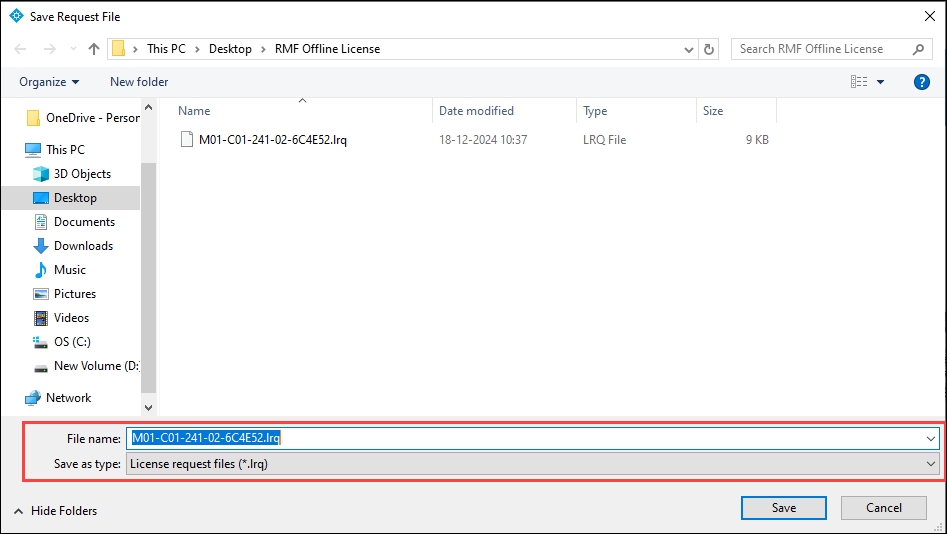
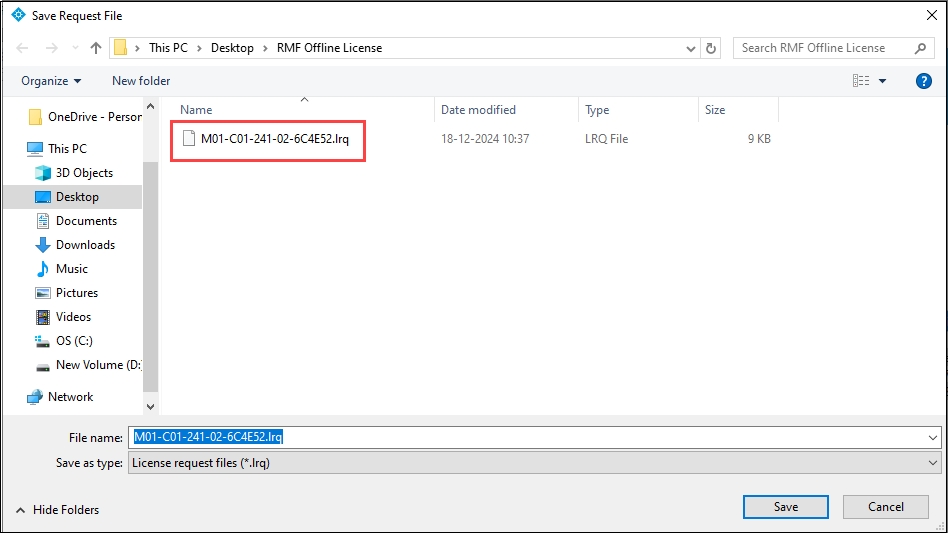
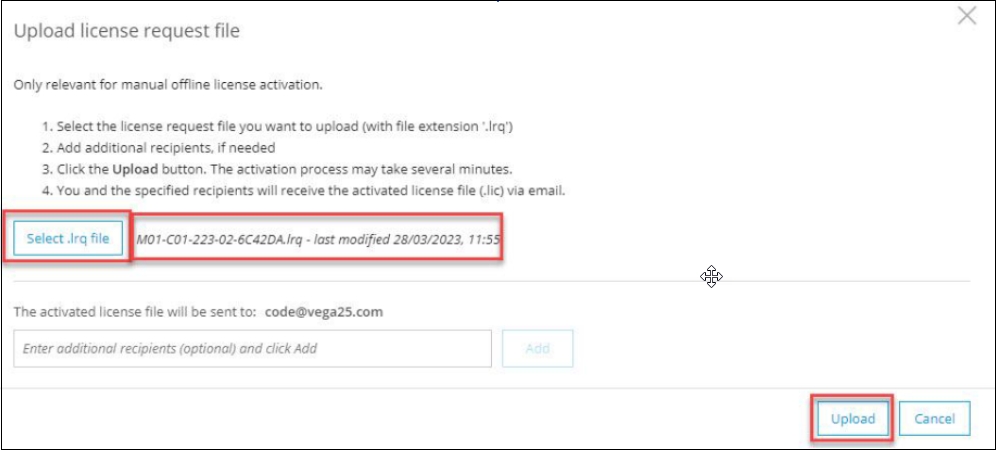

Choose Auto (pair servers) or Manual (map cameras) redundancy mode.
Restarts the SmartSync Service along with log details.
Select Restart with detailed logs from the SmartSync Settings.
Step Result: The service restarts and the advanced logging is enabled to log detailed information.
Singe Site = One Unique Database
Milestone Services and SQL are frequently clustered to ensure high availability via failover. The RMF installation varies accordingly. Use the links below to navigate to the relevant sections.
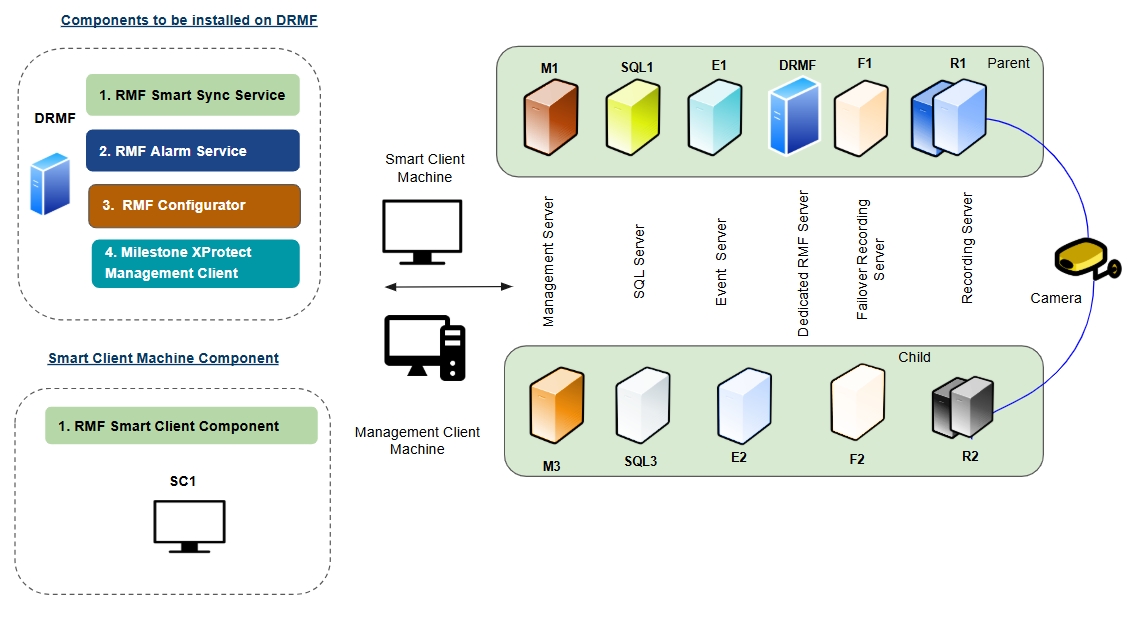
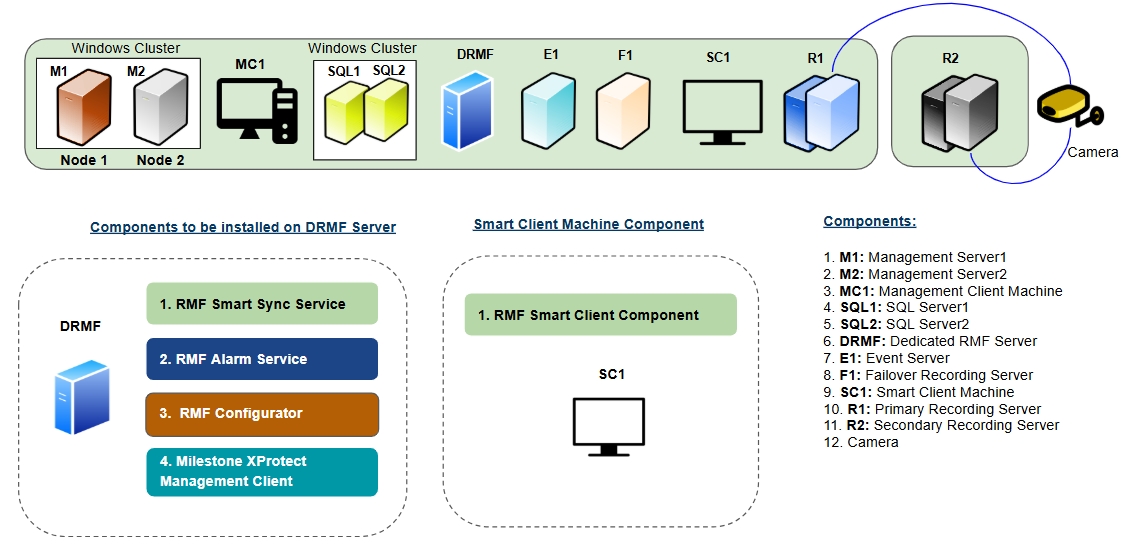
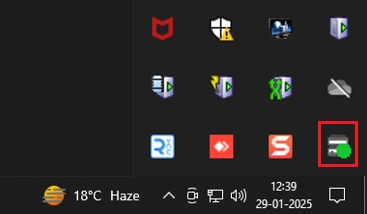
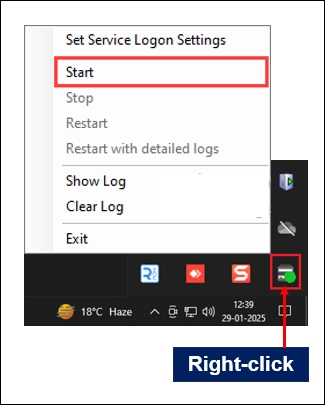
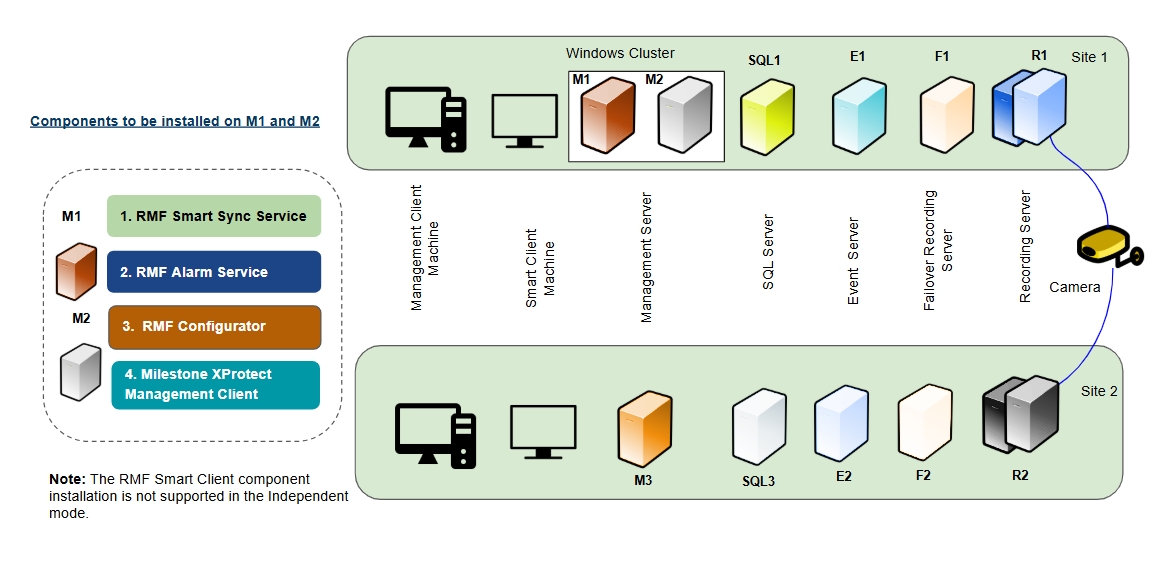
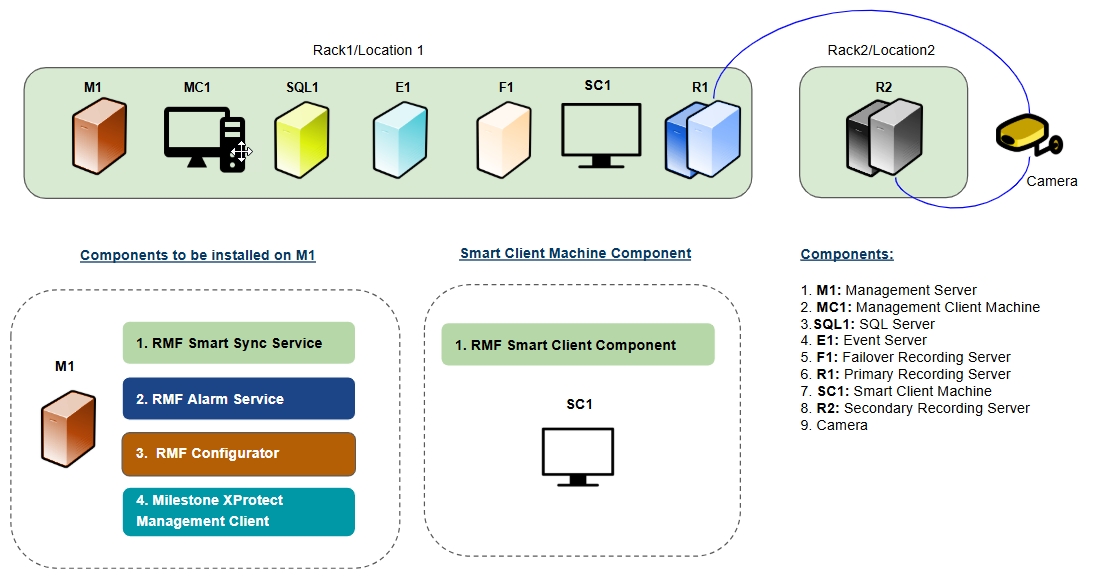
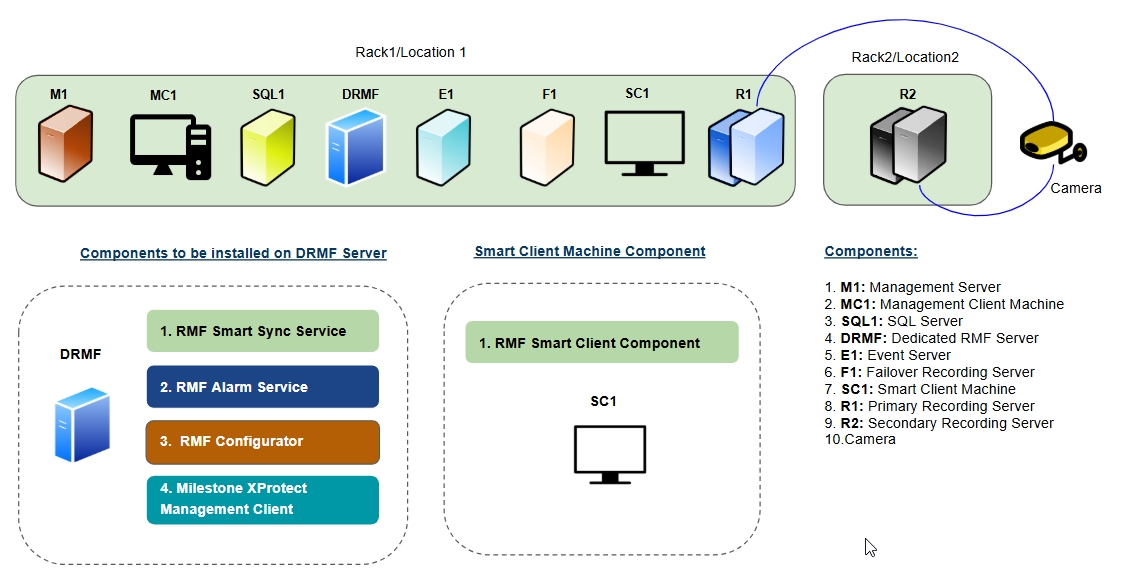
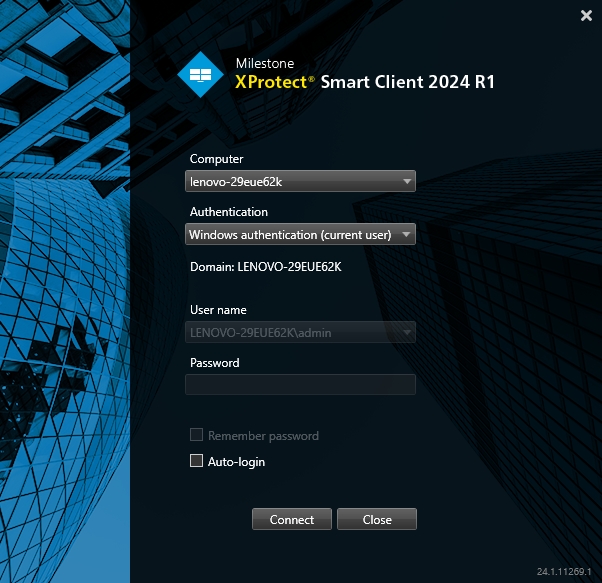
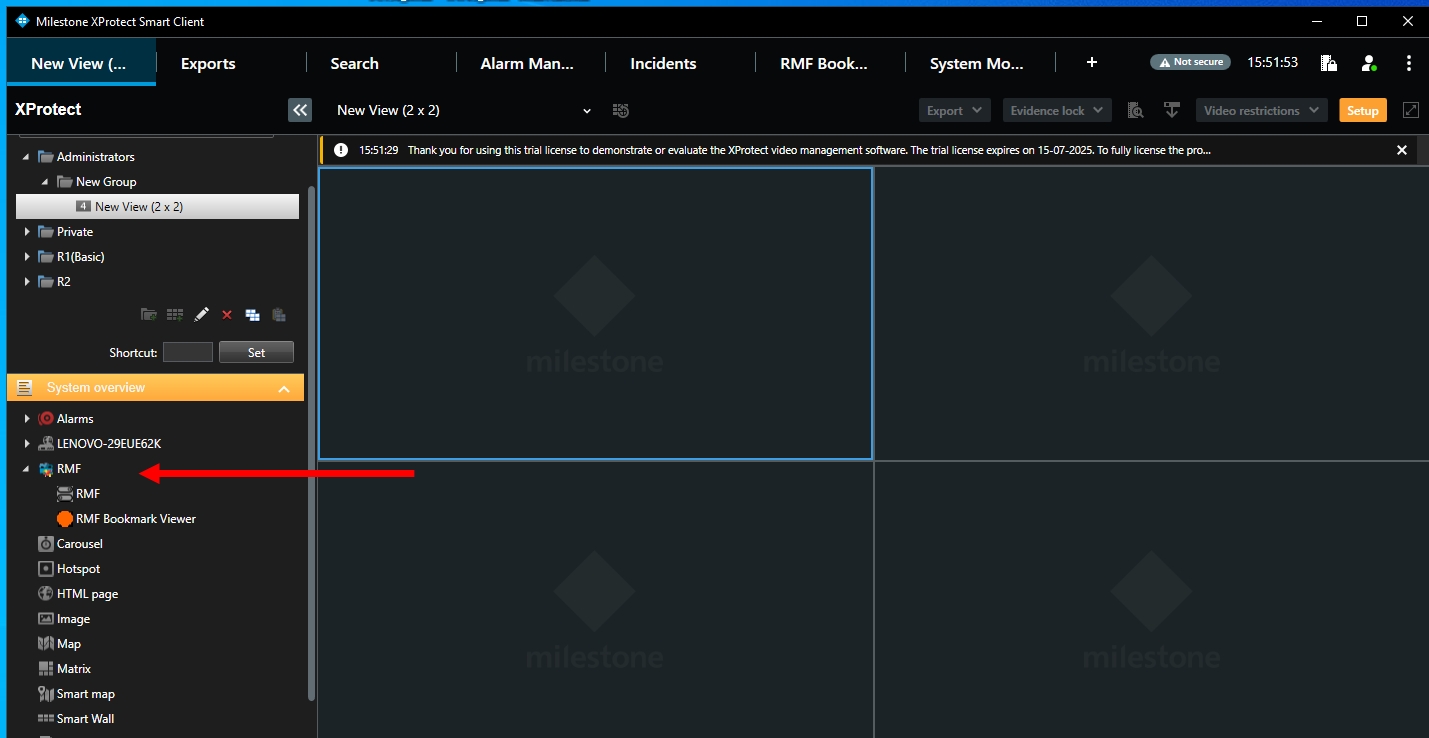
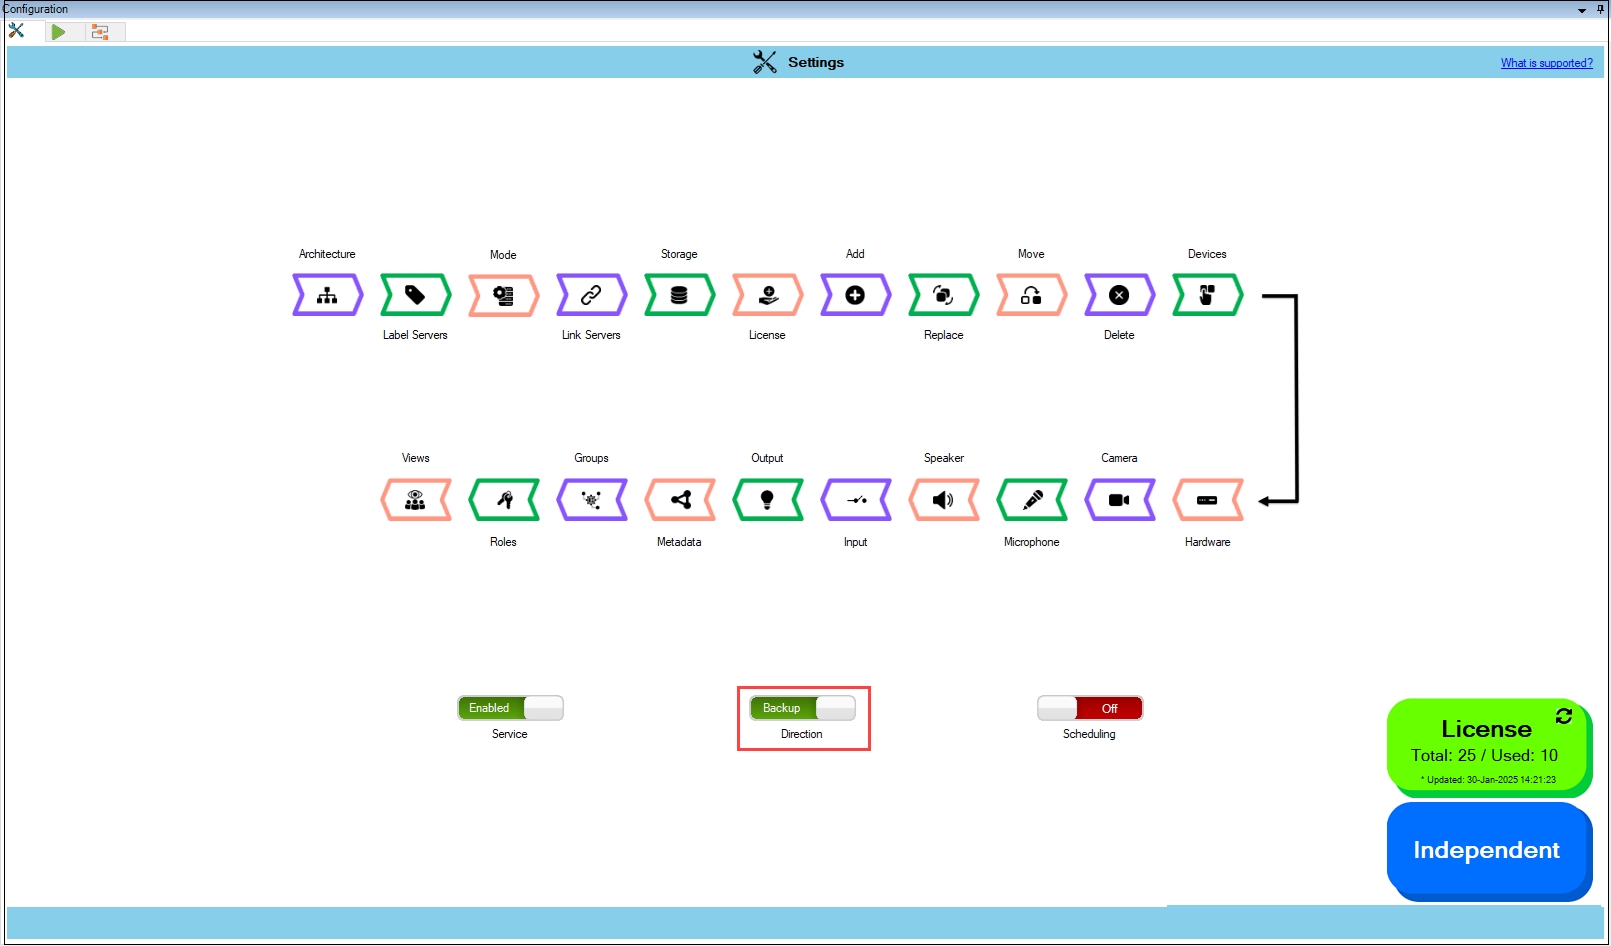
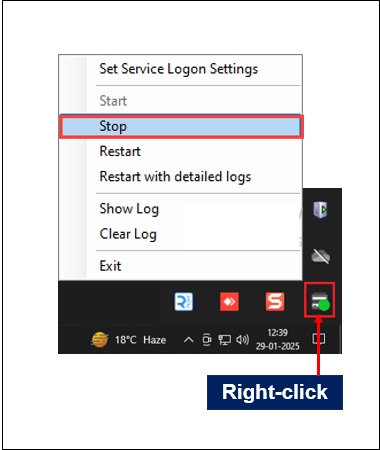
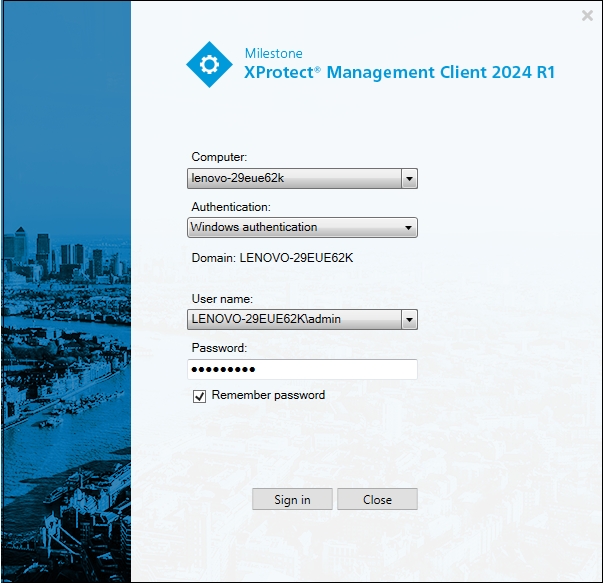
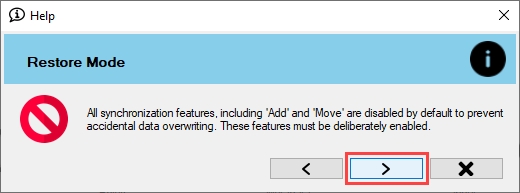
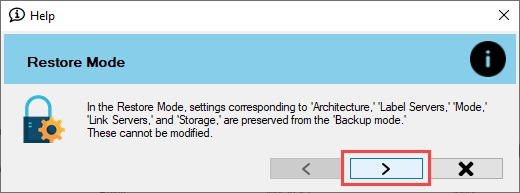
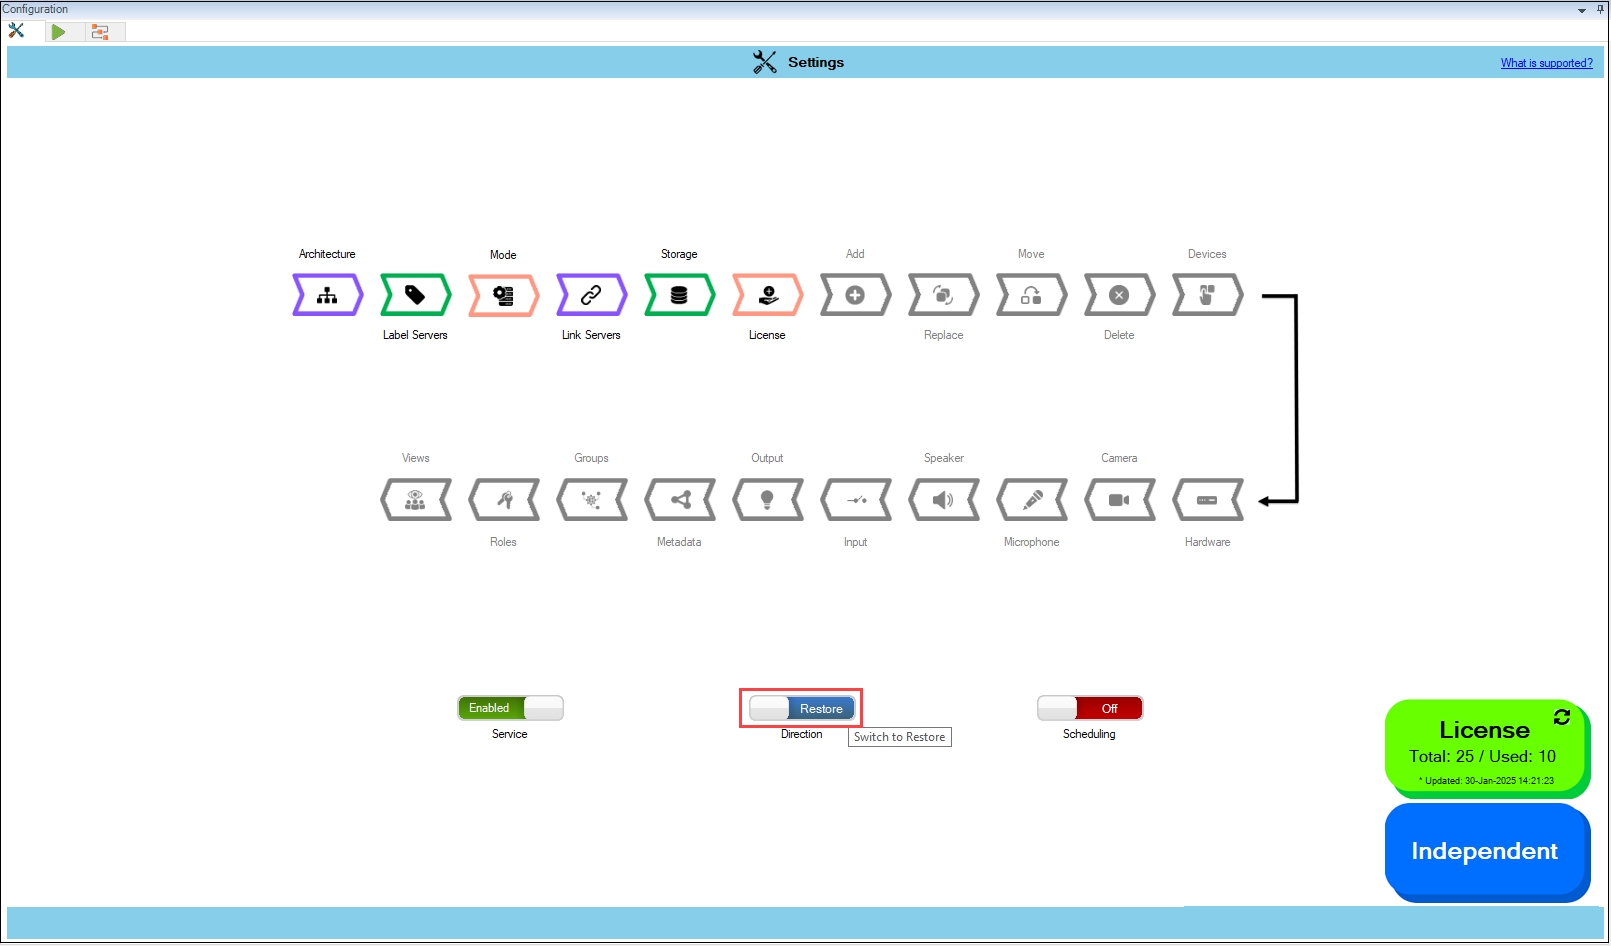
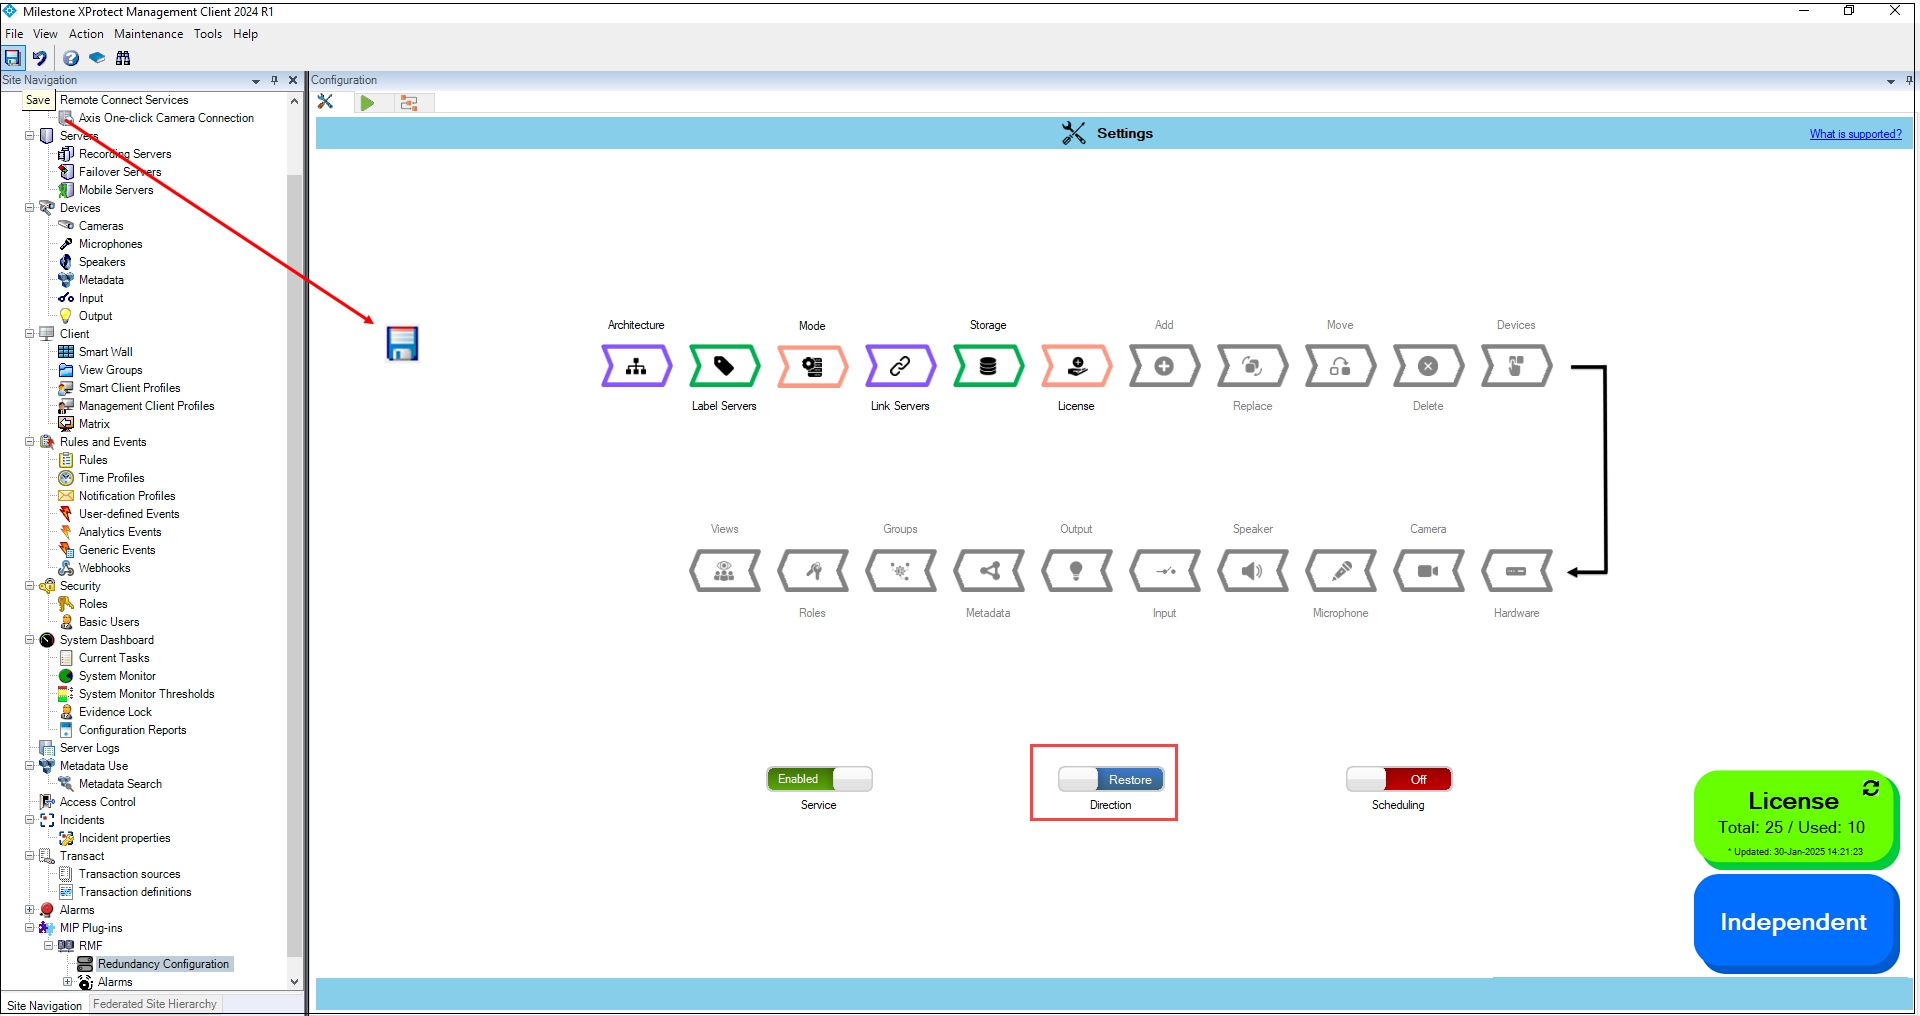
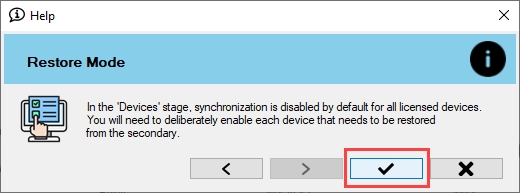
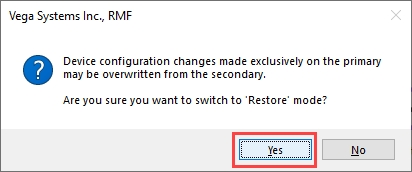

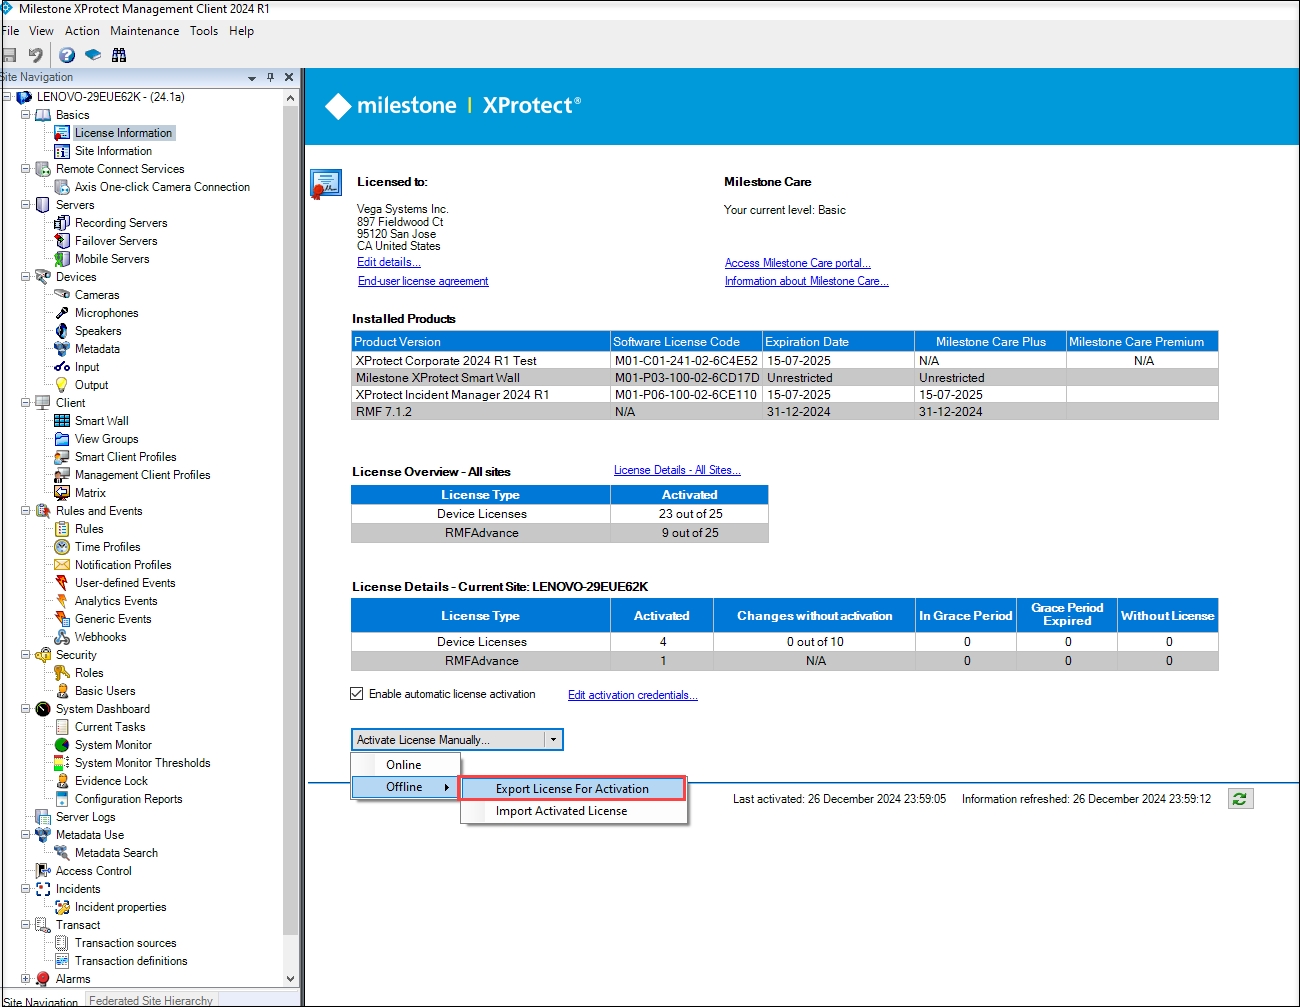
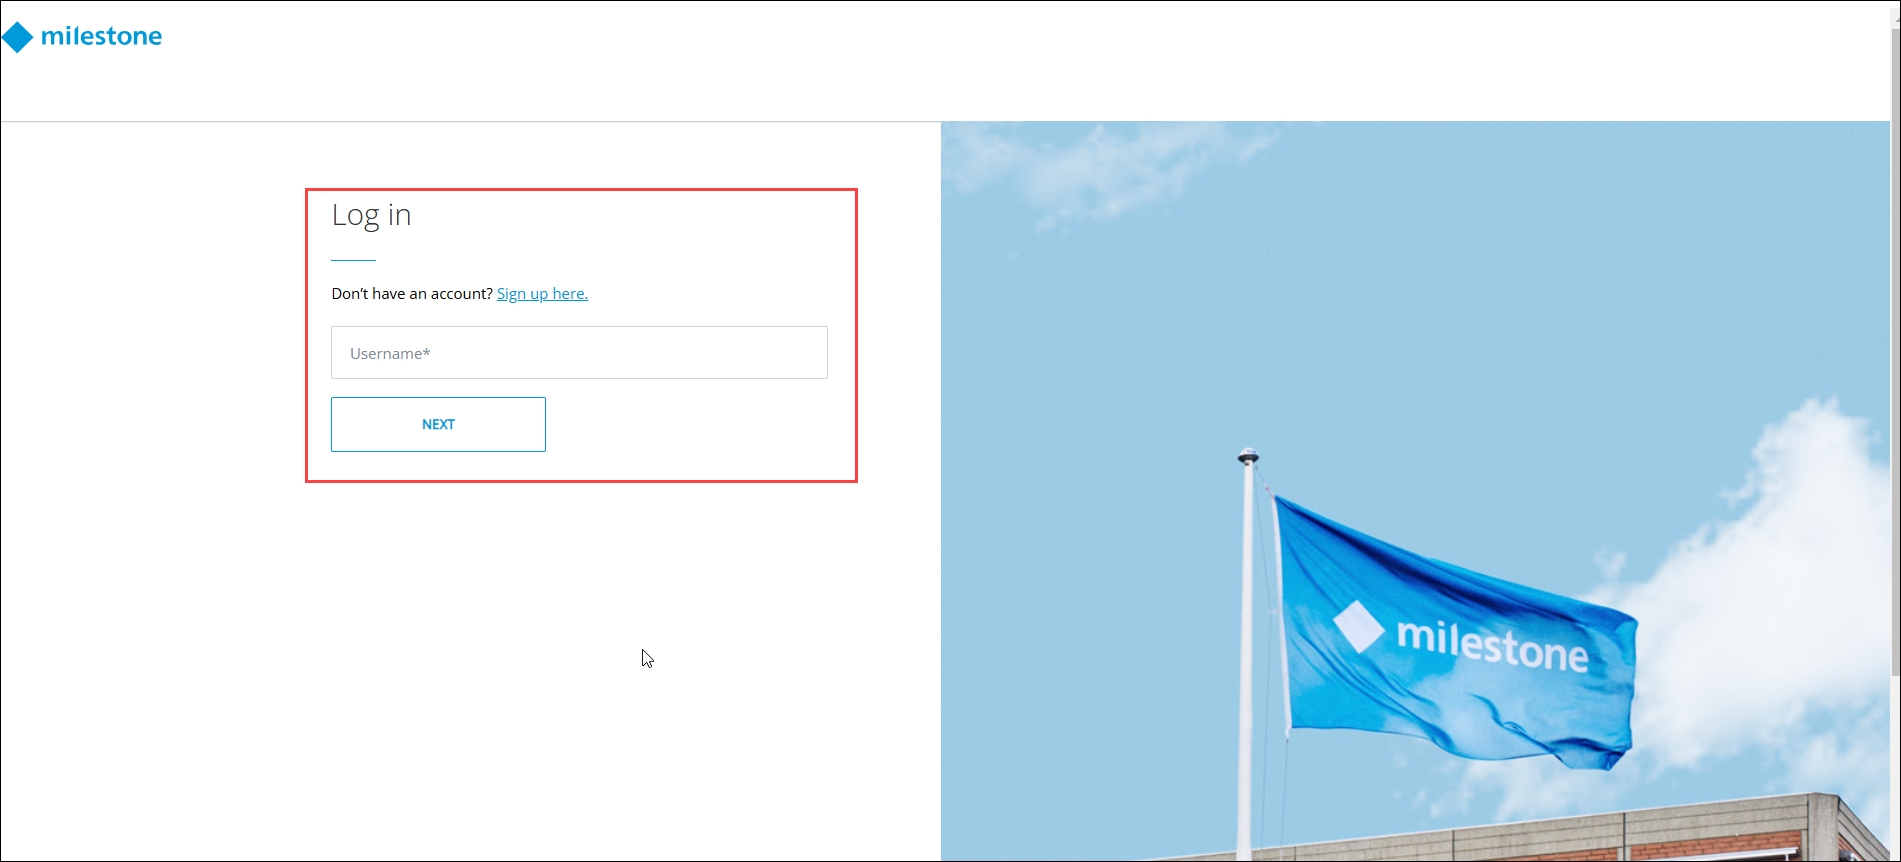
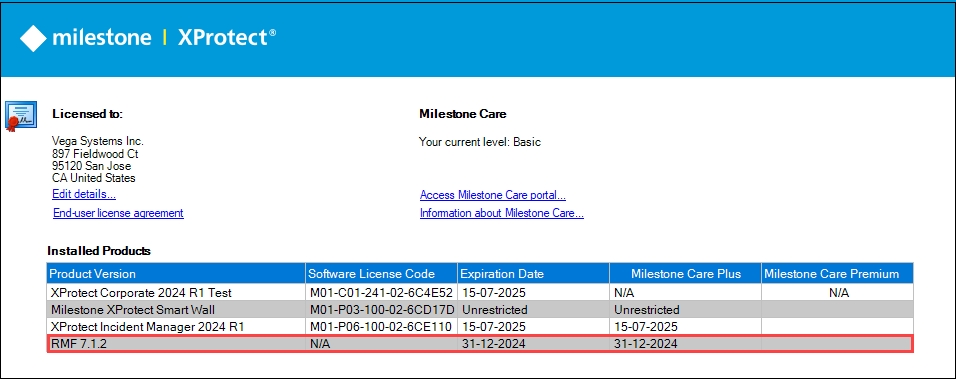
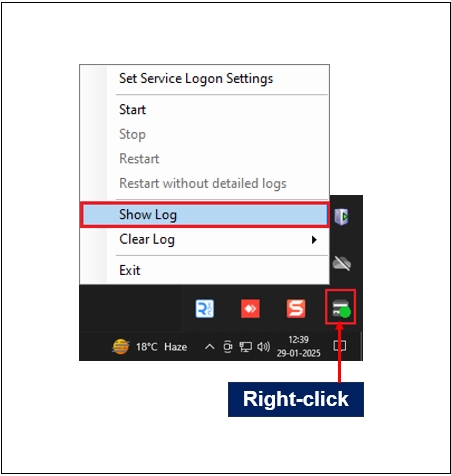
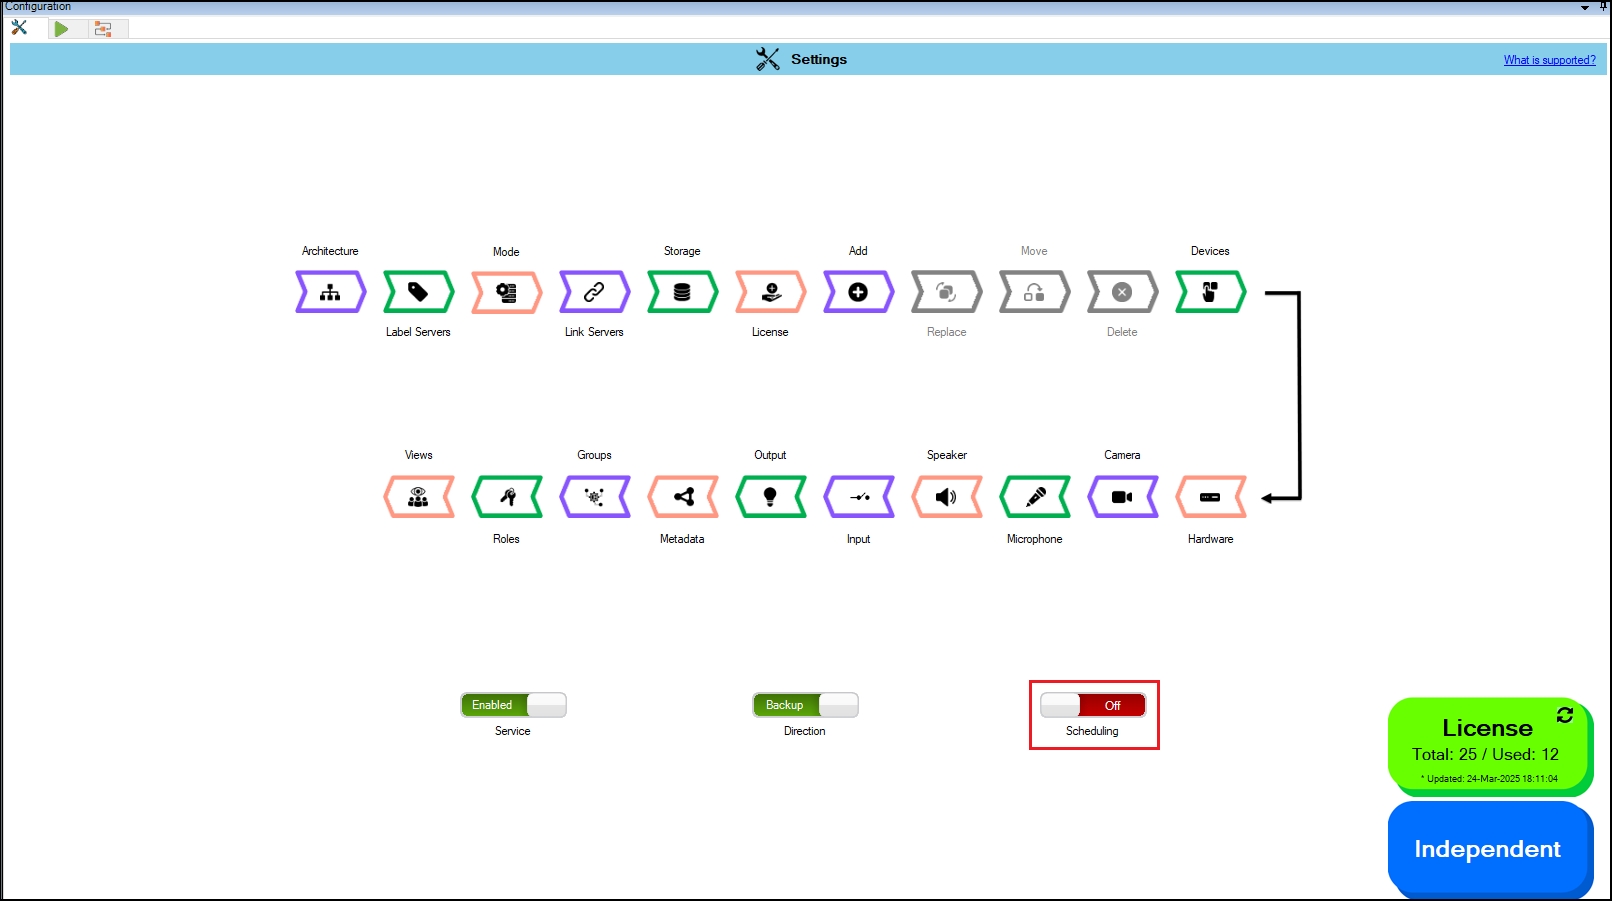
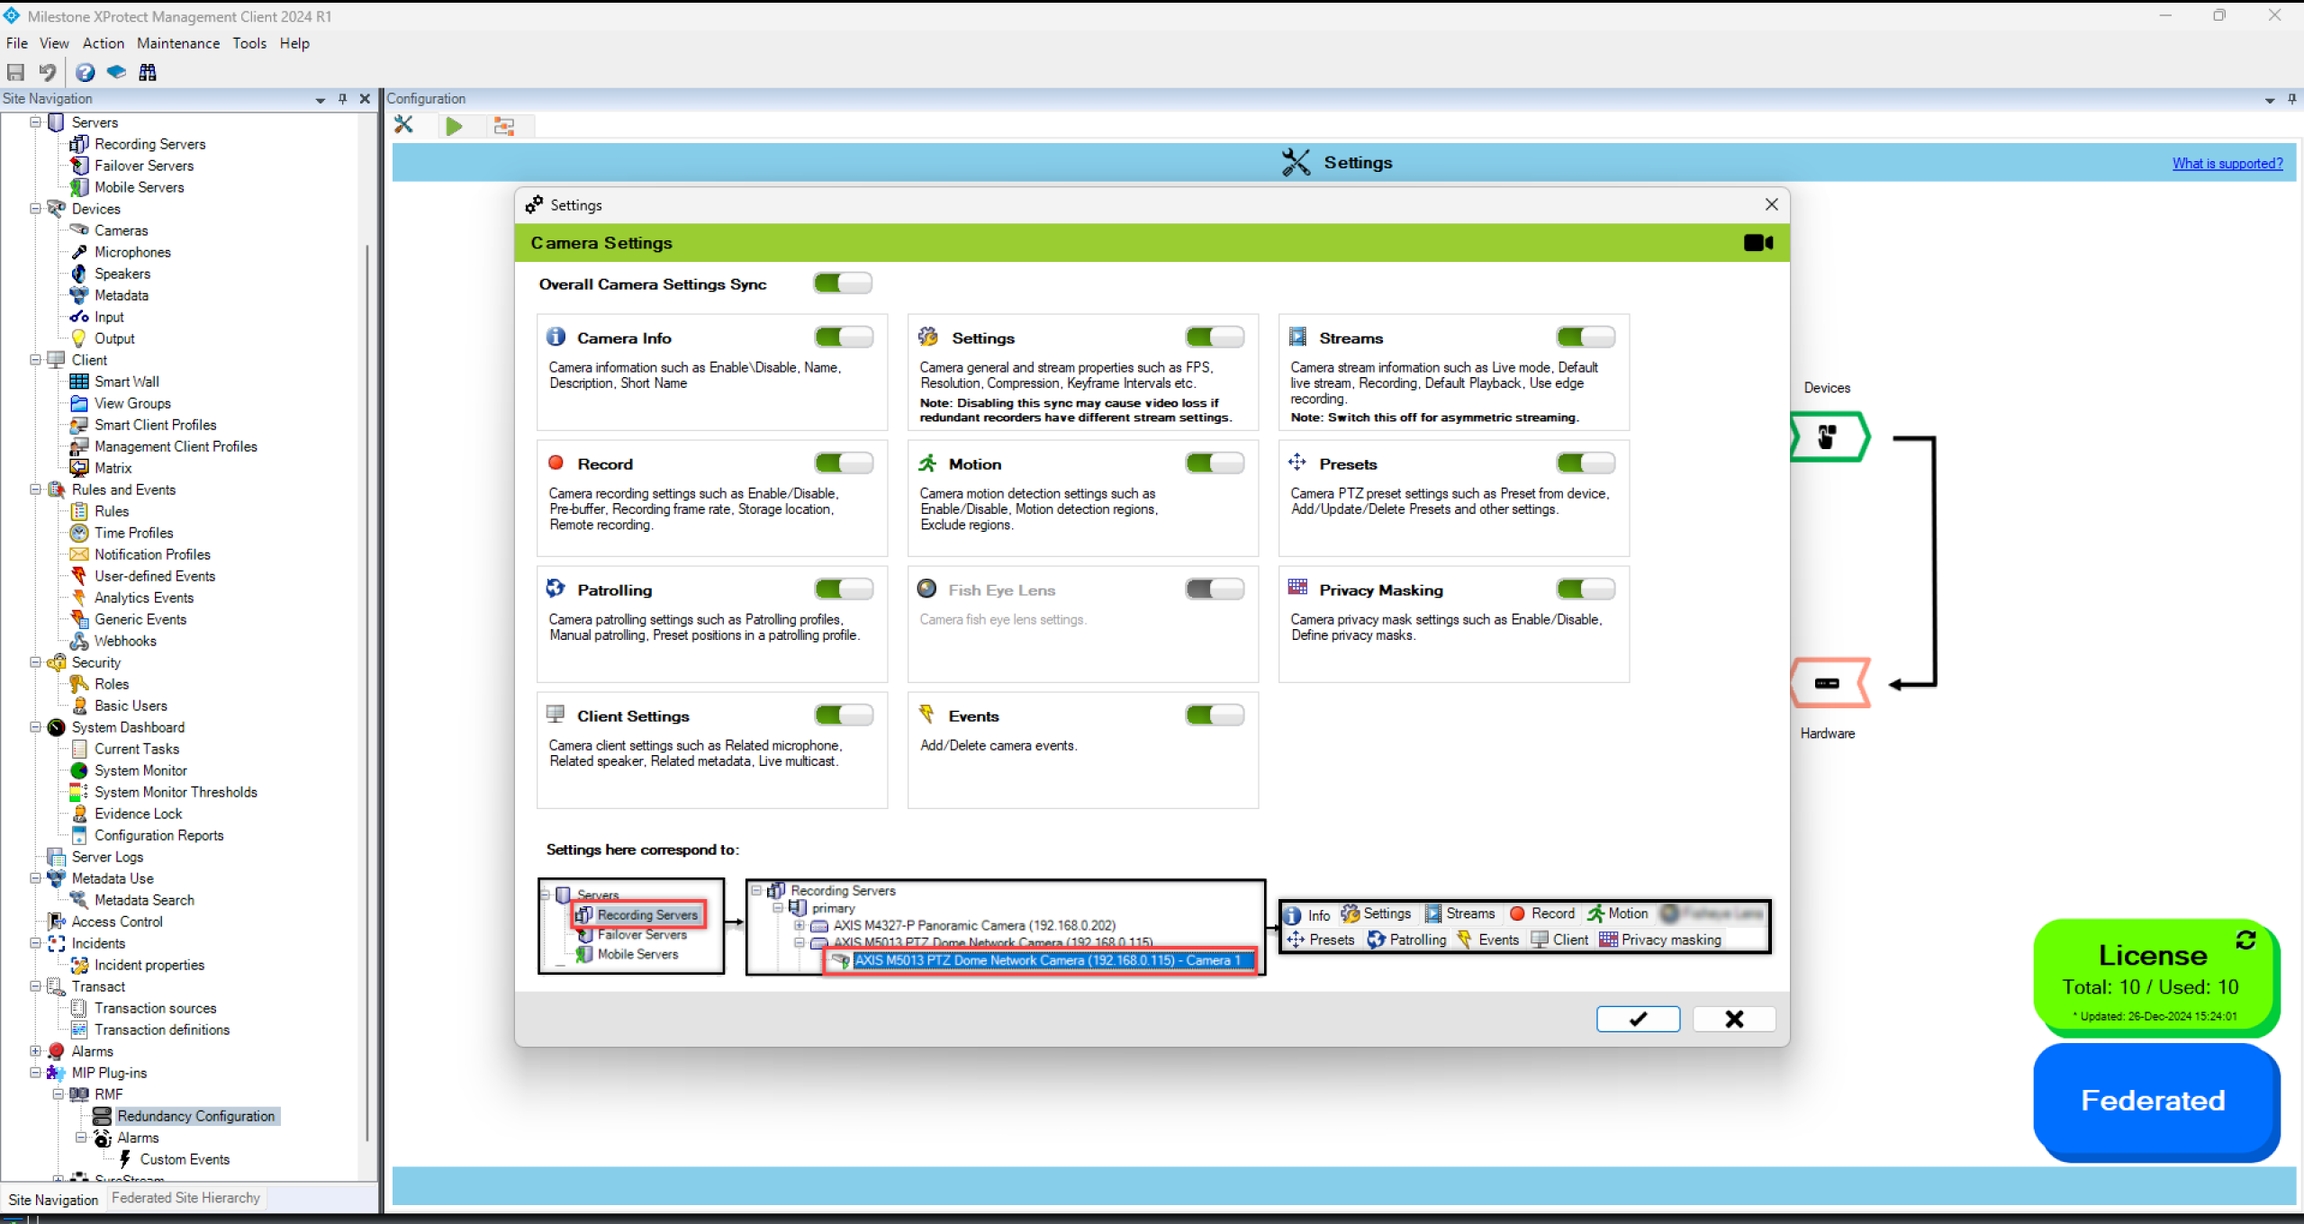

A camera must be part of a device group for an RMF license to be assignable to it.
Click the Scheduling radio button to turn it ON (). When scheduling is turned ON, the Schedule Settings pop-up window appears.
Confirm Button (✔ icon) – Saves and applies the selected scheduling interval. The system will then execute synchronization based on the specified frequency.
Cancel Button (X icon) – Closes the schedule settings window and returns to the previous/home page without saving any changes.
Help Button (? icon) - Refer to the illustrative images below. For example,
Processing Started - The system begins synchronization. Note: The processing time for each cycle may vary depending on the number of cameras distributed across the servers. A higher number of cameras could lead to increased data load and longer processing durations, while a lower number of cameras may result in faster processing times.
Processing Ended - After the synchronization process completes (for example, at 10:25 or 10:45, as shown in the picture above), the system enters an idle state.
Idle for Configured Interval - The system remains idle for the user-defined duration (for example, 10 minutes), specified in the ‘Schedule Settings’, before initiating the next synchronization cycle.
Click the Save button at the top-left corner of the page to apply scheduling settings and confirm the update. A pop-up window will appear, presenting two options for selecting when the synchronization process should begin.
Start Now
Clicking the Start Now button immediately initiates the synchronization process, overriding the scheduled time.
Useful when users want to trigger synchronization without waiting for the next scheduled run.
Start Later
Clicking the Start Later button schedules the synchronization to run at the specified date and time.
The system will execute synchronization automatically according to the configured interval.
Complete Server Labeling
Symmetric (1 primary → 1 secondary)
Every add / move / delete / replace on the primary is mirrored to its twin, and vice-versa.
Small or medium sites that want a “hot spare” mirror—e.g., a campus data-centre where each recording server has a dedicated twin in a nearby rack.
Asymmetric (M primaries → N secondaries, M>N)
Backup: add / move / delete / replace mirrored to the pooled secondary. Restore: only delete and replace are mirrored back from the secondary.
Multi-branch organisations that funnel many branch recorders into a few big DR boxes—e.g., 40 retail stores replicating to two core recorders at HQ.
Auto Mode is best when your redundancy design is already server-level and you want SmartSync to keep entire recorders in lock-step with minimum manual effort.
Manual Mode ignores recorder boundaries and works camera-by-camera:
You choose a secondary for each camera.
Delete and replace actions stay mirrored both ways.
Add and move are not auto-synced—you decide when and where to remap them. Add and Move Cameradevice management blocks disappear from the Configuration Dashboard if this mode is selected.
Typical use case: A retail chain has 40 critical cameras watching cash drawers and main entrances, scattered across eight recording servers. Company policy states that the 40 streams must be stored for two years on a high-capacity recorder at headquarters, while the other 800 cameras require the standard 30-day backup on local DR servers. Manual Mode allows you to route only those 40 important cameras to the long-retention recorder, leaving everything else on the standard pool—saving licenses, storage, and bandwidth without having to restructure your primaries.
Note: Manual mode is supported starting RMF versions 7.2.1 and beyond.
To select the mode, follow these steps.
Select Mode to pair servers and manage devices.
Step Result: The following screen appears. Click the Help icon for additional information.
'Auto Mode' is selected by default.
Click on the '?' to learn more.
To switch to manual mode, toggle the button.
Per-object replication control allows administrators to control the replication of objects and limit blast radius.
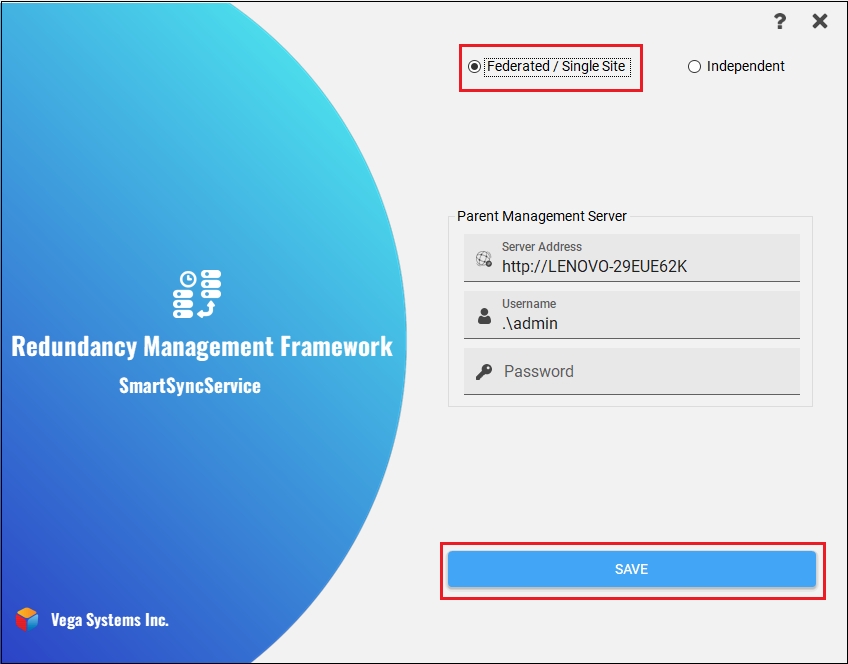
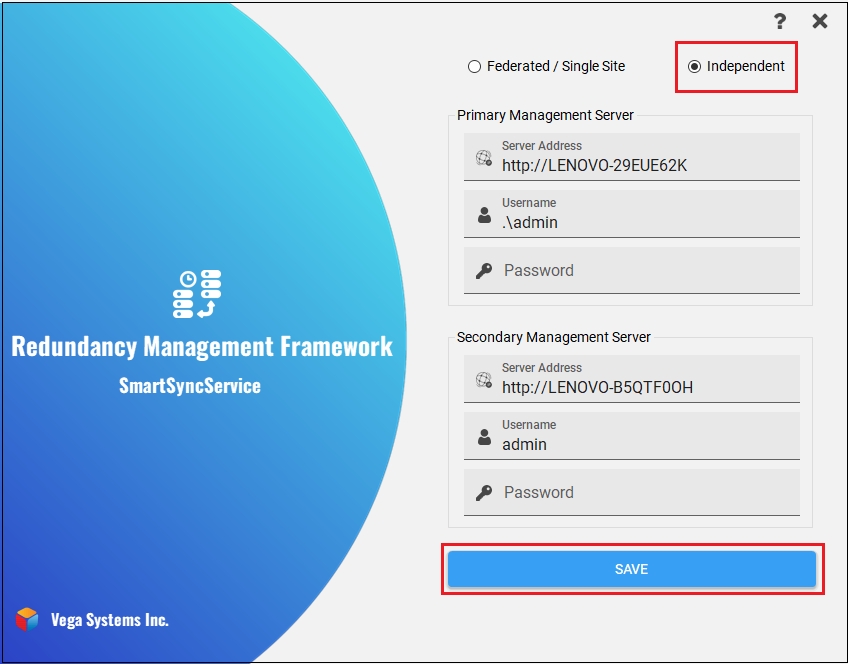
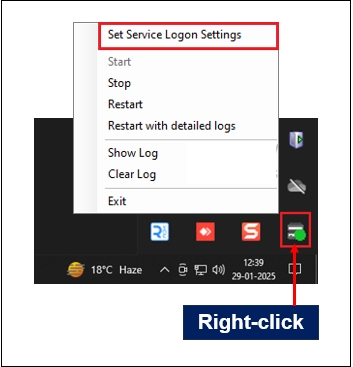
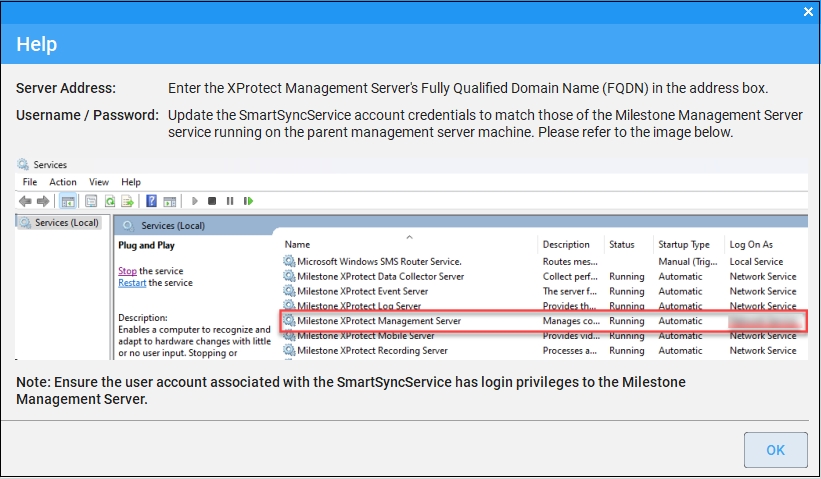
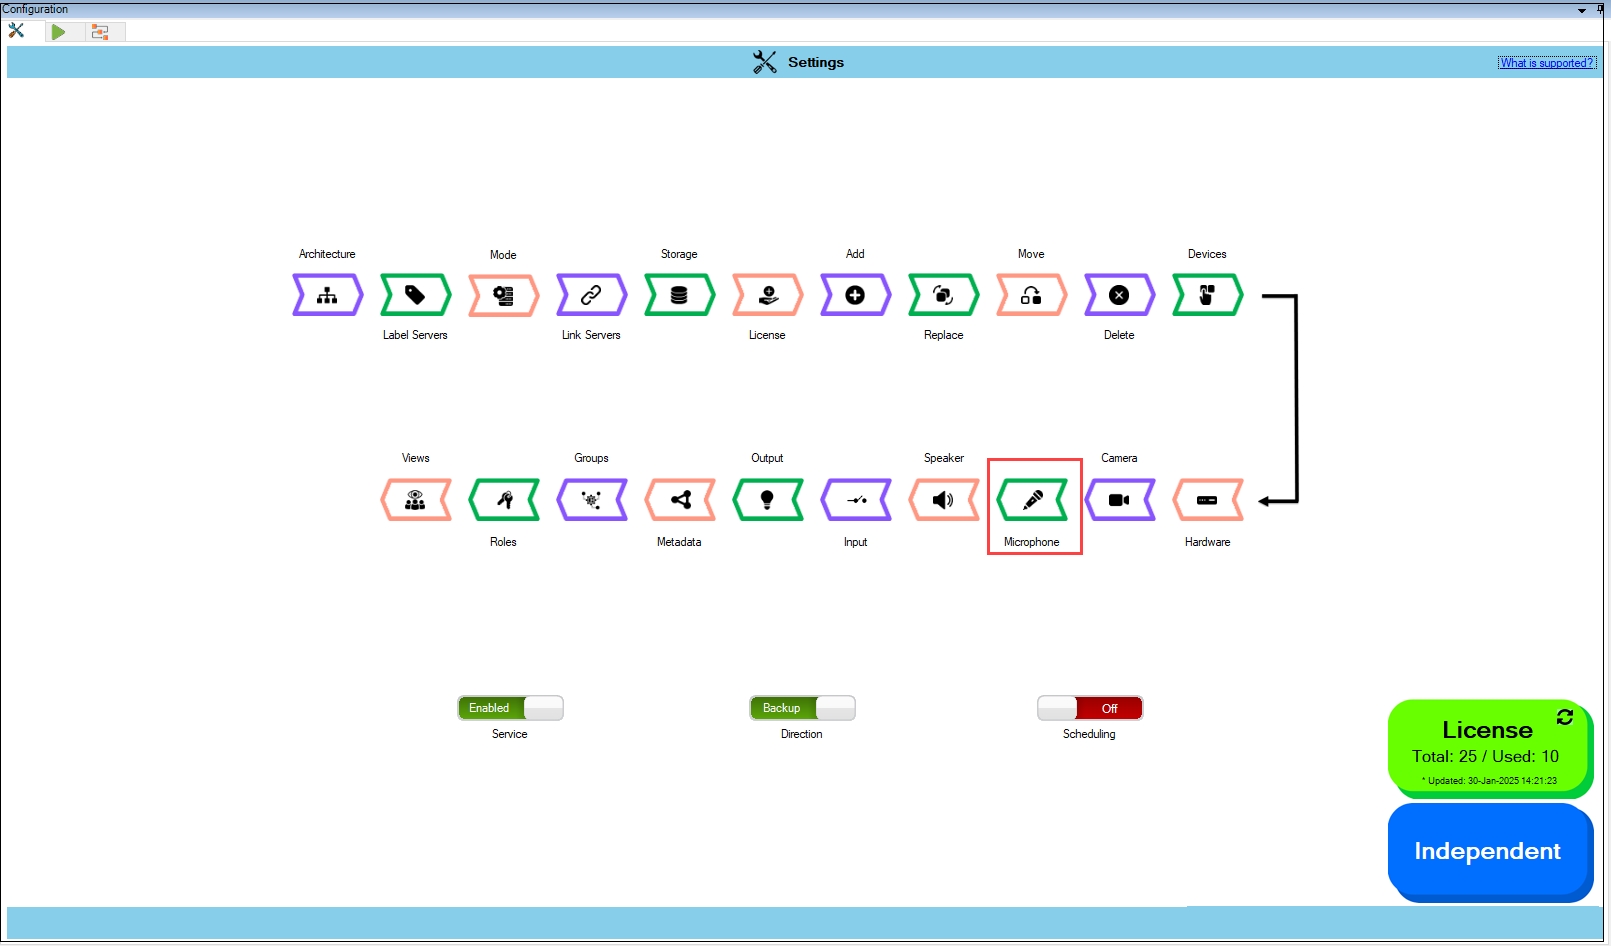
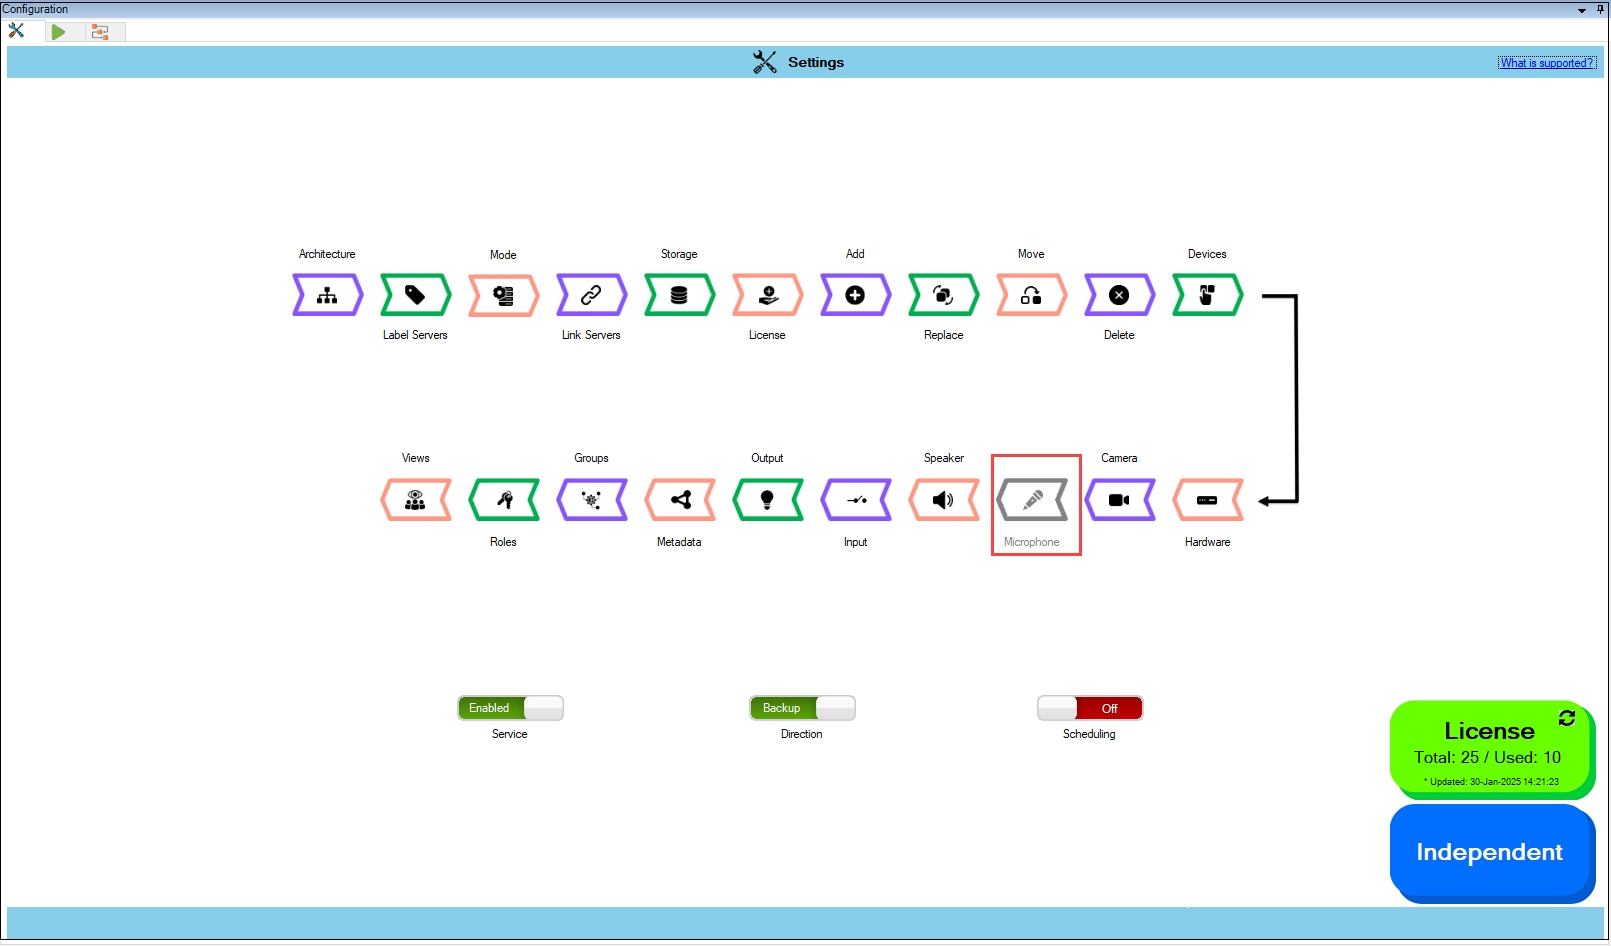
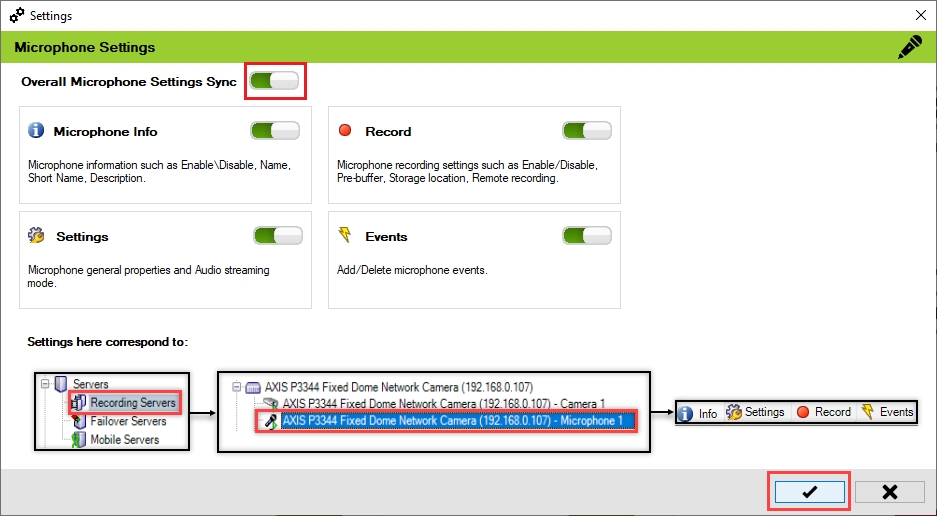

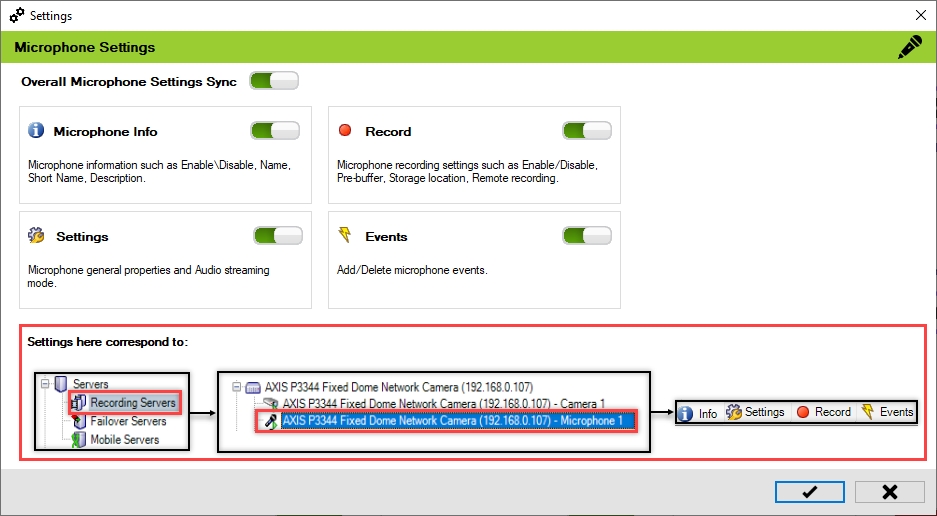
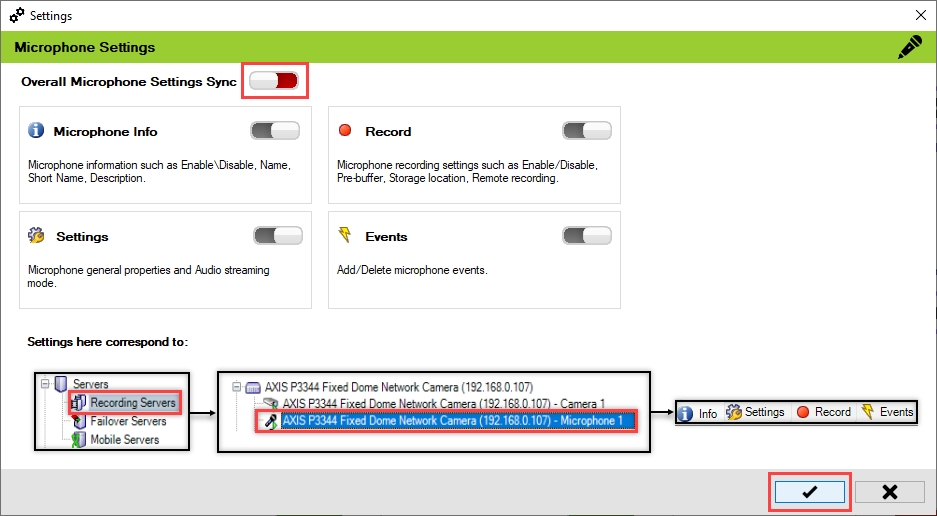
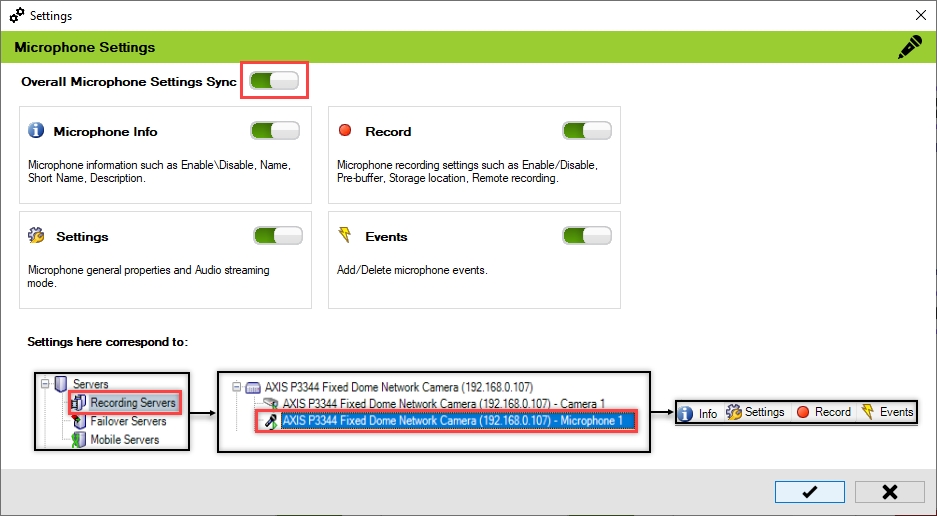


Follow these instructions if you have two separate XProtect deployments, each with its own, independent Management Servers and SQL servers, and the sites are not federated.
Perform the following steps for an Independent architecture:
Select the Independent architecture option.
For First-time configuration, the following screen will appear.
For subsequent architectural changes, click the Architecture button on the following screen.
For more information, click the Help icon.
Choose the architecture that represents the XProtect deployment at the site. In this scenario, select Independent.
Click the tick mark at the bottom of the screen to save the architecture.
Click Yes to confirm.
Click the Save icon in the top left corner of the Milestone toolbar to apply the changes.
Step 1: Navigate to System Tray -> Right-click SmartSyncService -> Set Service Logon Settings.
Step 2: Select Independent.
Step 3: Provide the credentials. Click the Help icon for more information.
Step 4: Click Save to save the configuration.
Click OK.
Click OK.
Verify that the Independent architecture type has been configured successfully. The selected architecture will be displayed at the bottom right.
Synchronize device groups.
Enabling this feature causes synchronization of device groups of all types between the primary and secondary data centers.
The scope is limited to RMF-licensed devices selected by the block and encompasses the features listed under the "Settings here correspond to" section in the picture below. The direction of synchronization depends on the direction setting. See .
To synchronize the device groups, perform the following steps:
Click Groups.
Step Result: The Groups Settings screen appears. All device groups are enabled by default.
Click the Save button to continue.
Click Save in the Milestone toolbar to save the changes.
To turn off the synchronization of groups:
Move the toggle button to display red and click the Save icon.
Click Save in the Milestone toolbar to save the changes.
If all group settings are disabled, as shown in the following screenshot, then the Groups option in the configuration screen is also disabled.
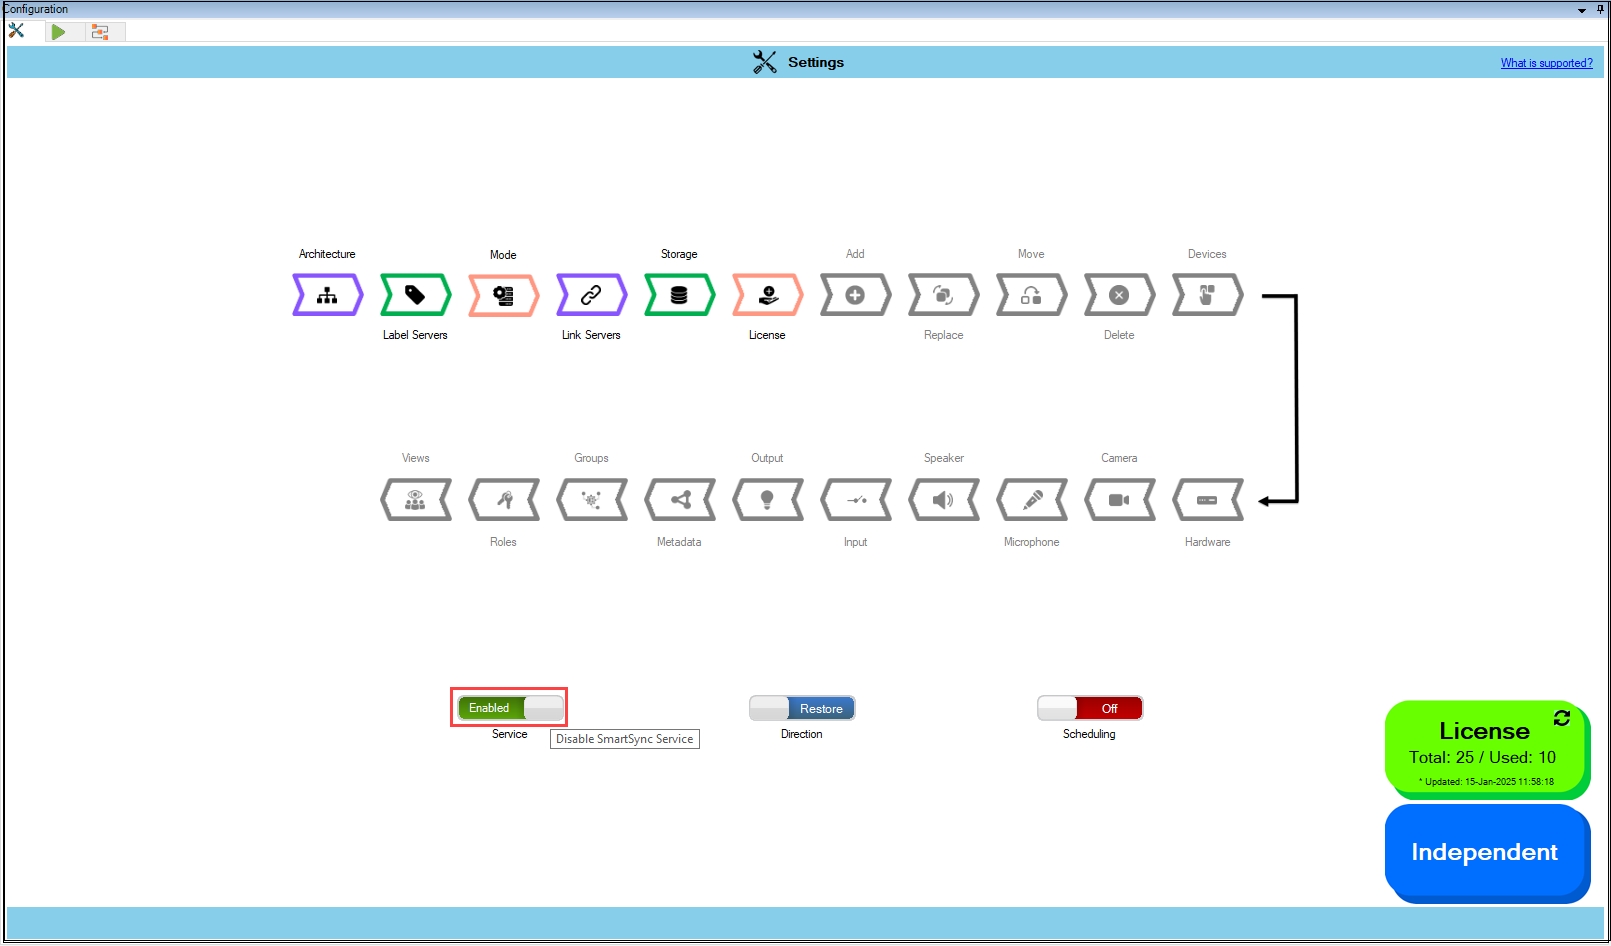
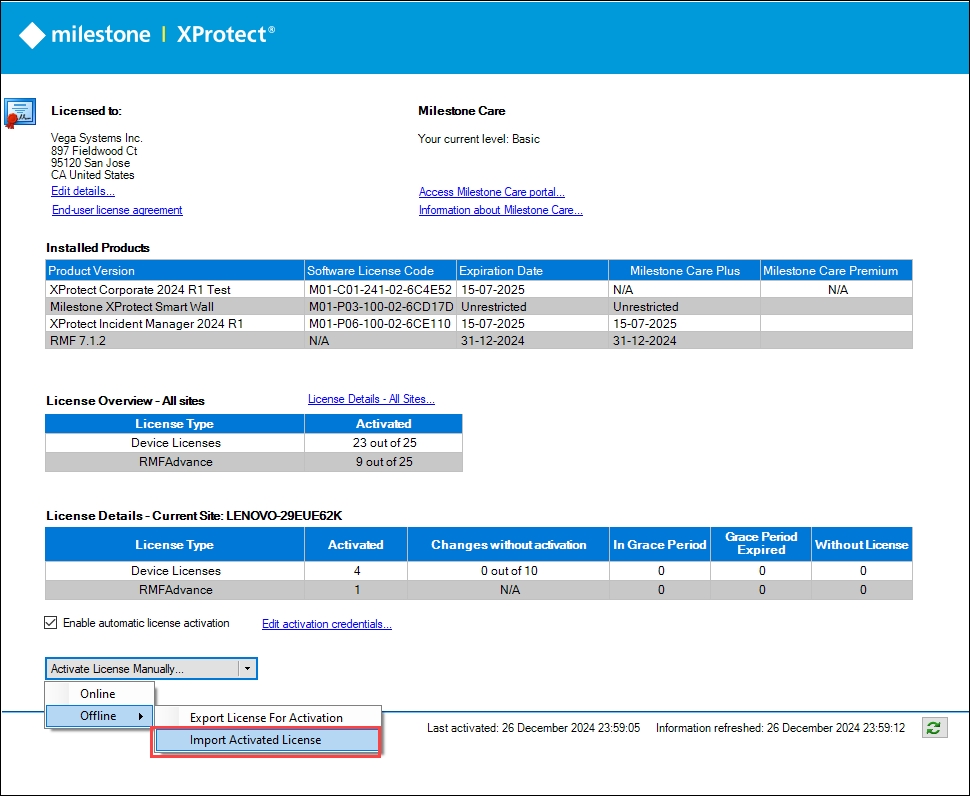
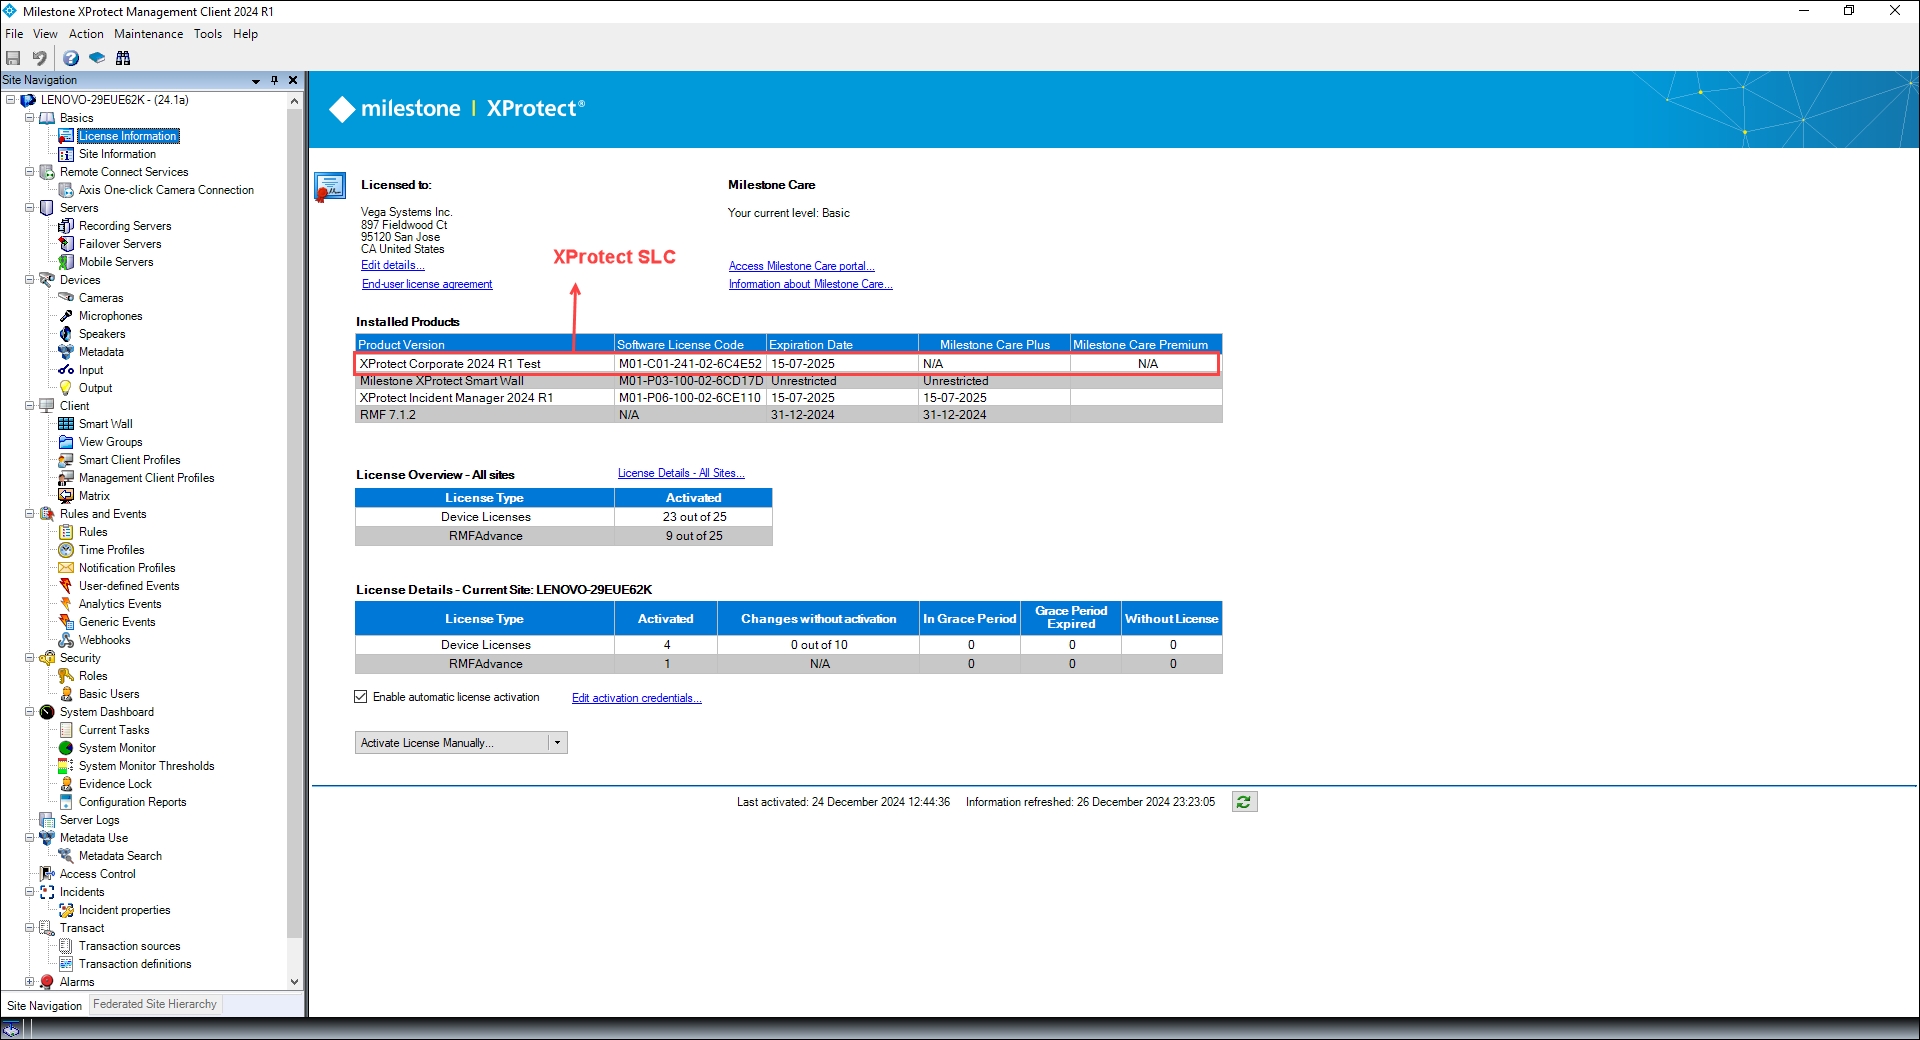
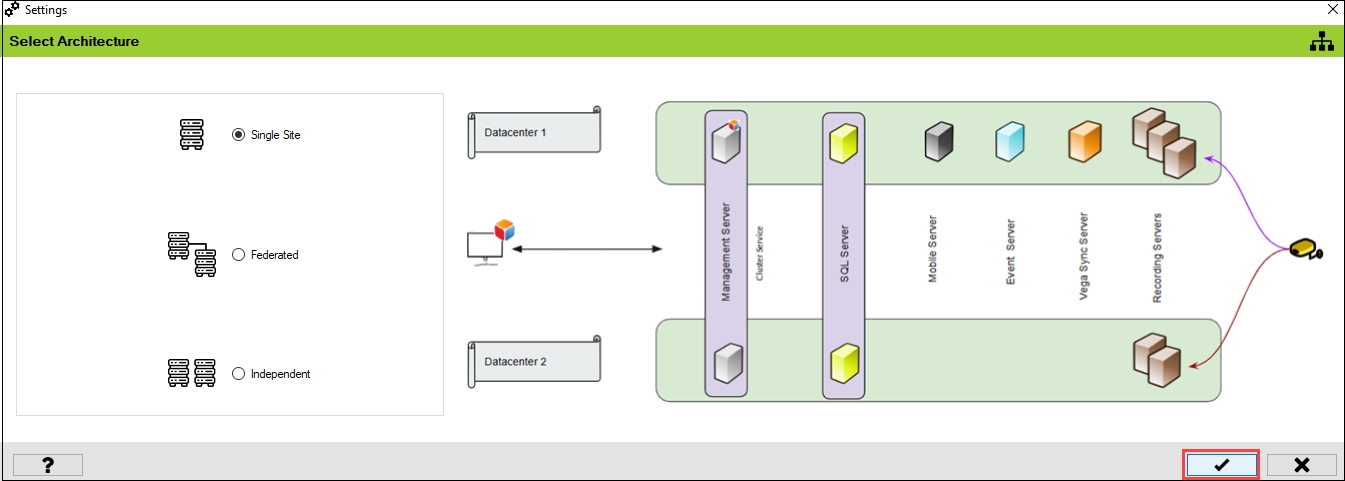
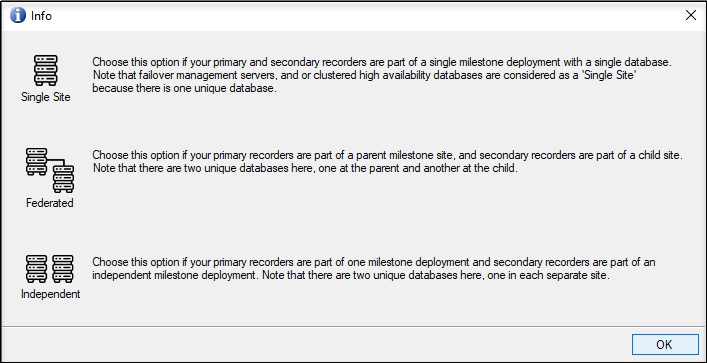
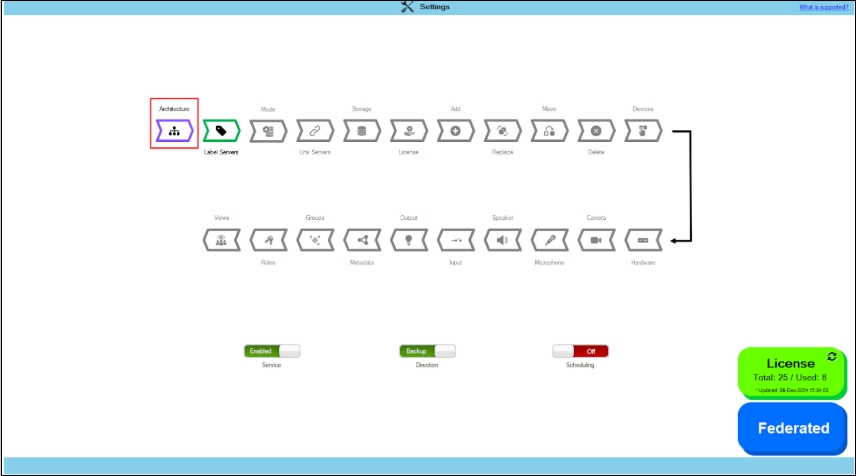
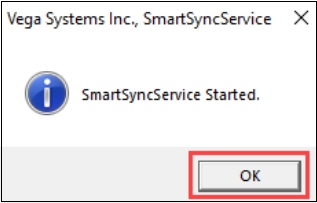
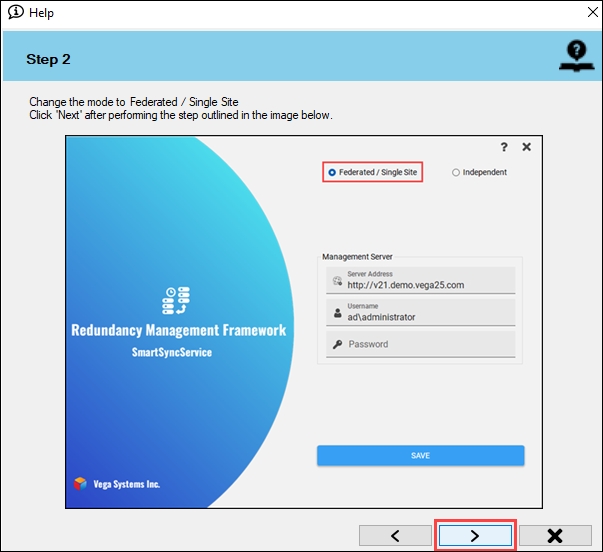

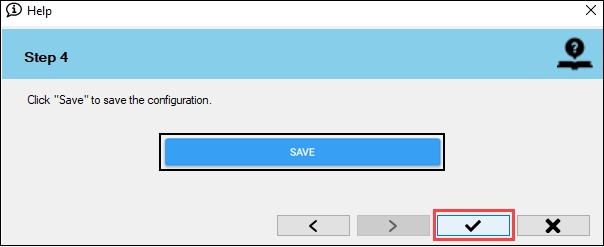
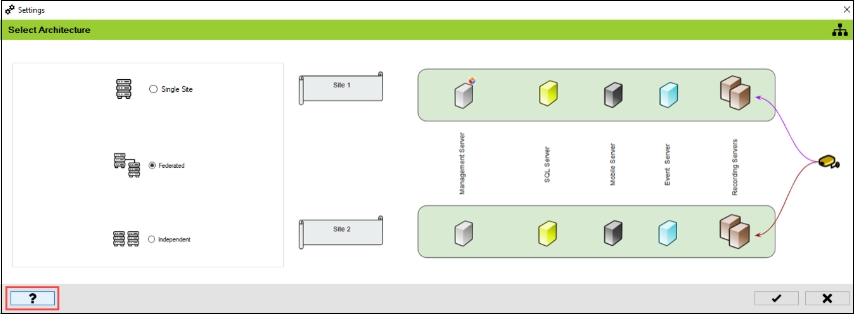
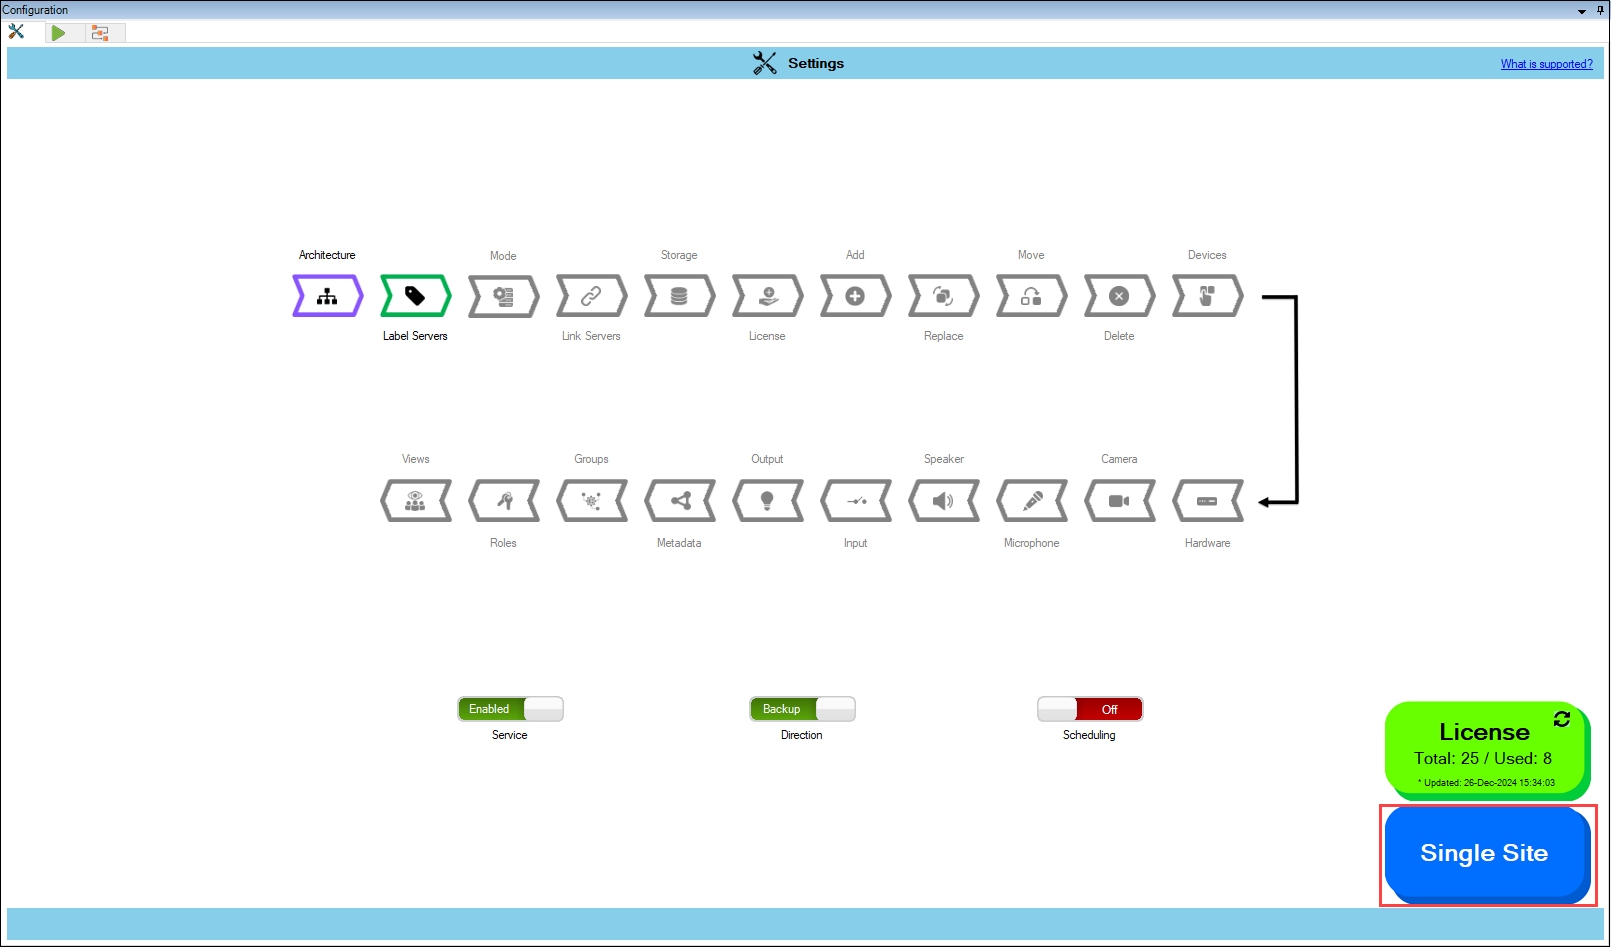

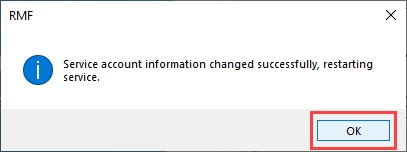
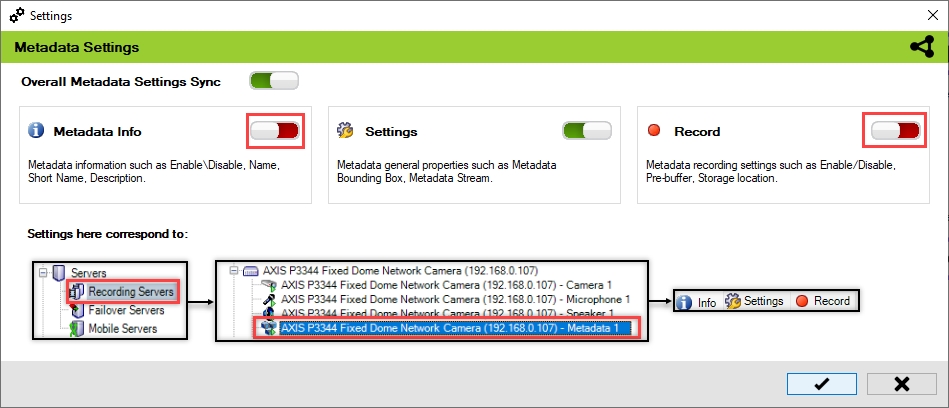


Set RMF to reflect the XProtect Architecture at your site.
Launch the Milestone XProtect Management Client application as an administrator on the machine where the RMF services are installed.
Log in to the Management Server as a user with admin privileges.
RMF Manual uninstallation procedure.
Perform the following steps to uninstall RMF:
Navigate to the Control Panel on the local machine and click Open.
Select Programs and Features.
Precision Synchronization for Hardware Settings
Each hardware device could contain one or more cameras, speakers, microphones, inputs, outputs, and metadata streams. Use this block to control which hardware properties are automatically synchronized by RMF. Such settings correspond to IP addresses, passwords, device-level event definitions, hardware names, etc.
Quick Tools to run specific synchronization tasks
Workflows in the RMF configuration interface are predefined tools or modules that simplify and guide administrators through specific configuration and synchronization tasks between primary and secondary data centers.
The RMF synchronization service is the automated workhorse for scheduled, hands-free synchronization. However, sometimes administrators need to run specific parts of the synchronization process manually for quick updates.
Switch to Backup Mode.
In this mode, the RMF SmartSync service copies changes from the primary site to the secondary site. During the initial configuration, set the sync direction to Backup Mode.
Move the Direction toggle button to display green.
Click Yes when the confirmatory dialog box appears.


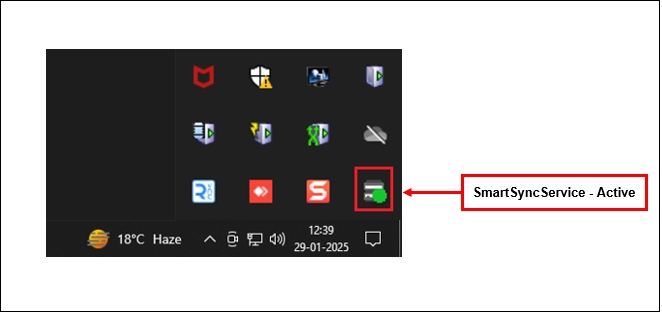

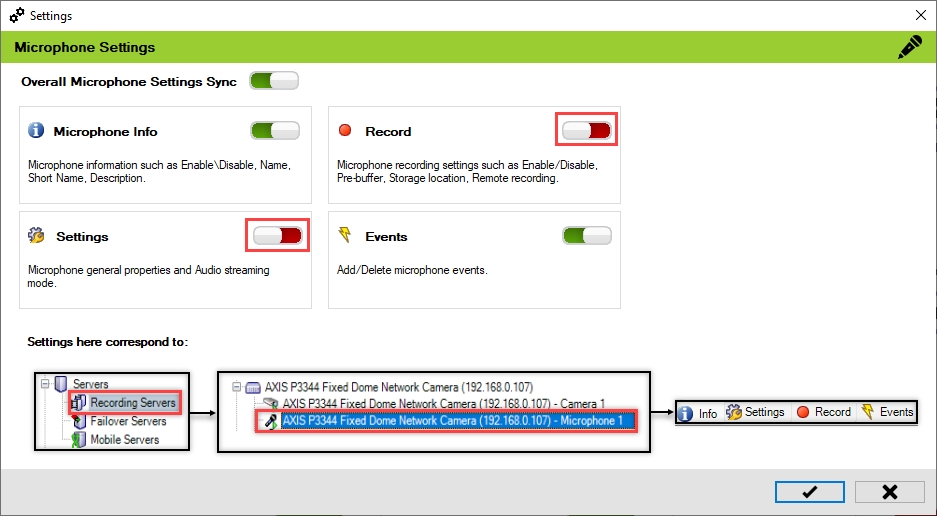
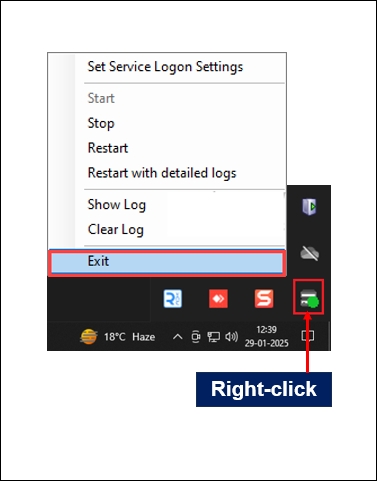
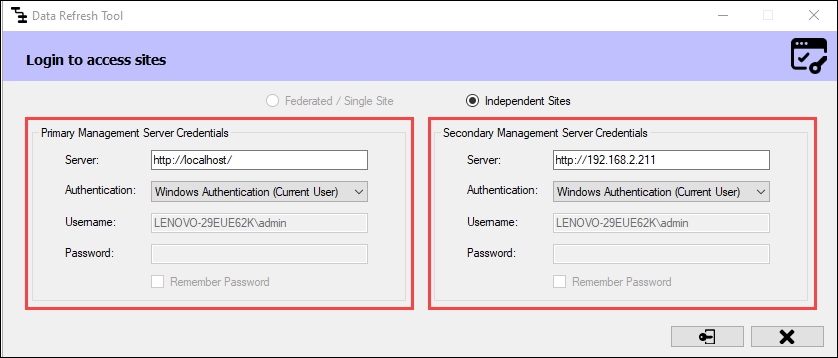
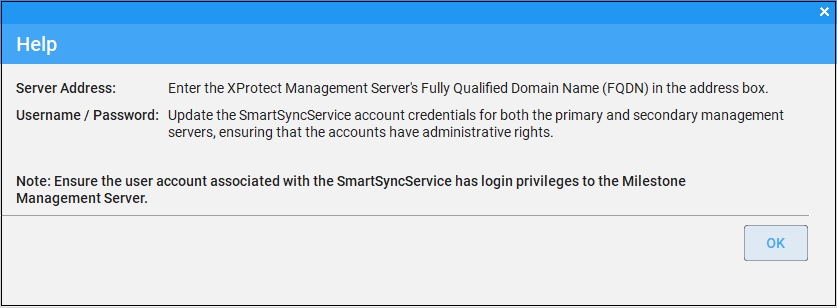
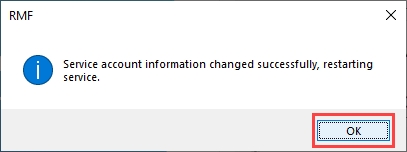
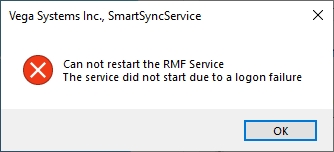

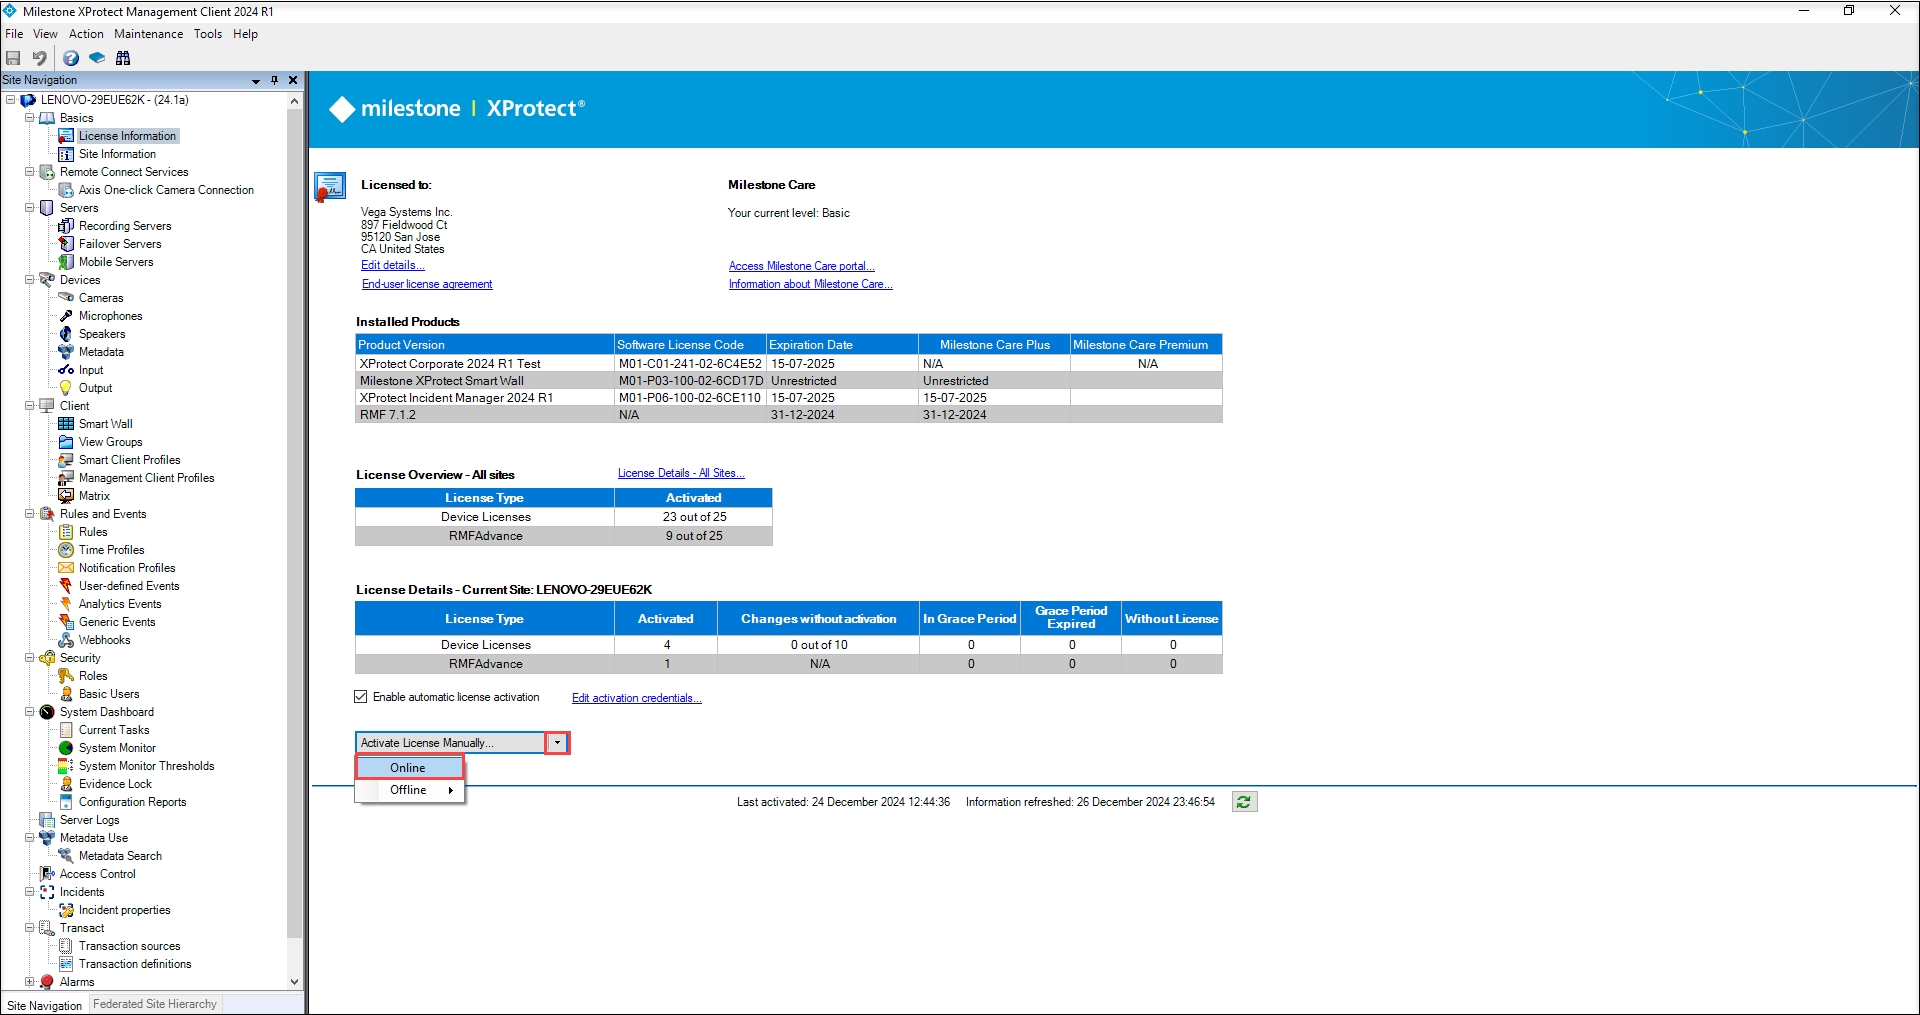

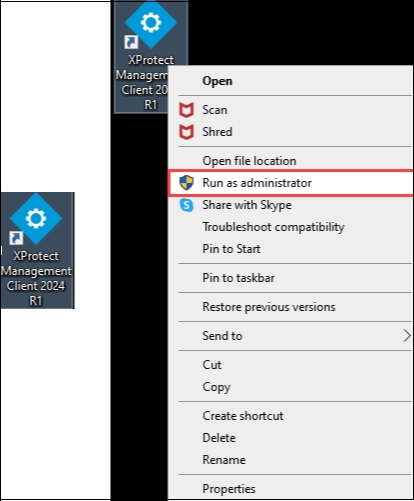
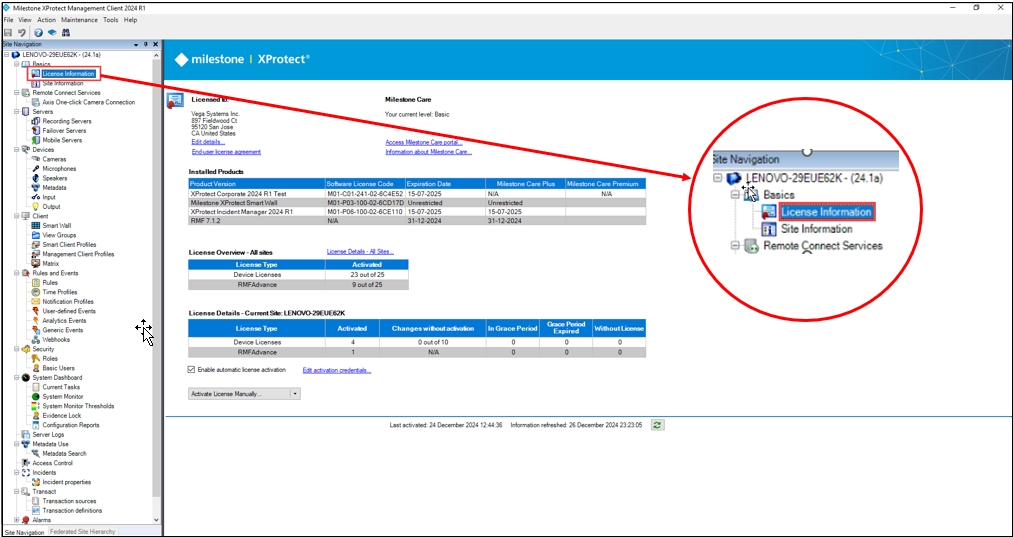
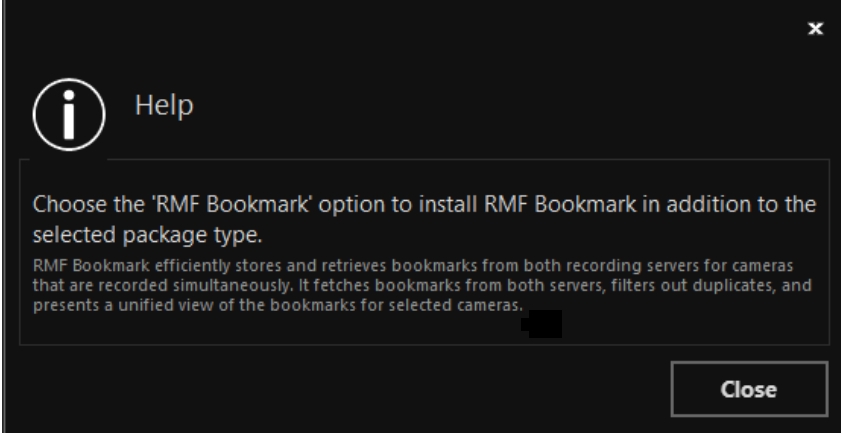


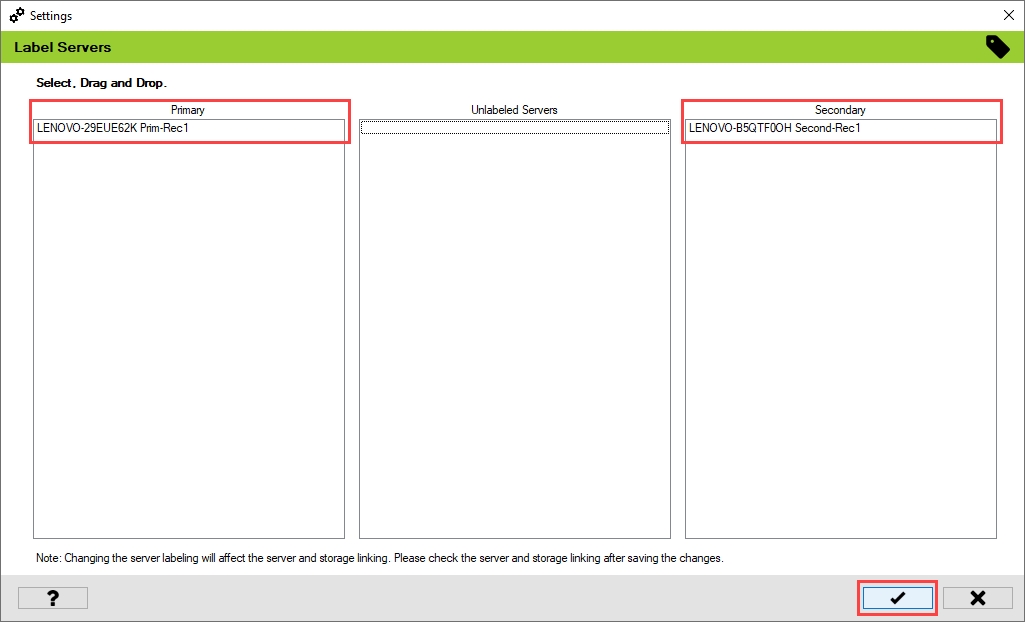

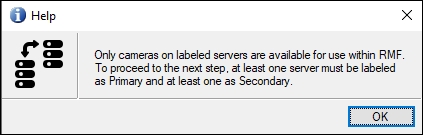

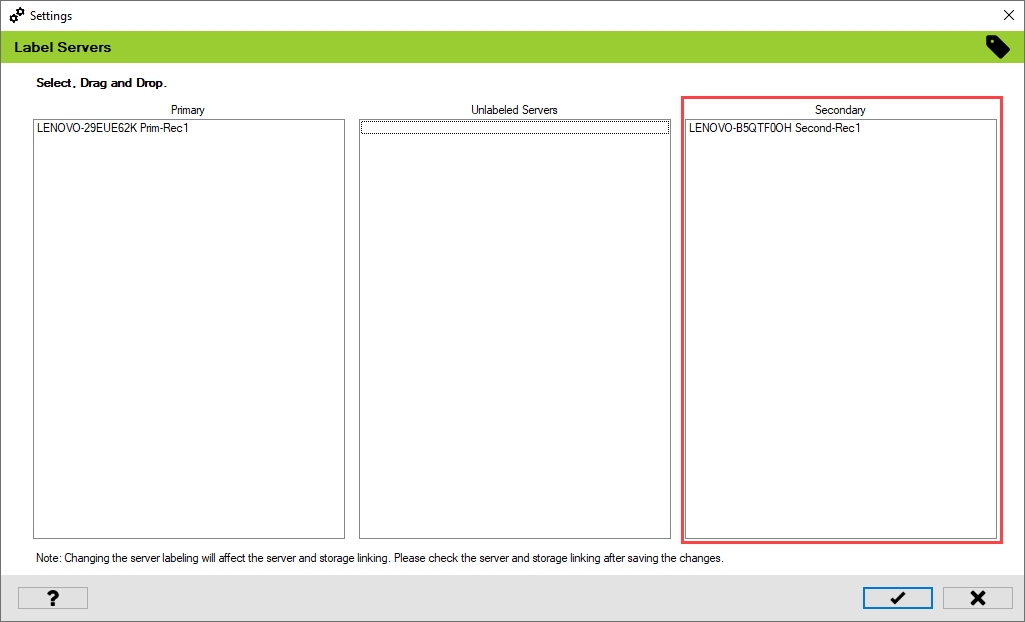

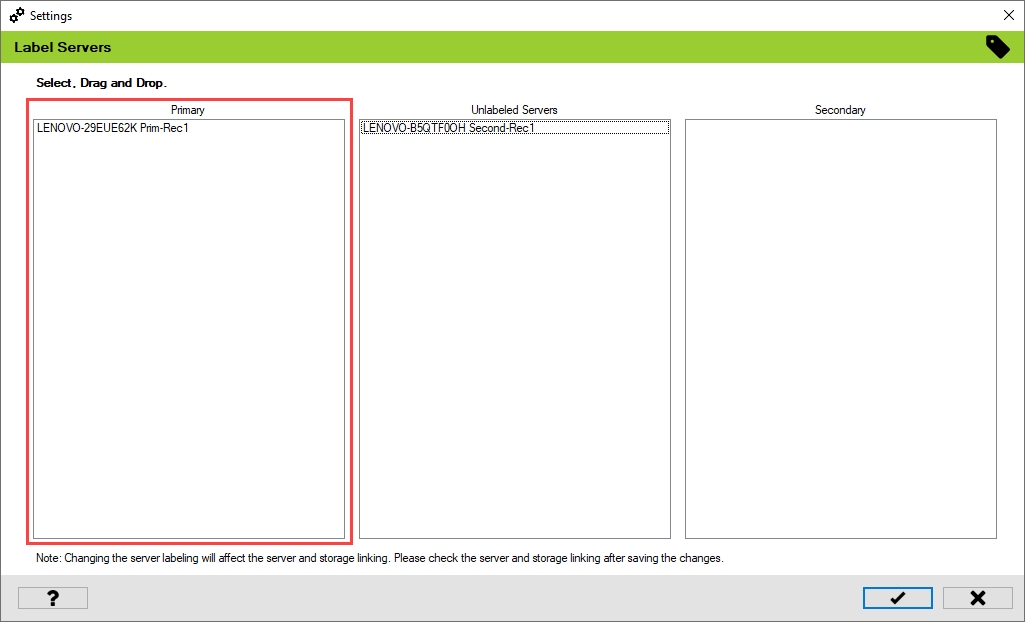
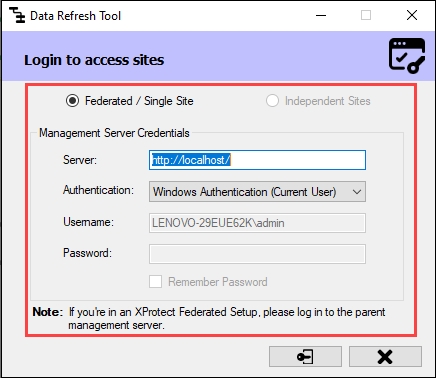
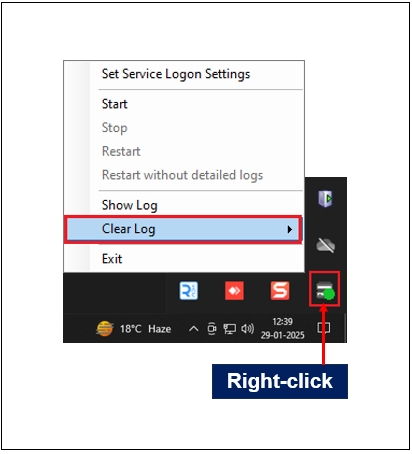
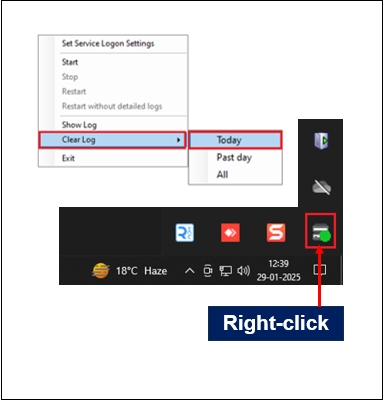
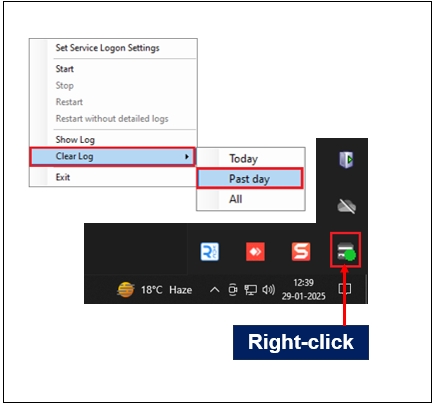
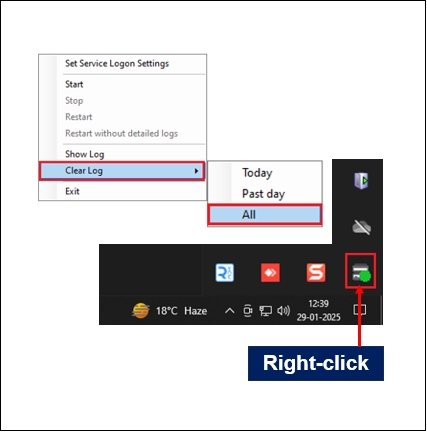
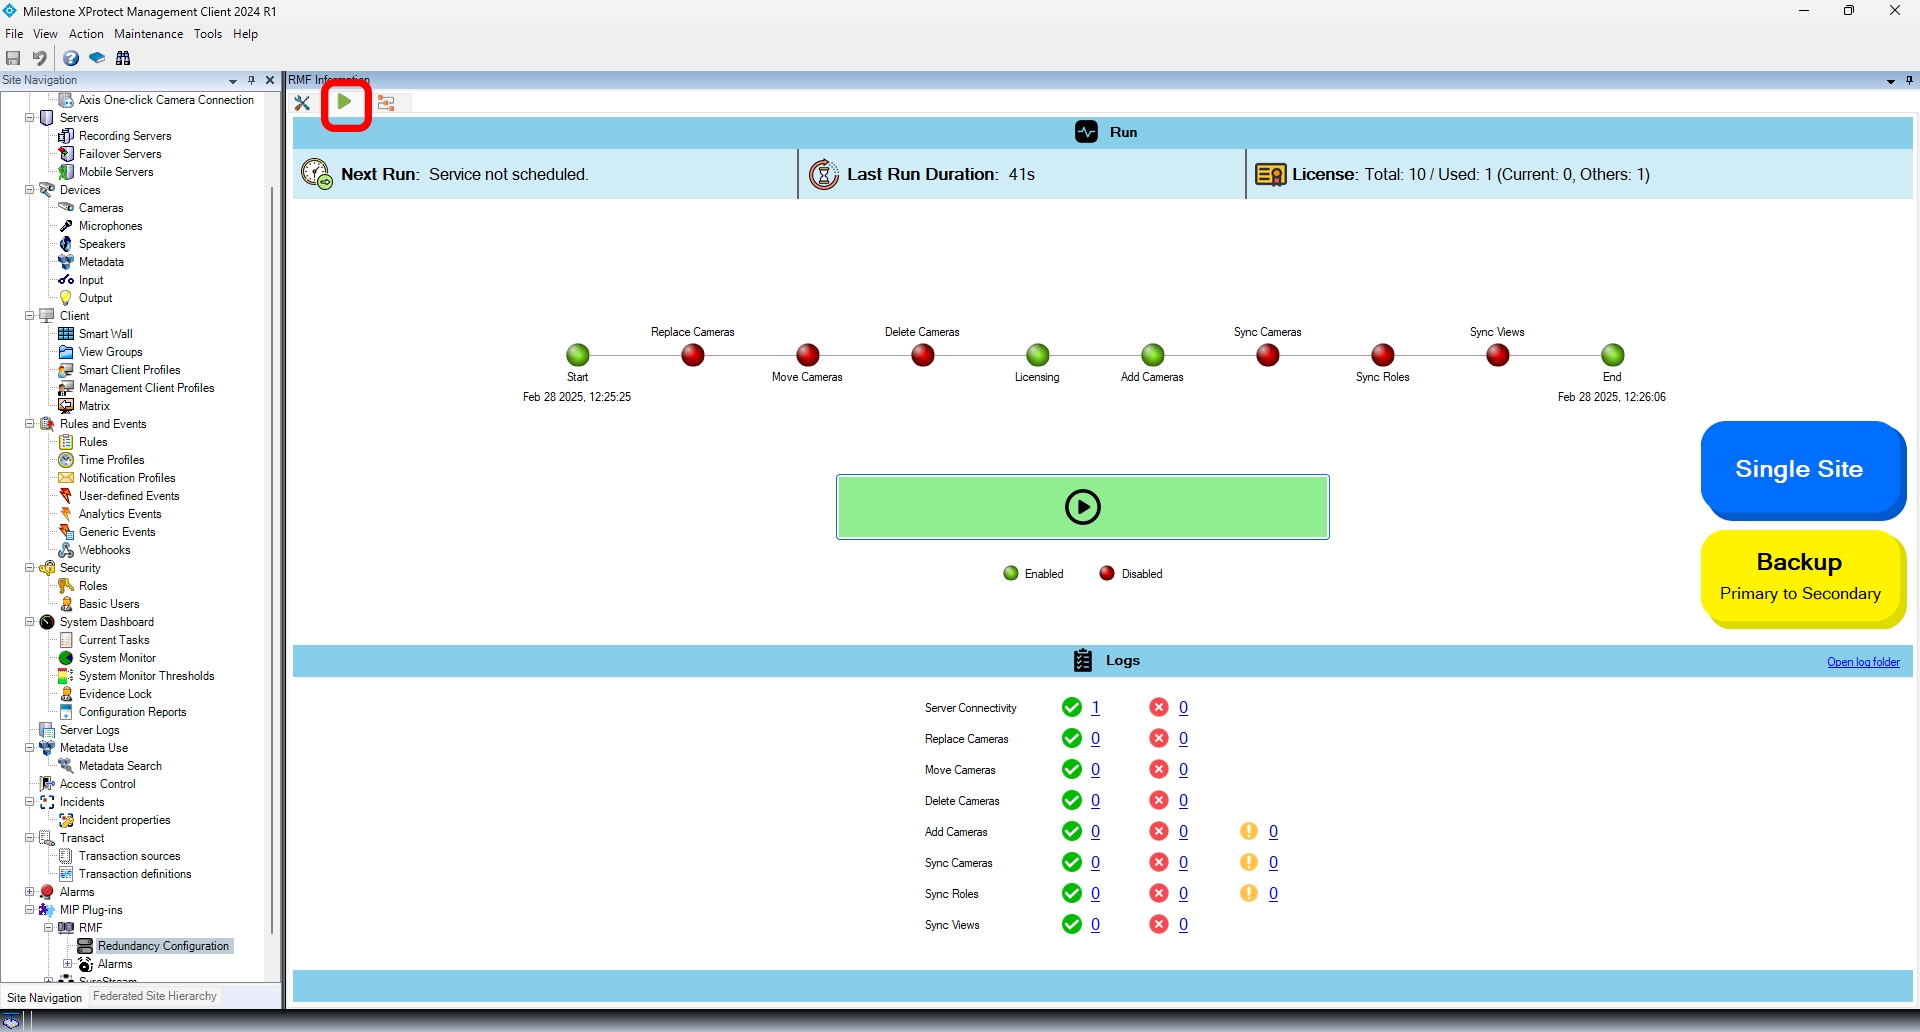
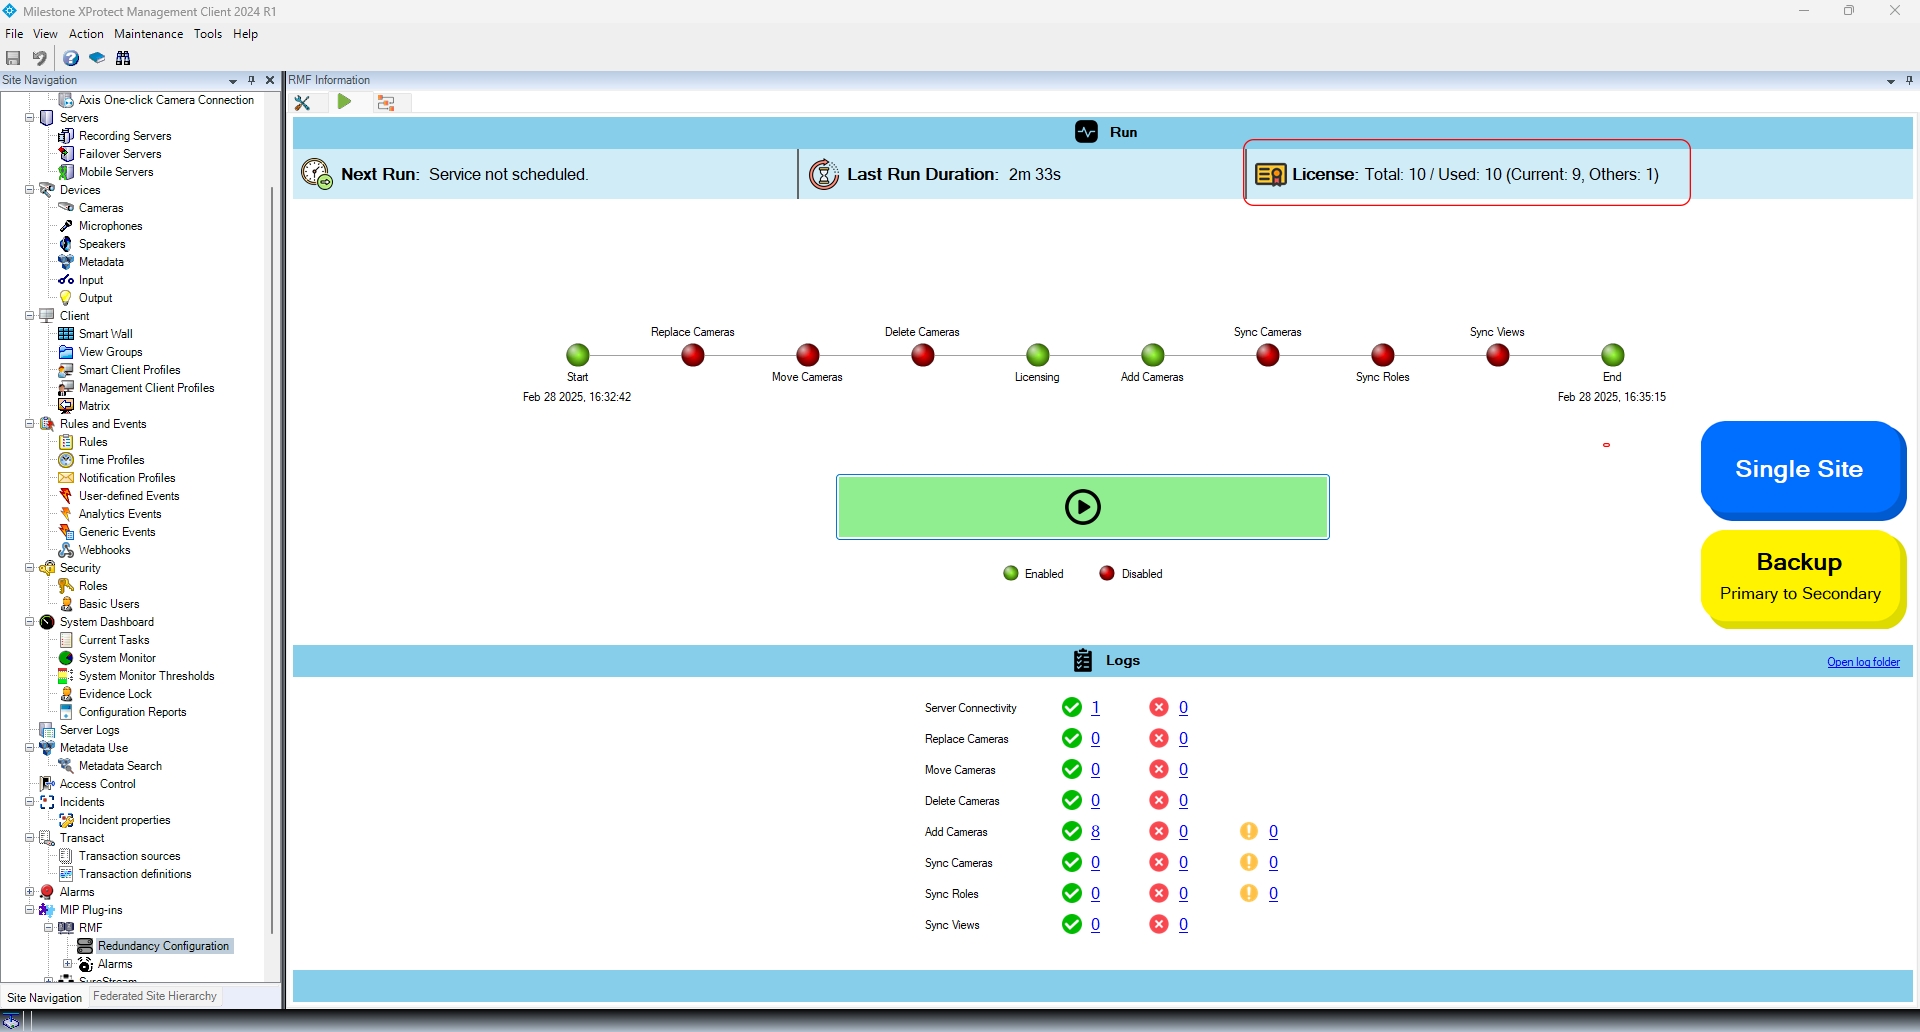
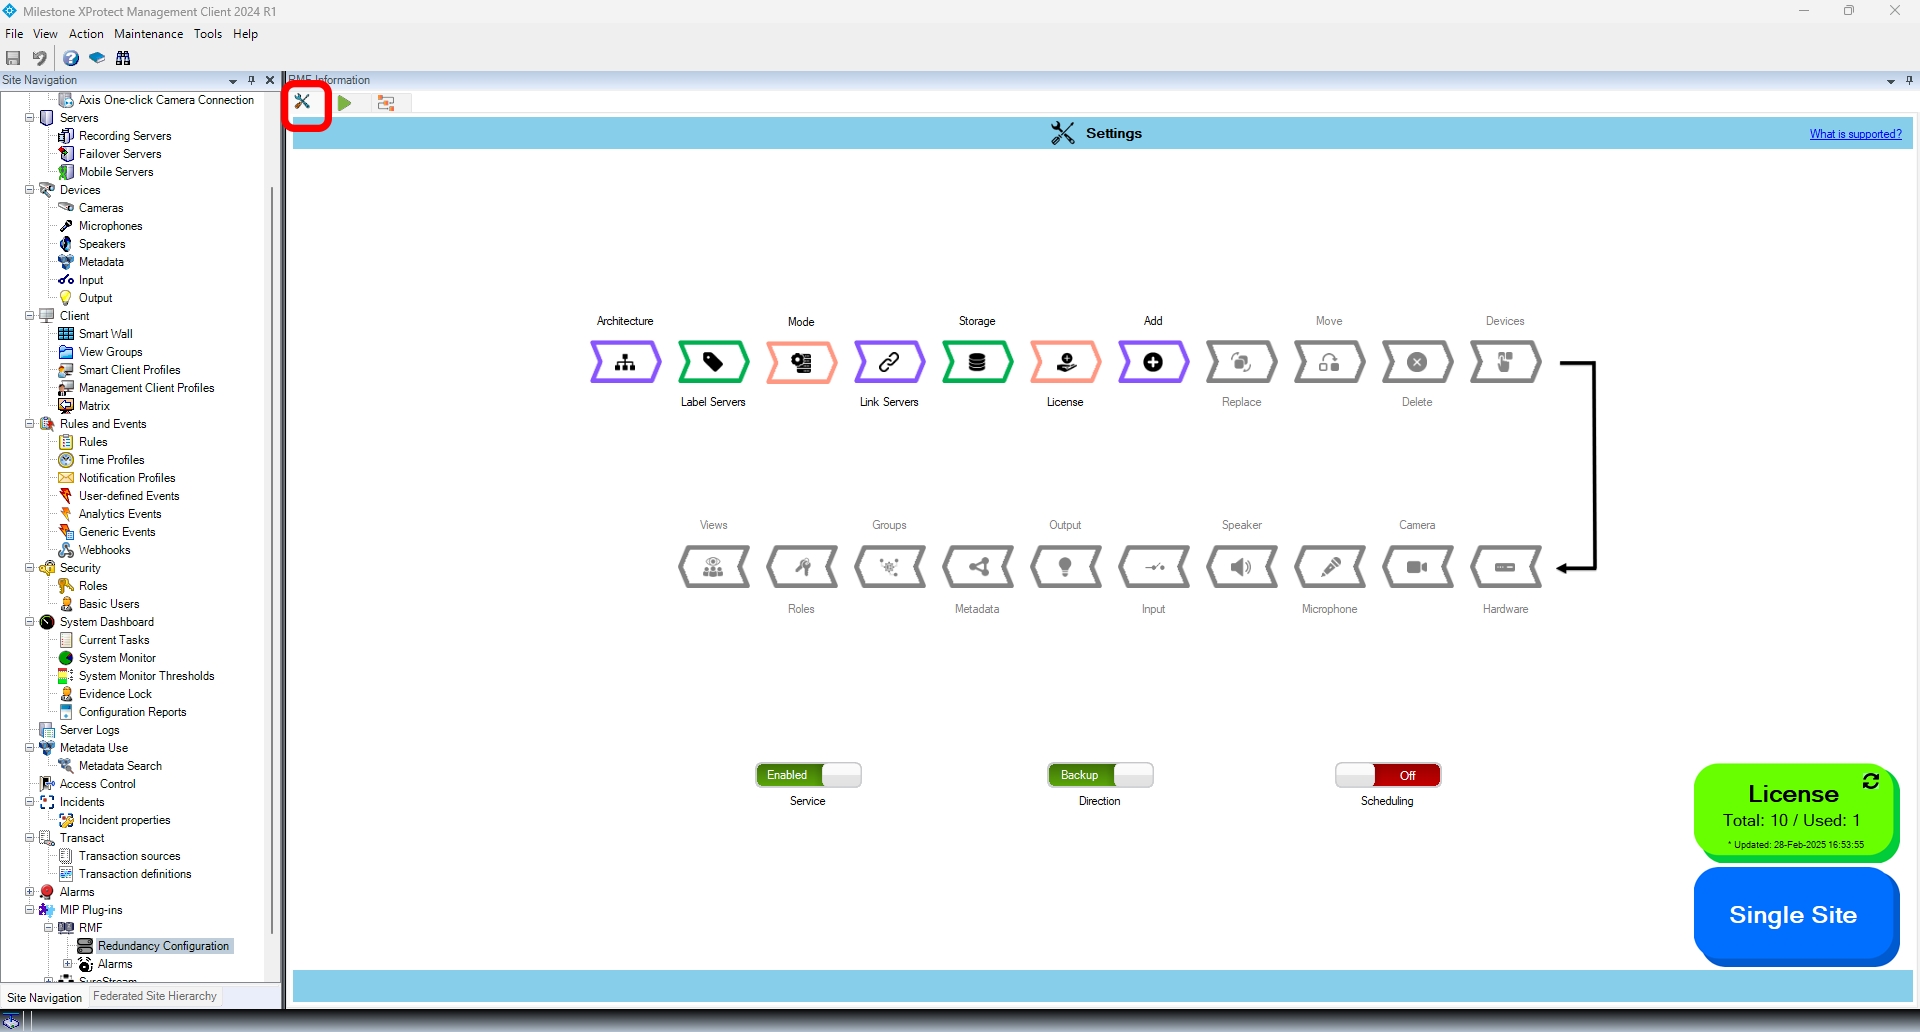
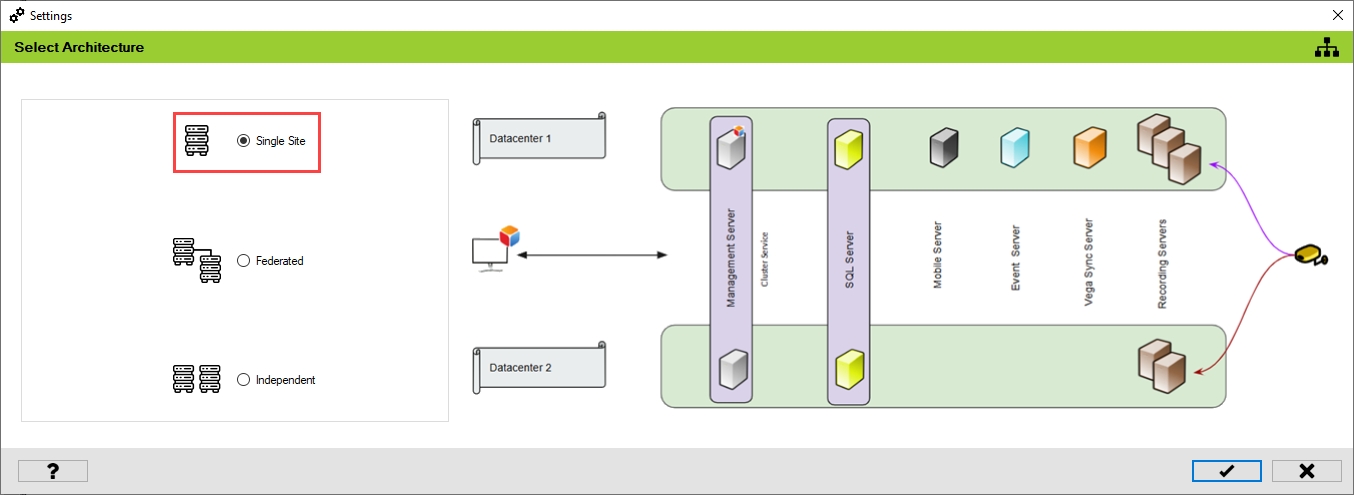
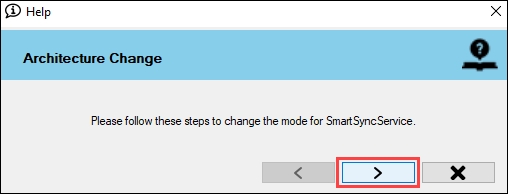
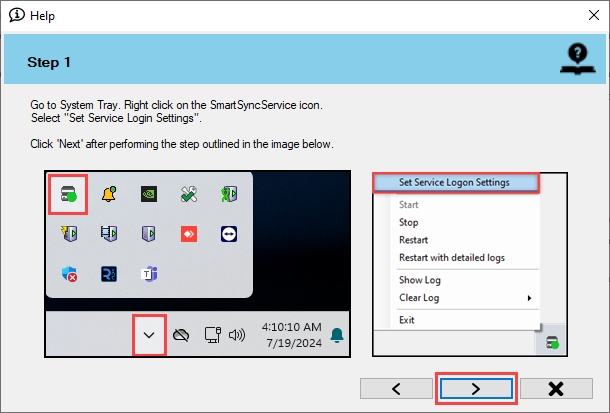
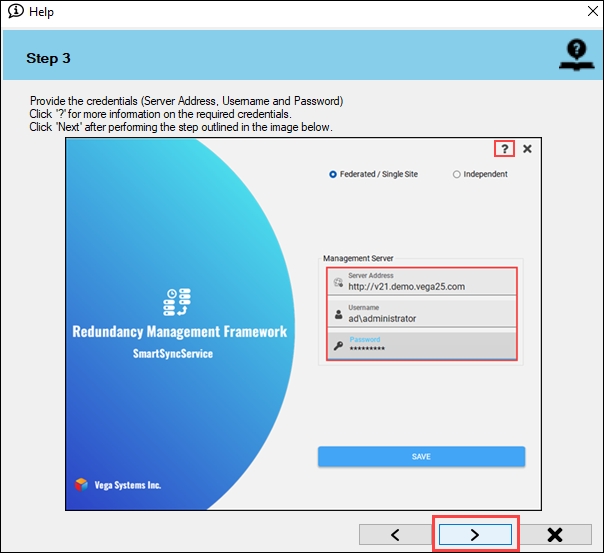
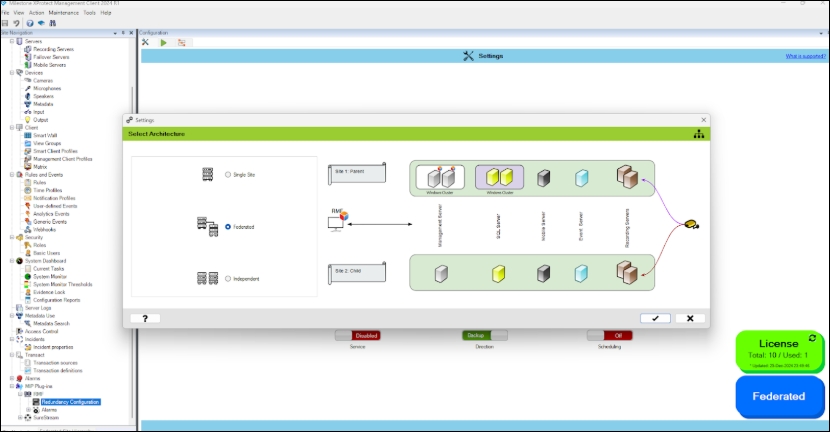
Select the RMF plug-in from Site Navigation → MIP Plug-ins.
Click the RMF Expand button to view the Redundancy Configuration.
Then, click on the Architecture block, as shown in the following screenshot.
The following architectural types are available for further configuration and settings.
Single Site
Federated
Independent
Single Site:
Select this option if your primary and secondary recorders are part of a single Milestone deployment with a single database. Note that failover management servers and/or clustered high-availability databases are considered a "Single Site" because there is one unique database.
If your XProtect architecture is a Single Site, see the sectionSingle Site.
Federated:
Select this option if your primary recorders are part of a parent Milestone site and secondary recorders are part of a child site. Note that there are two unique databases here, one at the parent and another at the child.
If your XProtect architecture is Federated, see the sectionFederated.
Independent:
Select this option if your primary recorders are part of one Milestone deployment and secondary recorders are part of an Independent Milestone deployment. Note that there are two unique databases, one at each separate site.
If your XProtect architecture is Independent, see the sectionIndependent.
Right-click Redundancy Management Framework and click Uninstall.
Click Yes in the confirmatory dialog box that appears.
Step Result: The Redundancy Management Framework plugin is uninstalled.
The scope of action is limited to RMF-licensed devices selected in the Device Selection section. The direction of synchronization depends on the direction setting. See Set Synchronization Direction. If no devices are selected in the Device Selection block, this option is disabled.
To synchronize your hardware settings, follow these steps:
Click Hardware.
Enable the Overall Hardware Settings Sync to synchronize all the individual hardware settings. Different sub-settings can be enabled or turned off as needed.
To retain your configured settings, click the 'Check Mark' icon. Then, click 'Save' in the Milestone toolbar to save changes.
To enable and synchronize the device input settings, perform the following steps:
Click Input.
Enable the Overall Input Settings Sync to enable all the individual device input settings. Enable/Disable different sub-settings as needed.
To retain the settings, click the Check Mark button.
Click Save in the Milestone toolbar to save the changes.
To turn off the device input settings synchronization, perform the following steps:
Click Input.
To turn off the synchronization of the device input settings, move the toggle button to display red and click the Save icon.
Click Save in the Milestone toolbar to save the changes.
Step Result: The Input settings option is disabled.
For example, once a user's permissions are updated, they can manually run the roles configuration workflow to apply the changes immediately.
This ensures faster updates without waiting for the synchronization service.
Click OK when the confirmatory dialog box appears.
Click Save in the Milestone toolbar to save the changes.


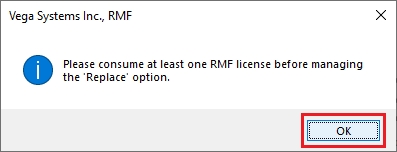
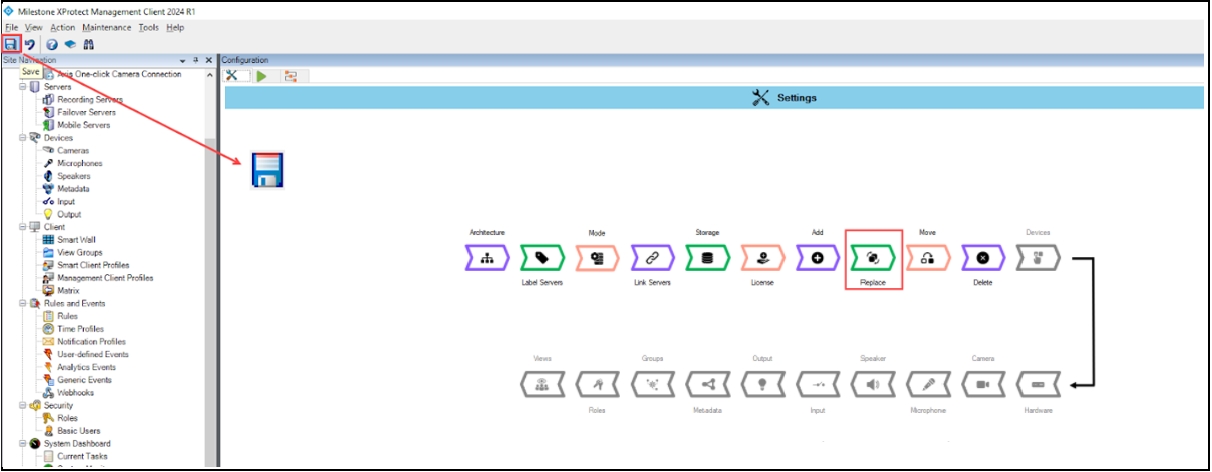


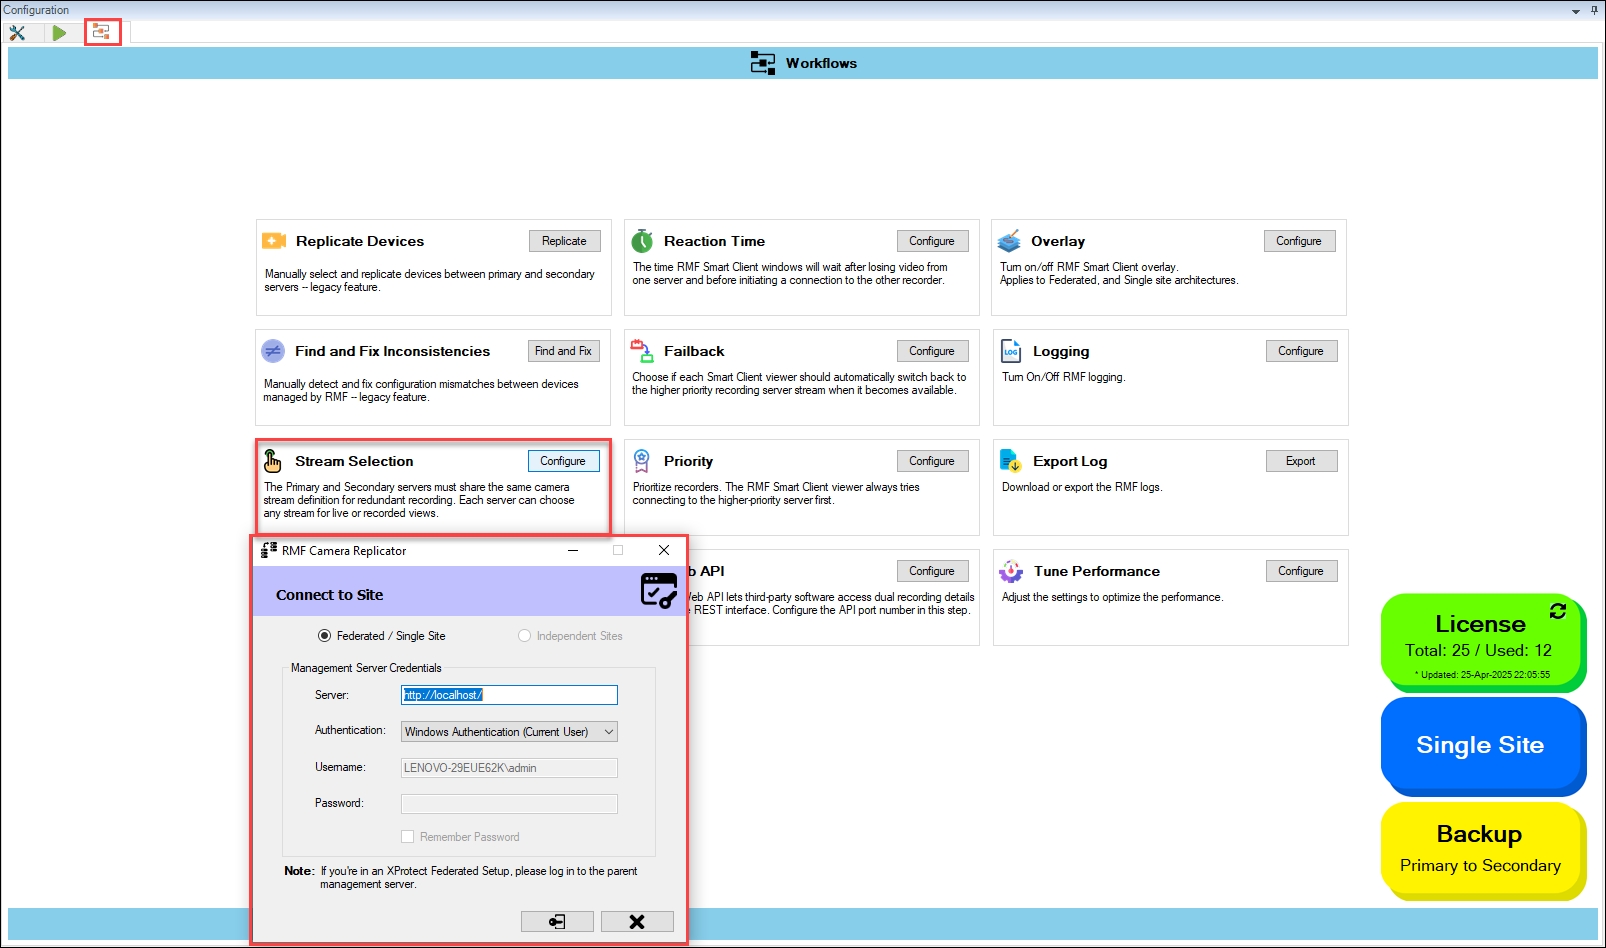
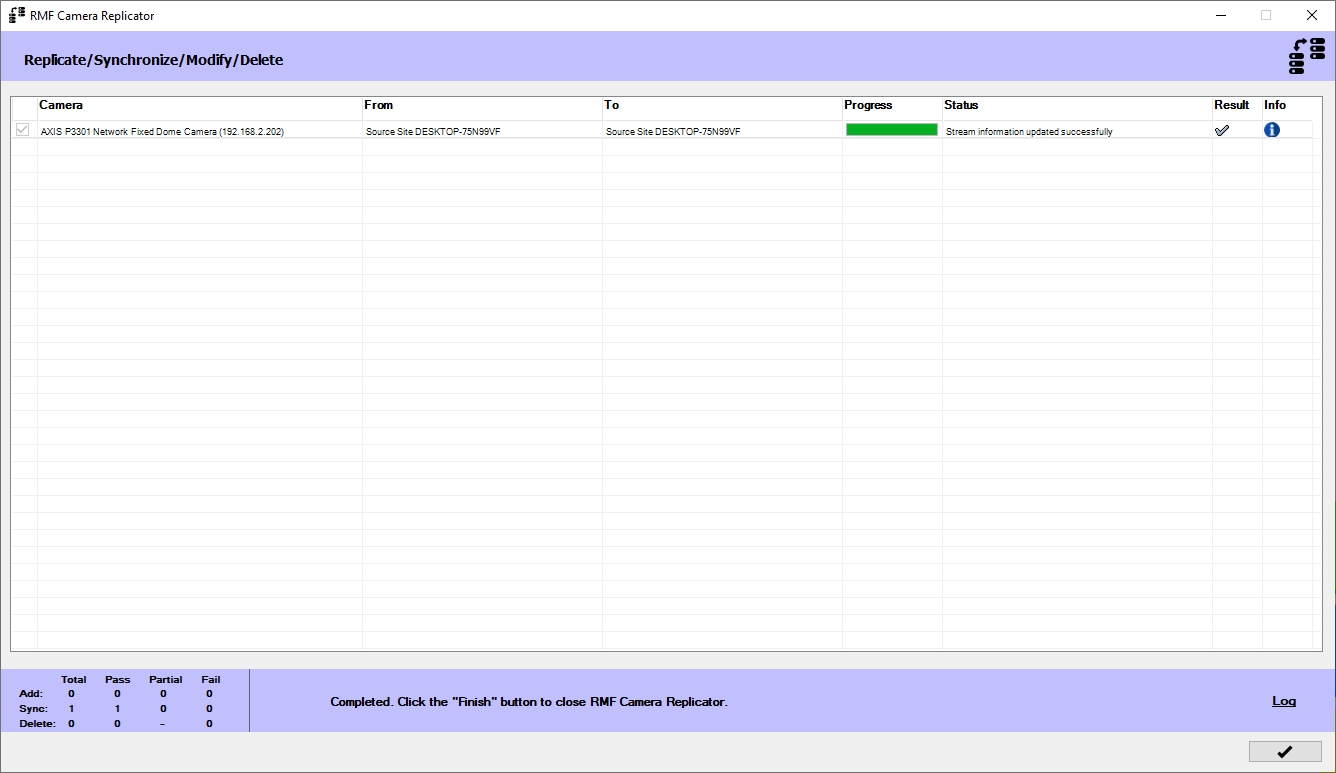
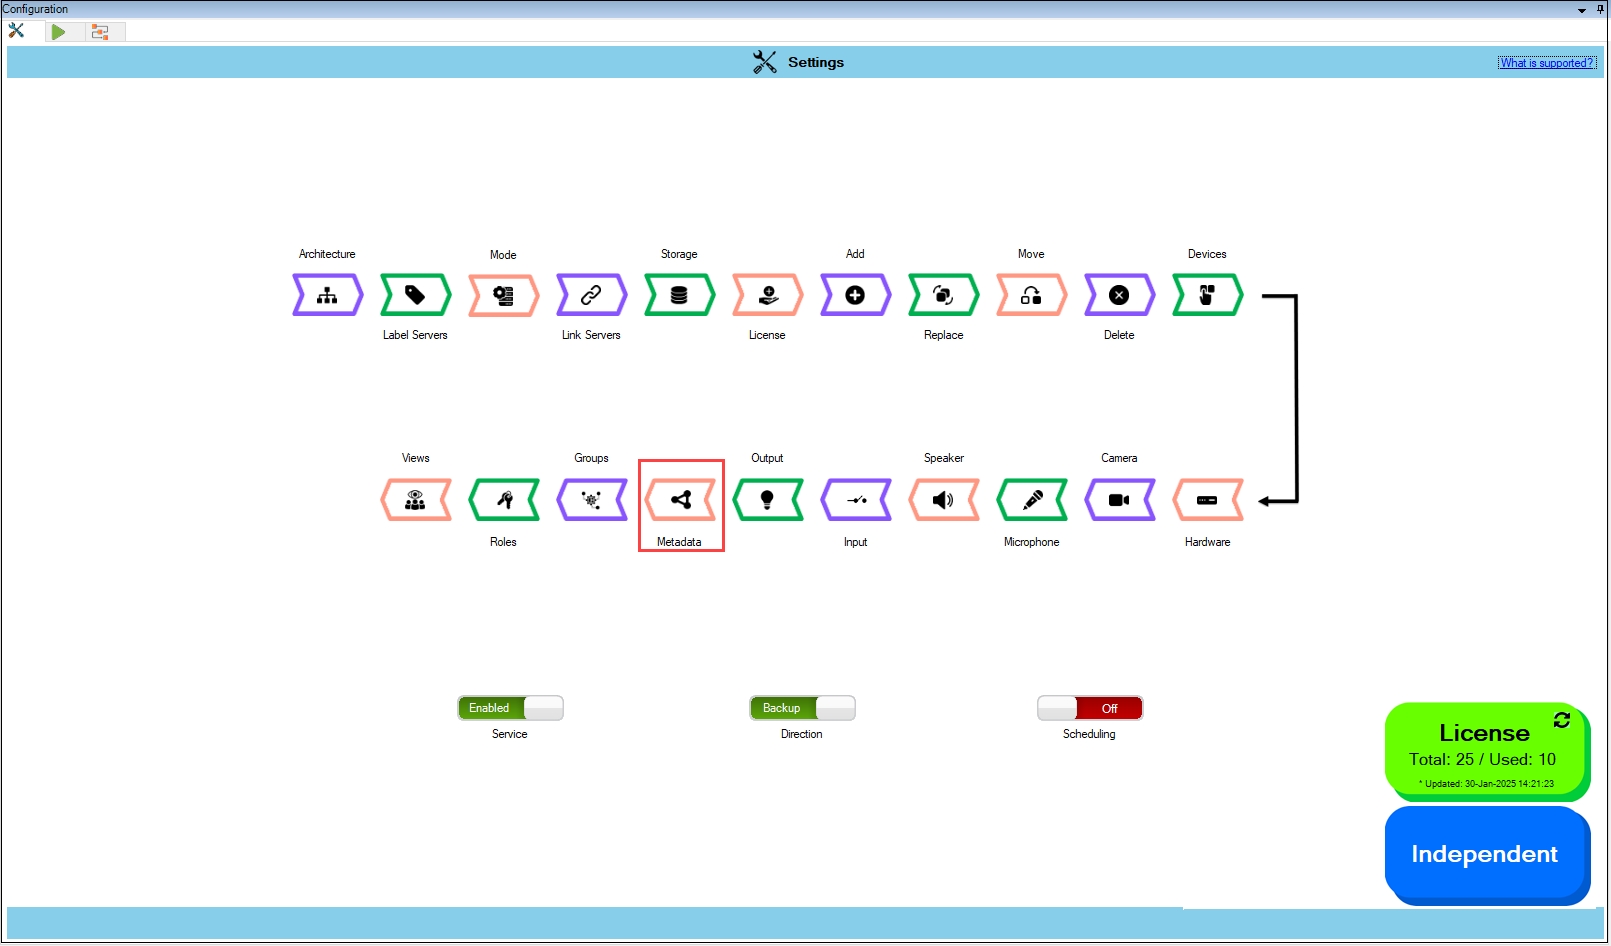
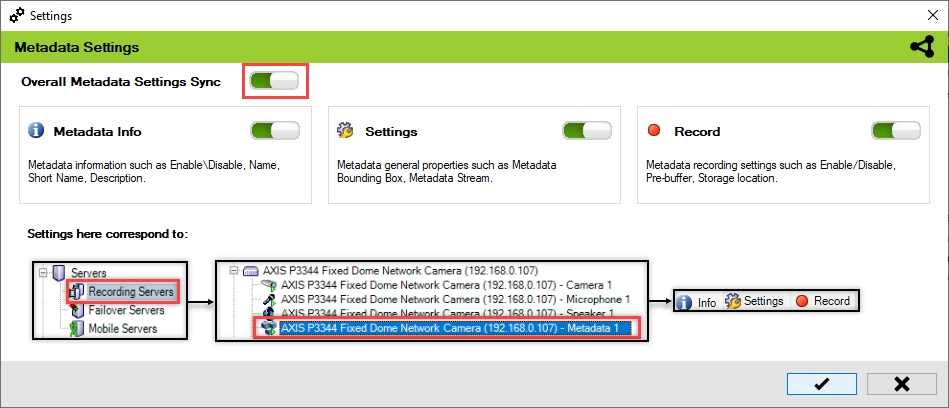


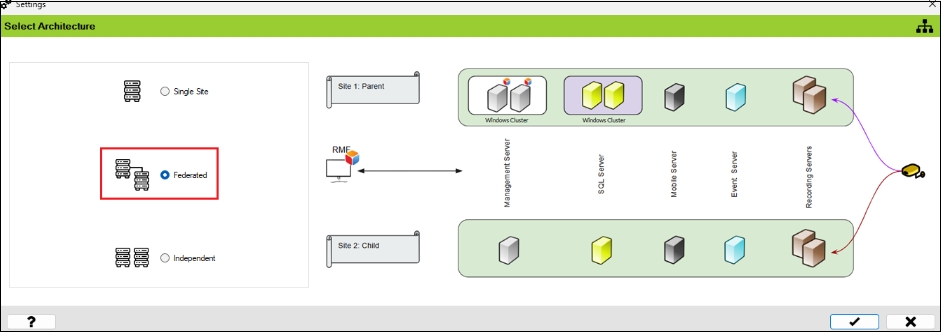
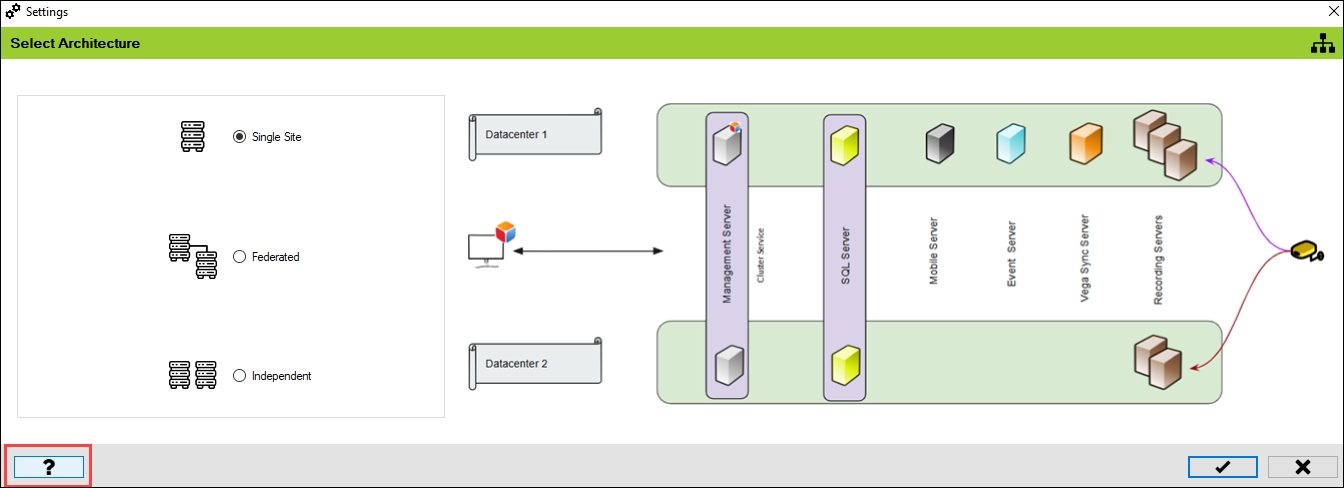
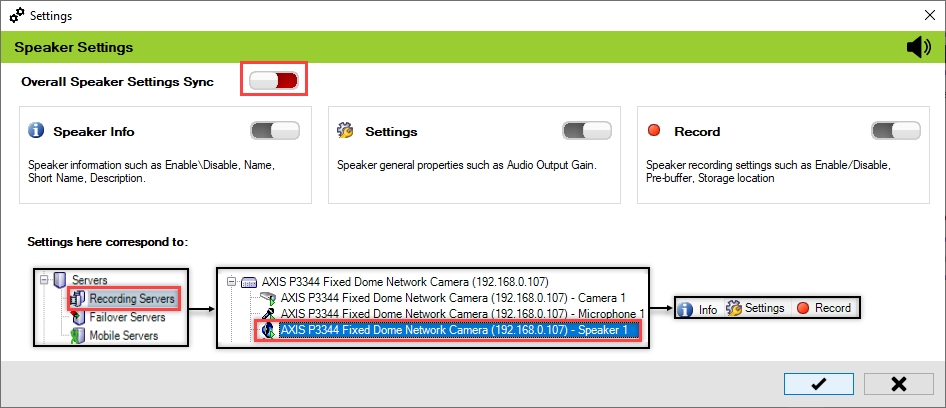
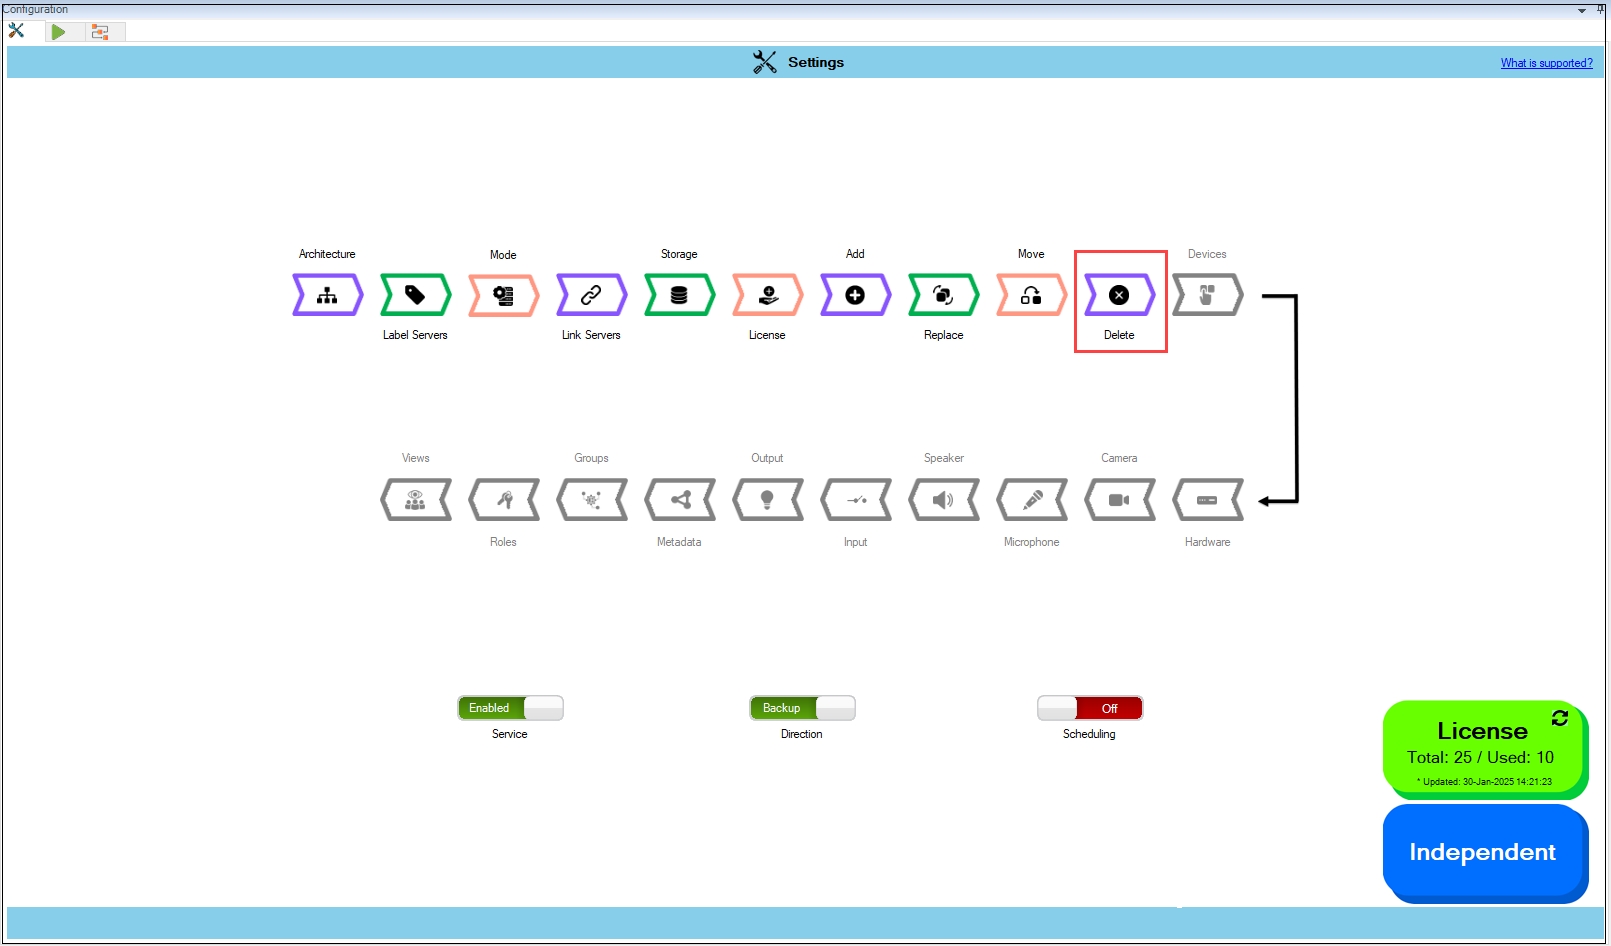
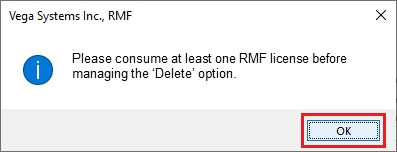

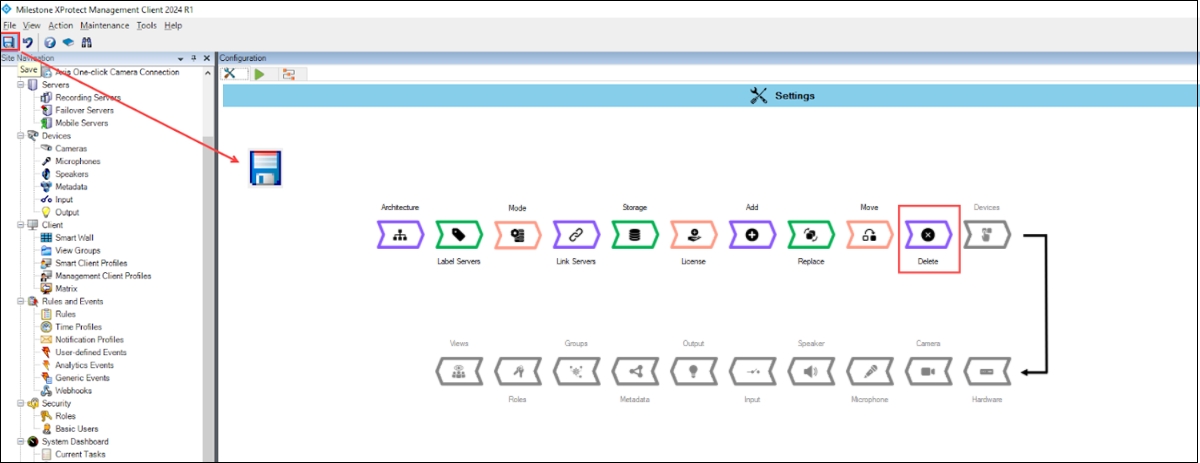
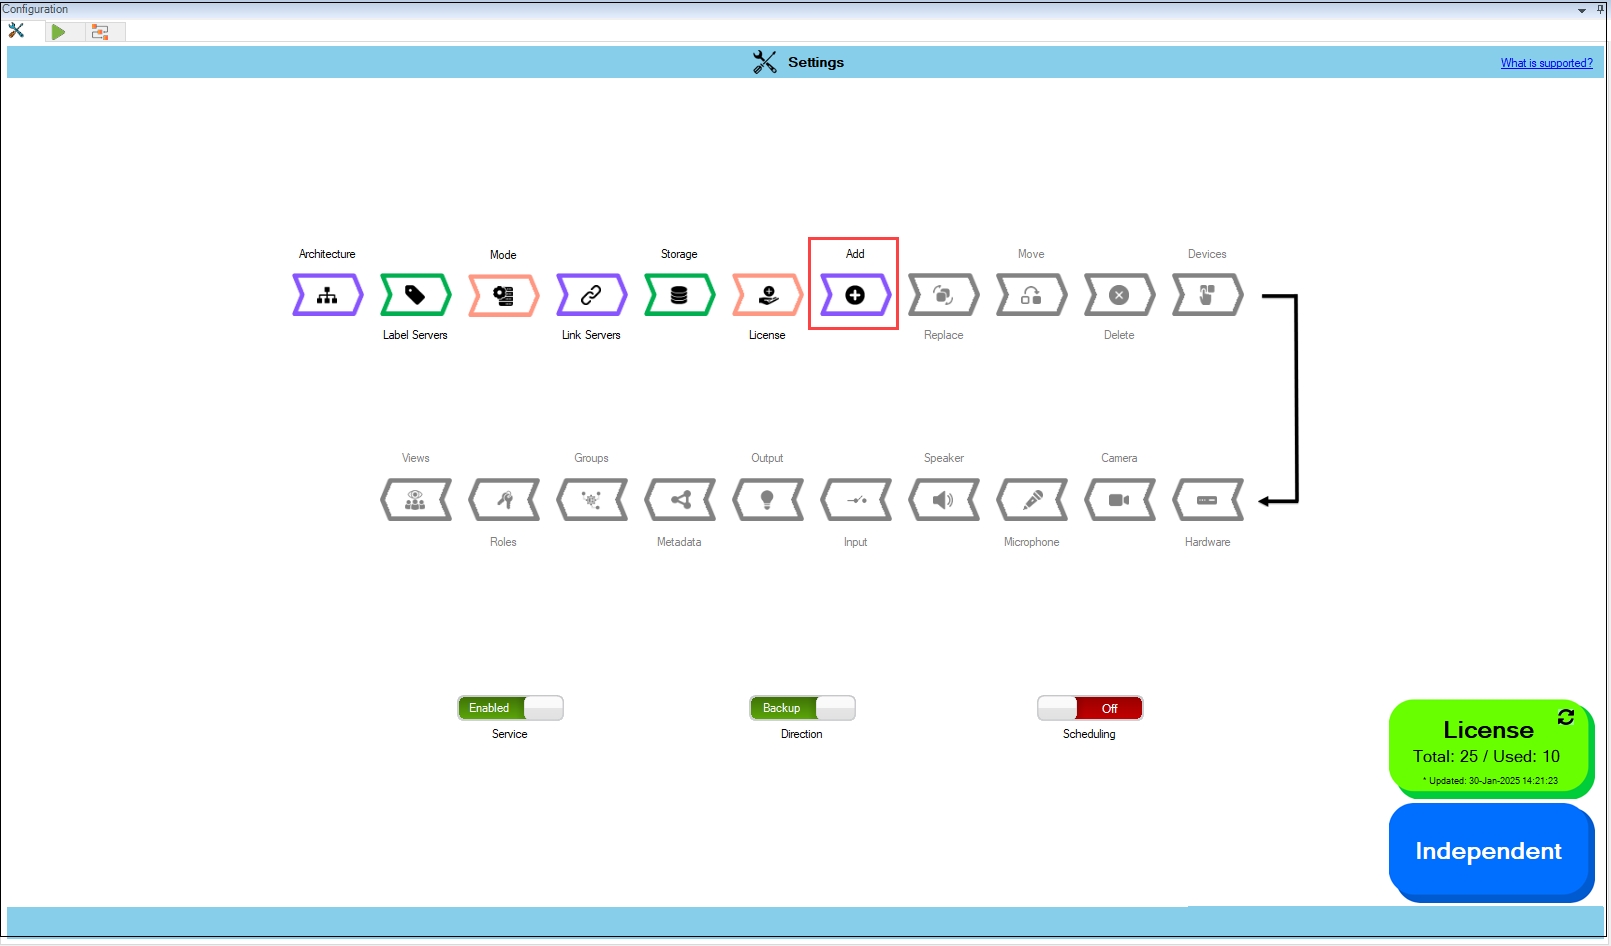
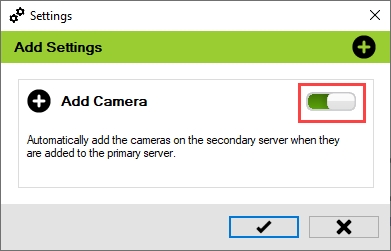
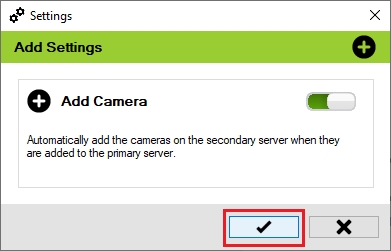
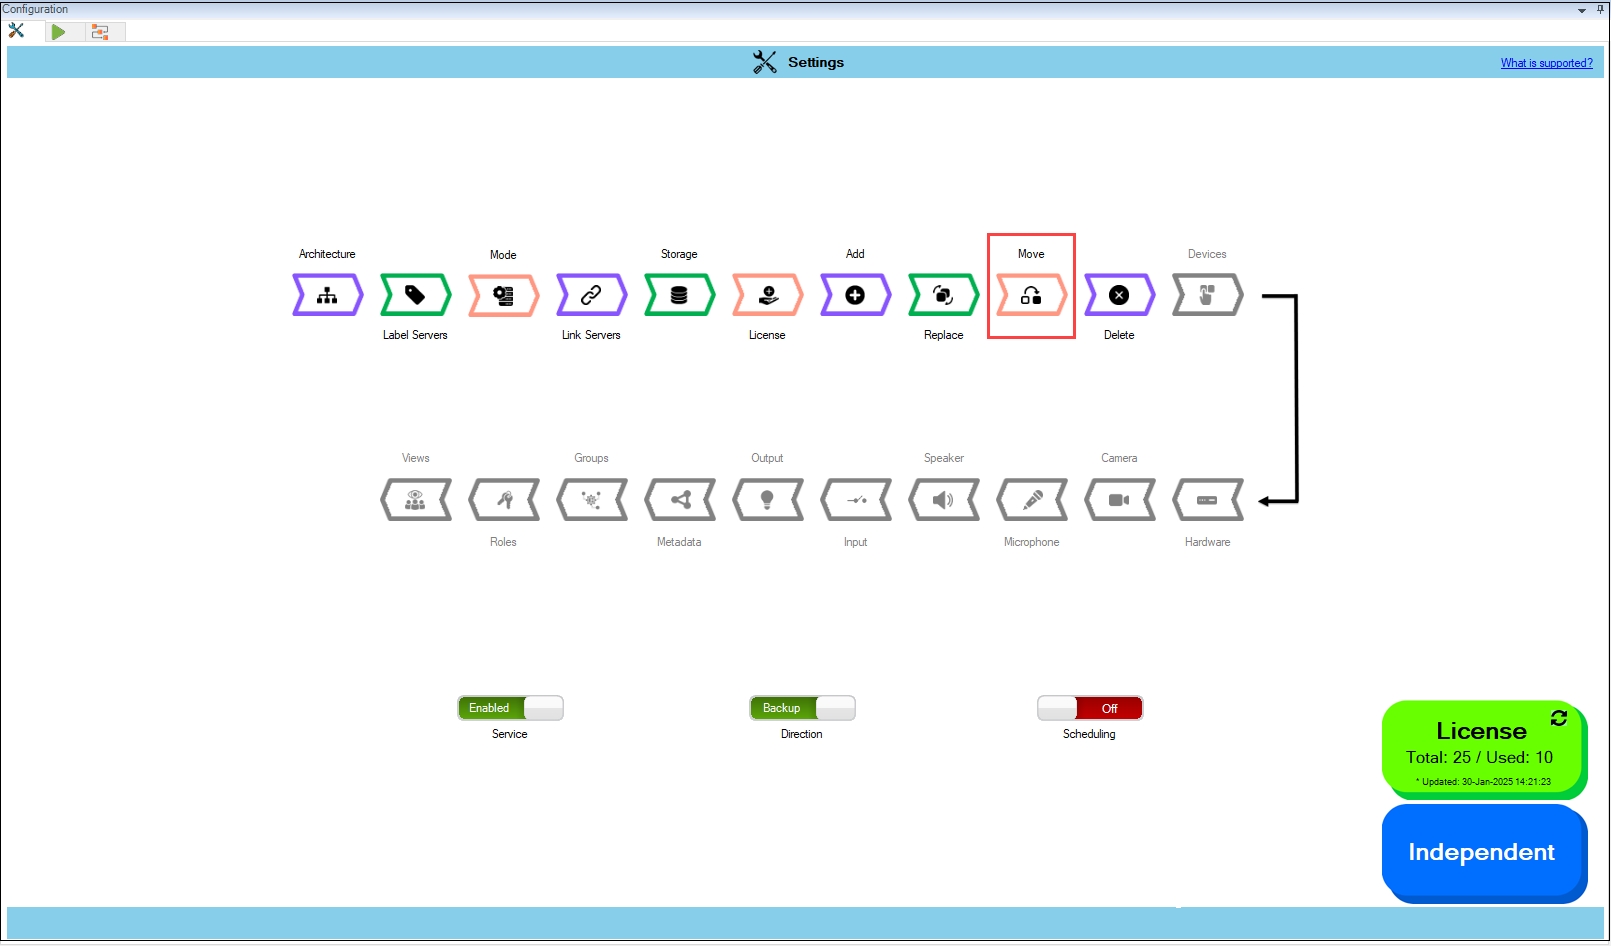
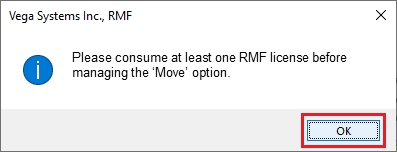
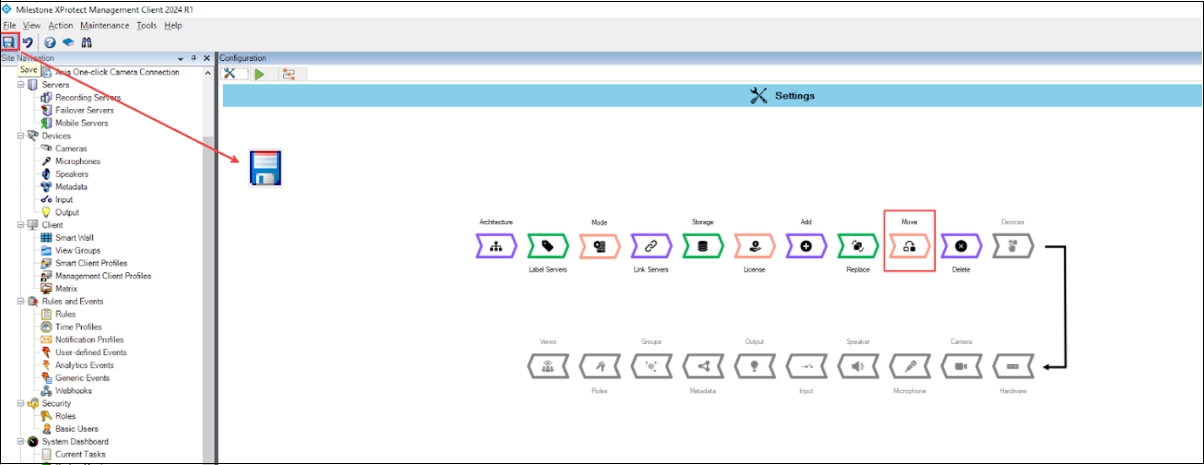


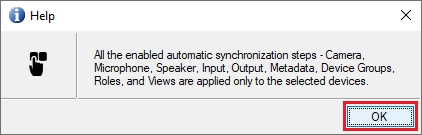

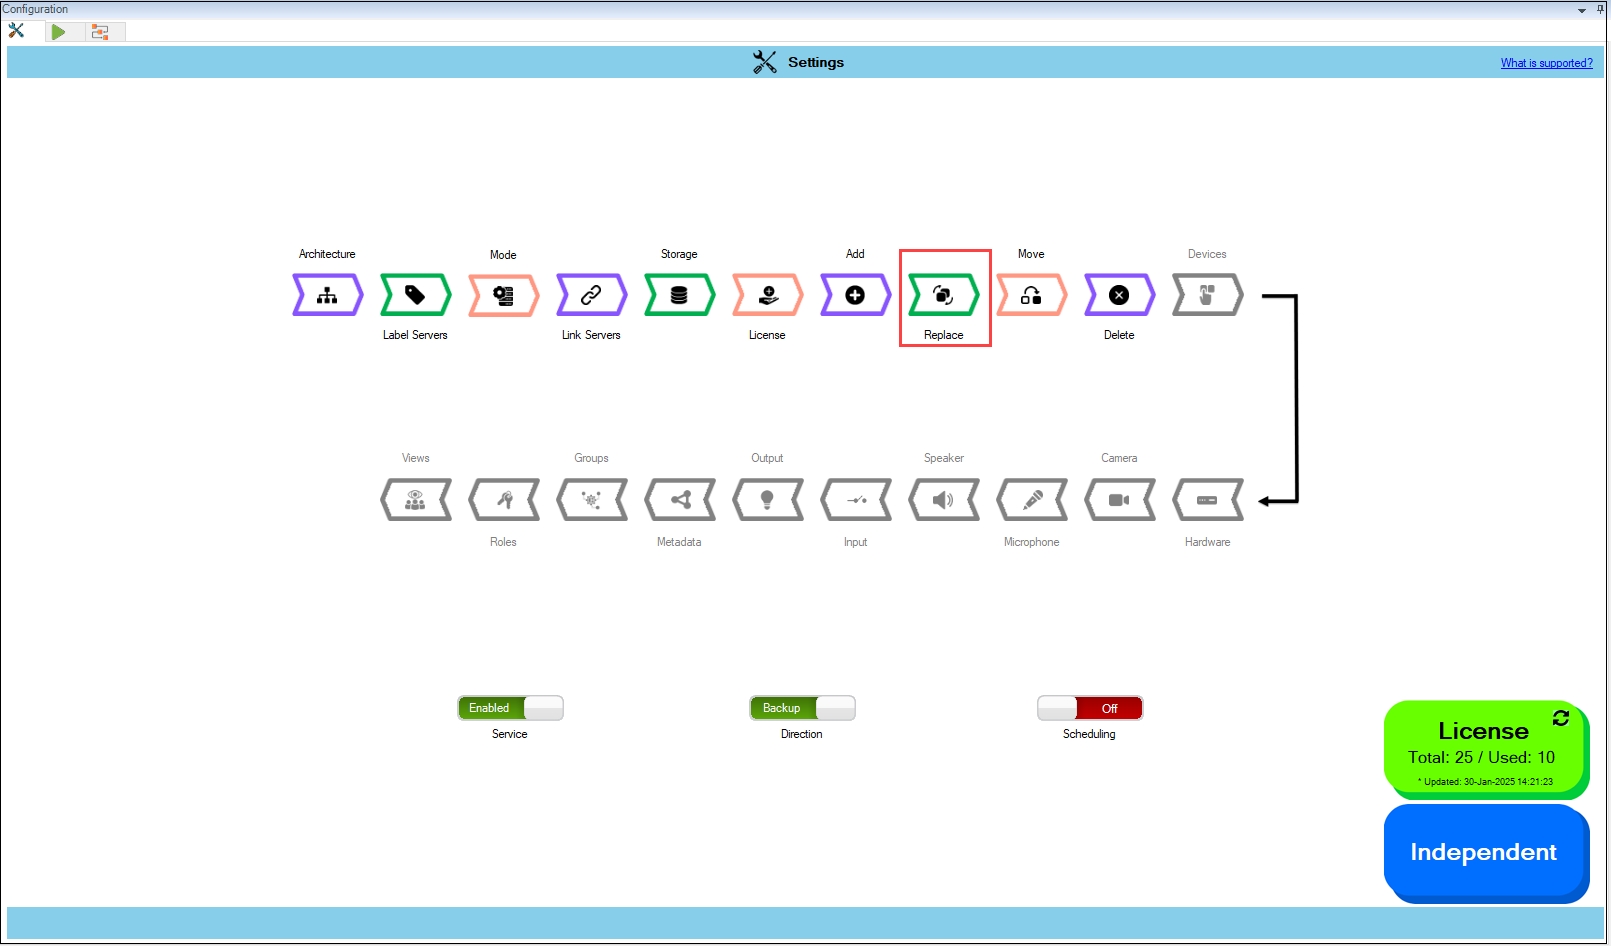
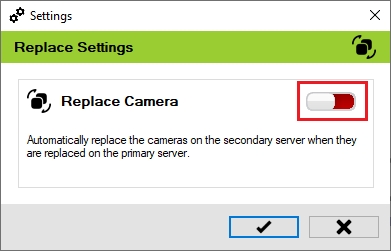
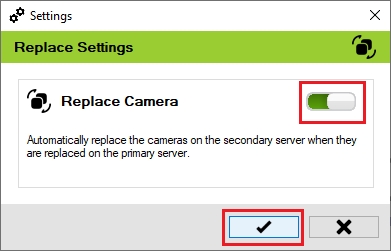
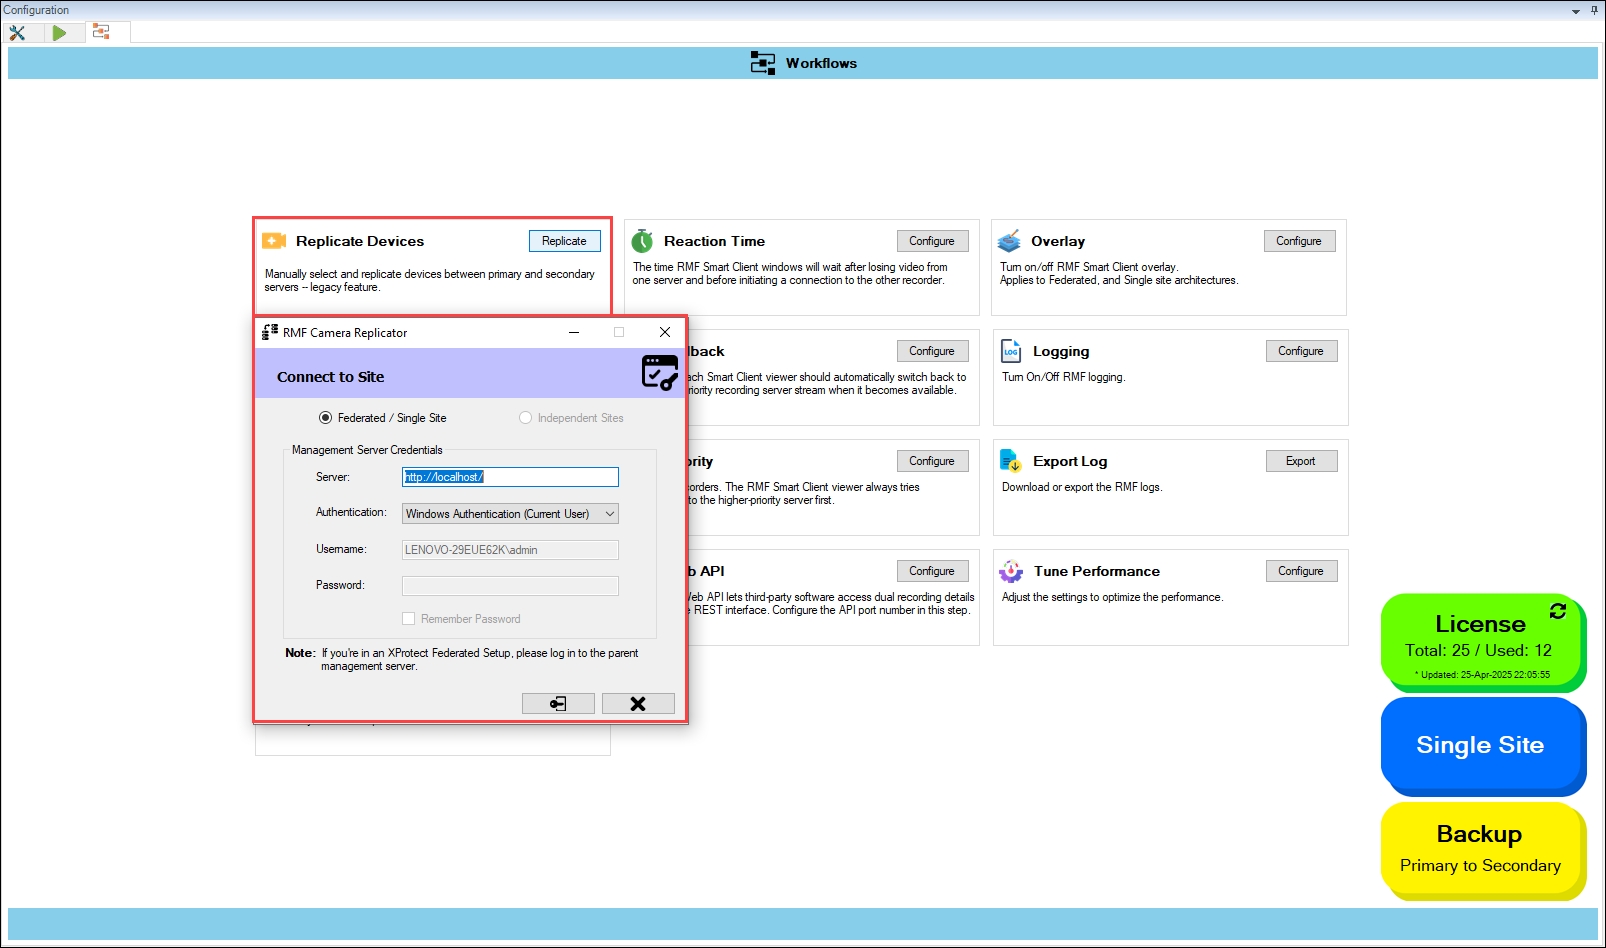
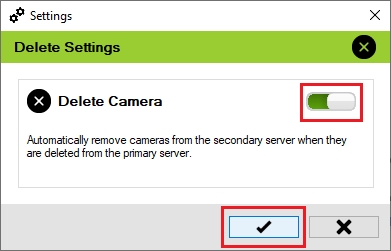

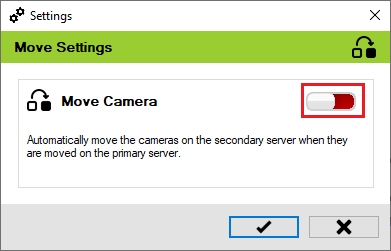
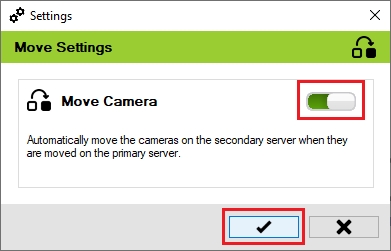
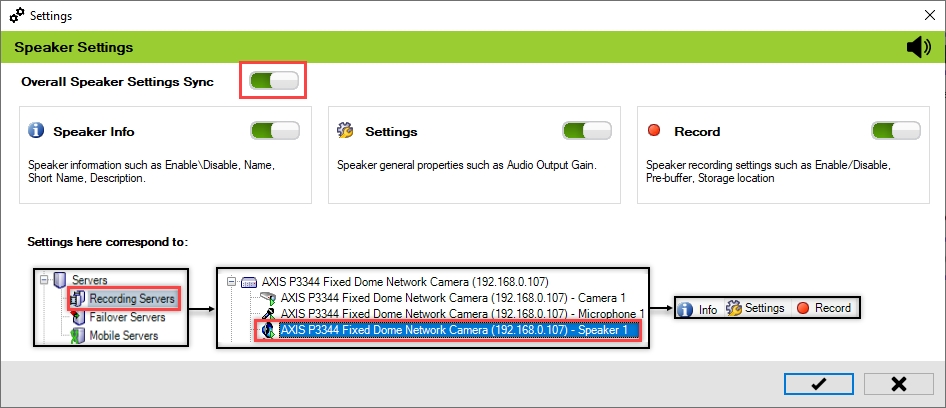
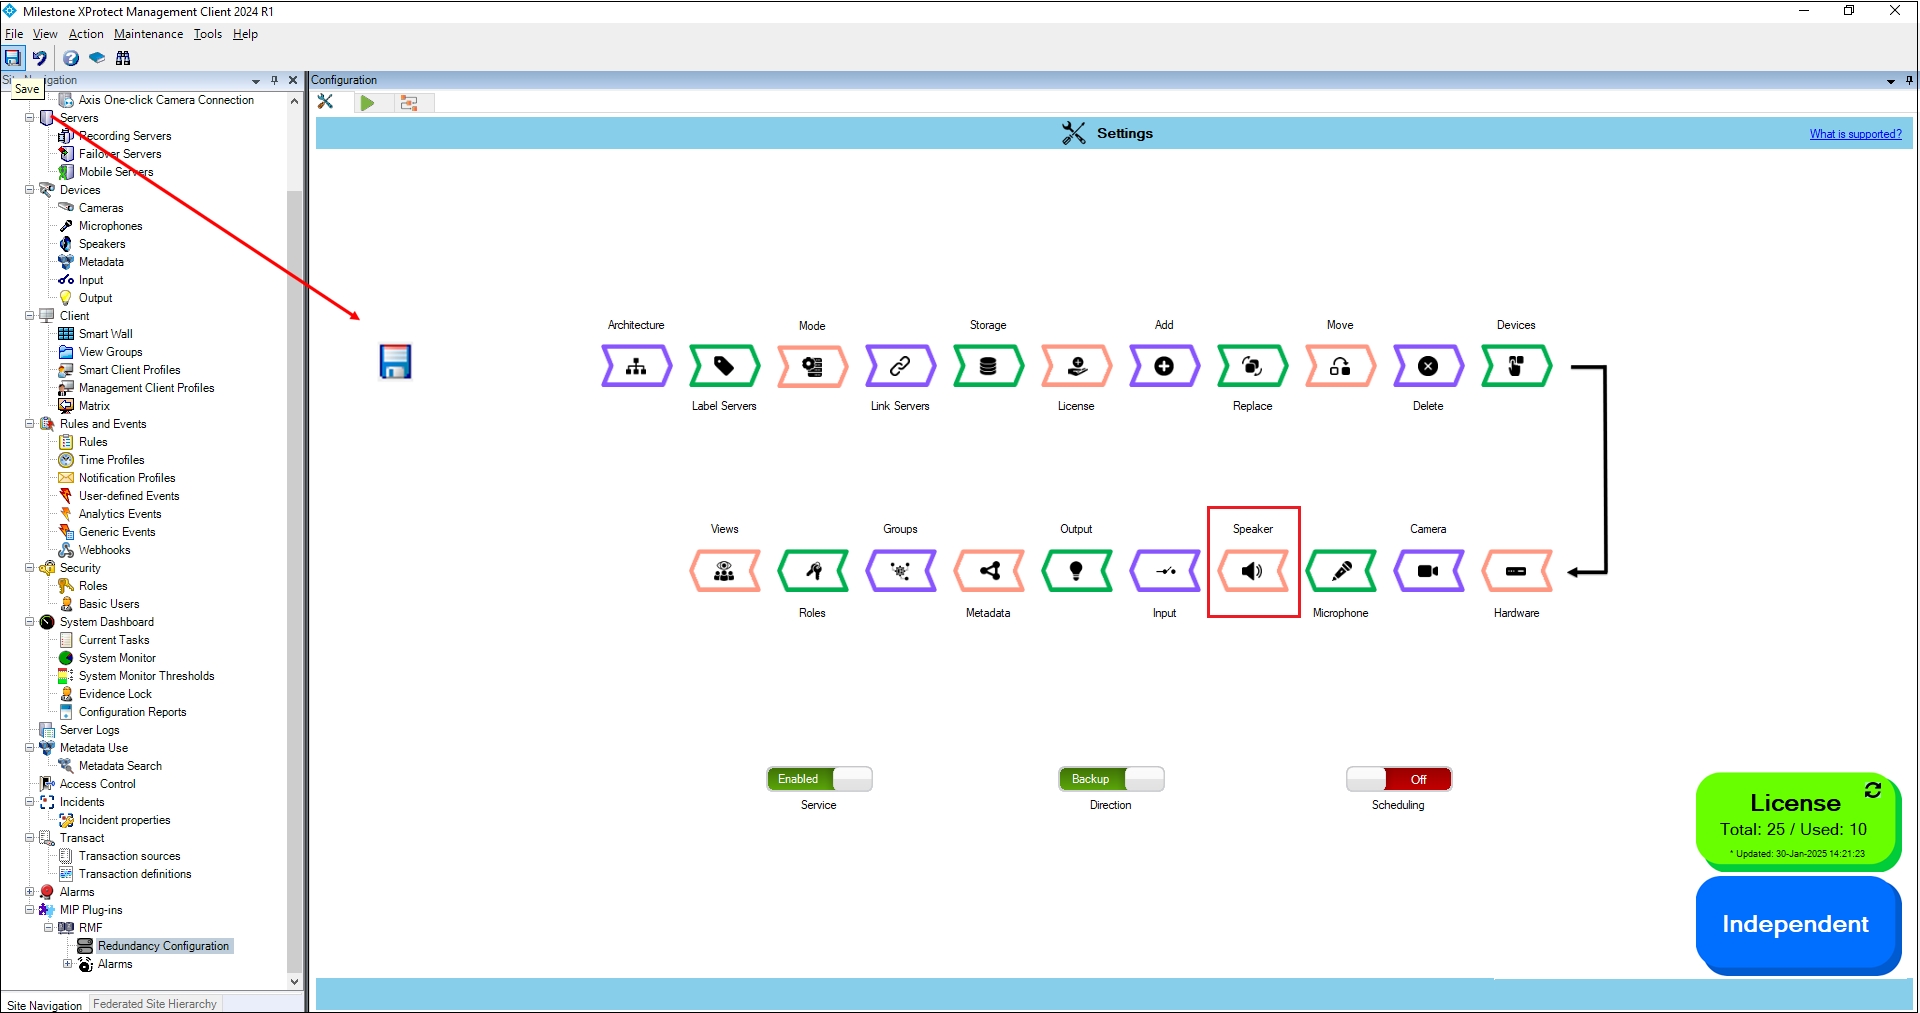
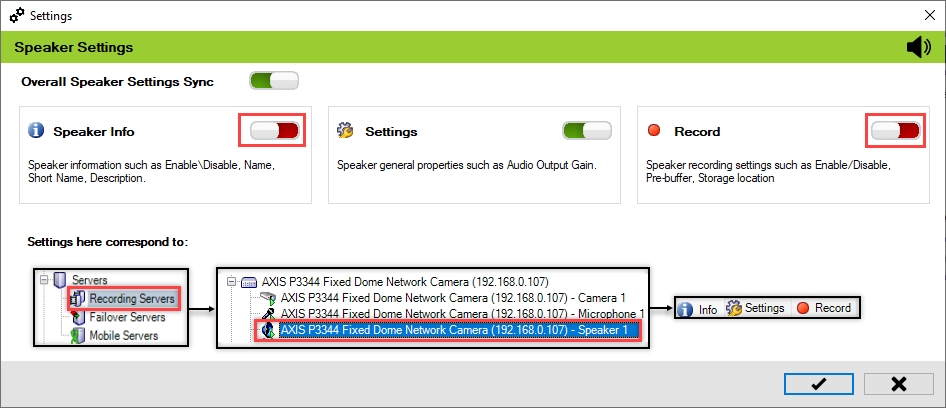

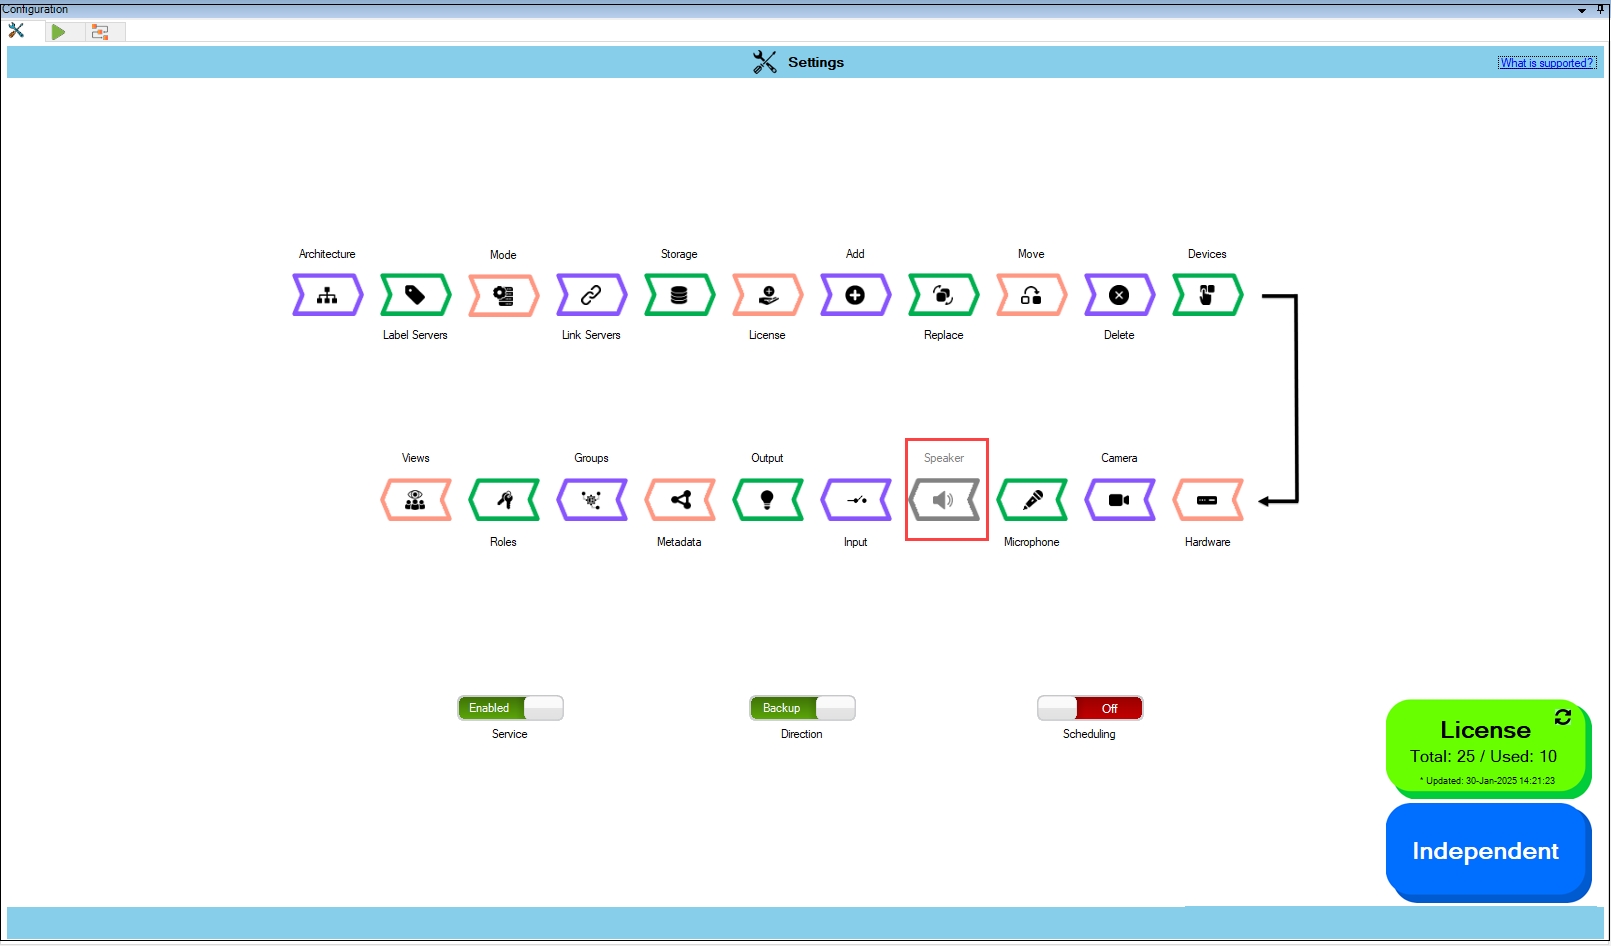

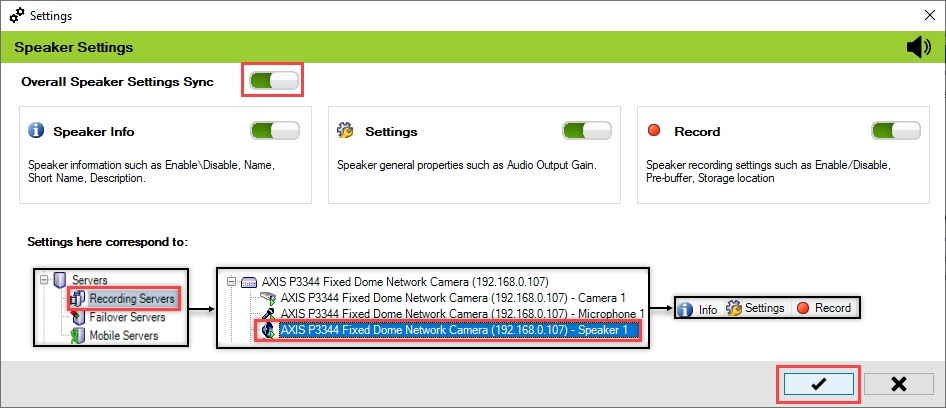
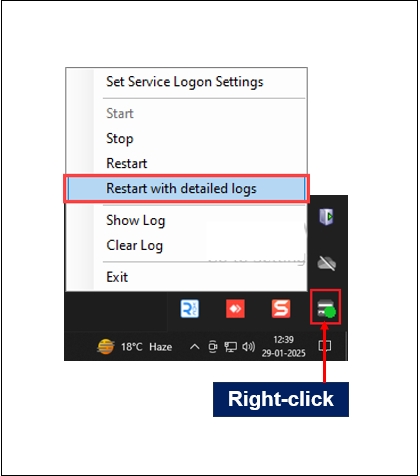
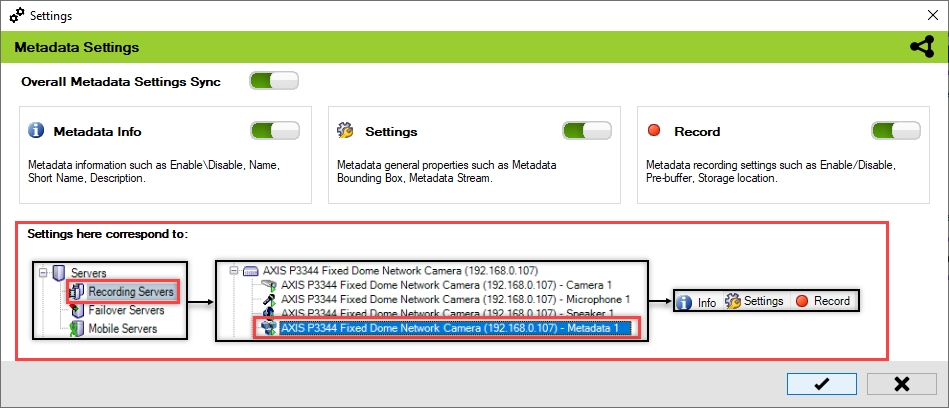

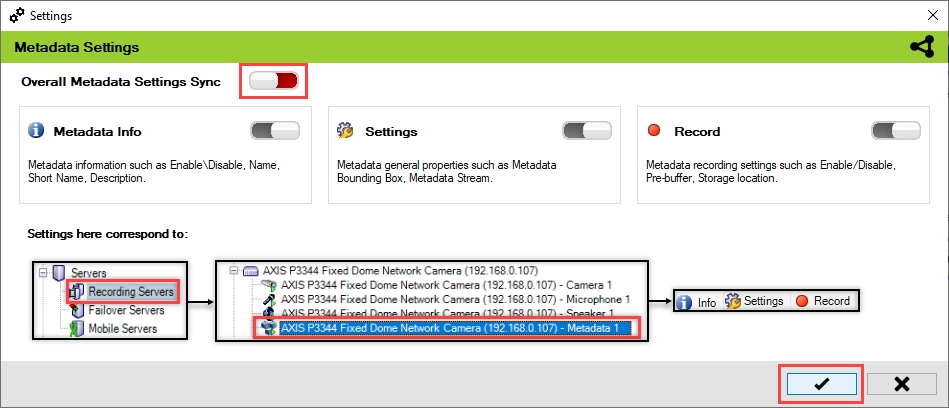

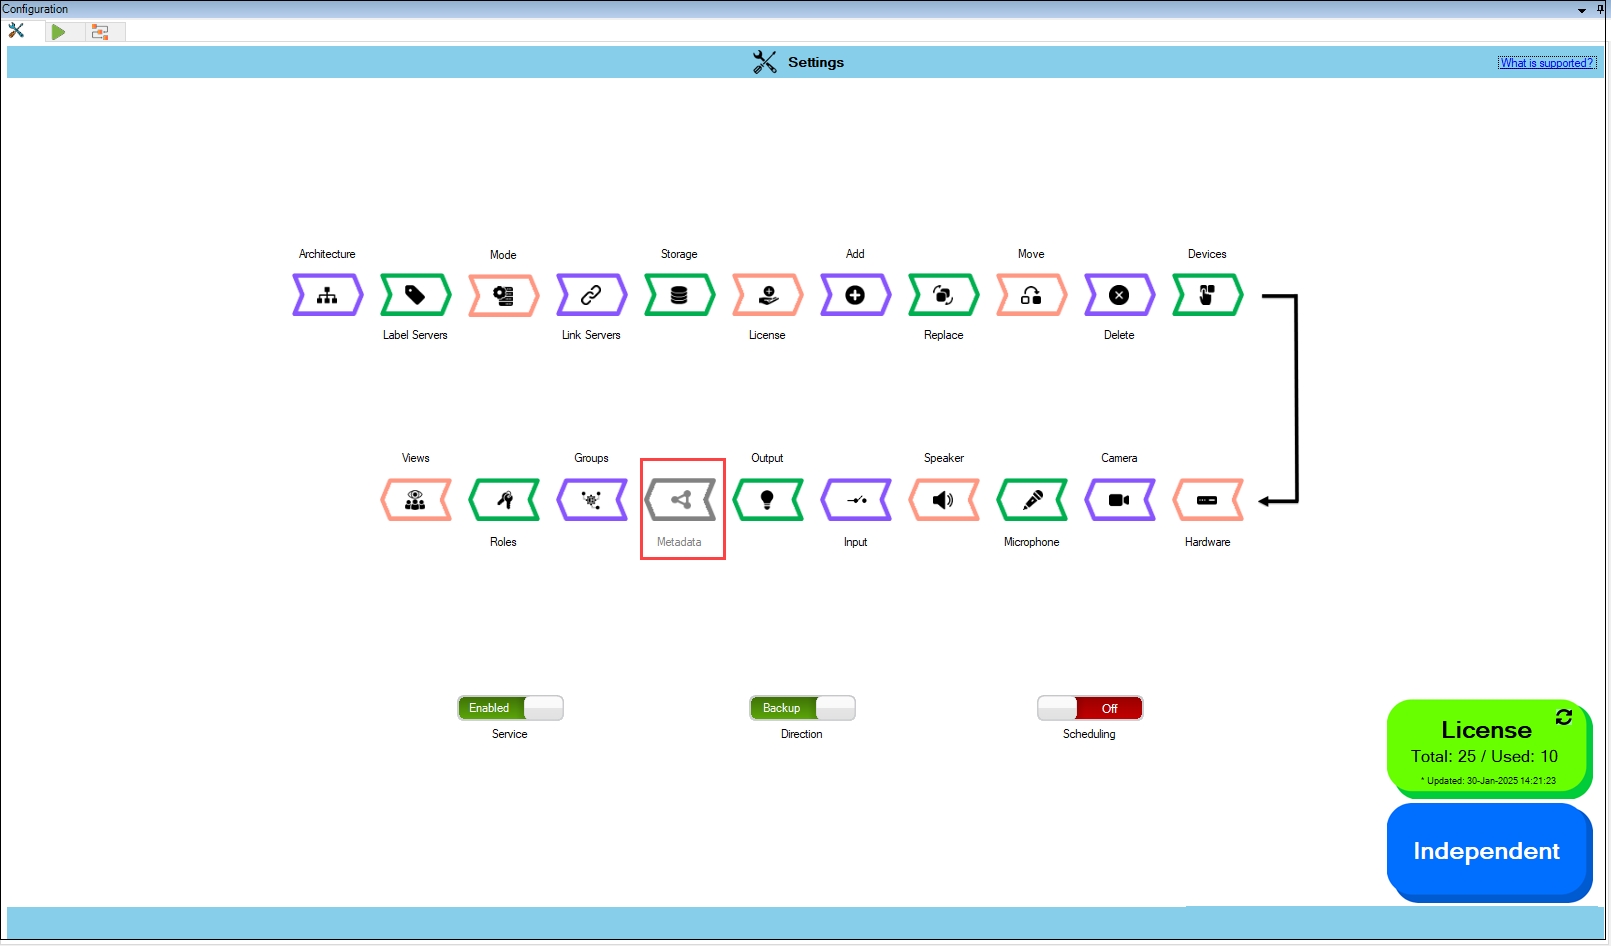
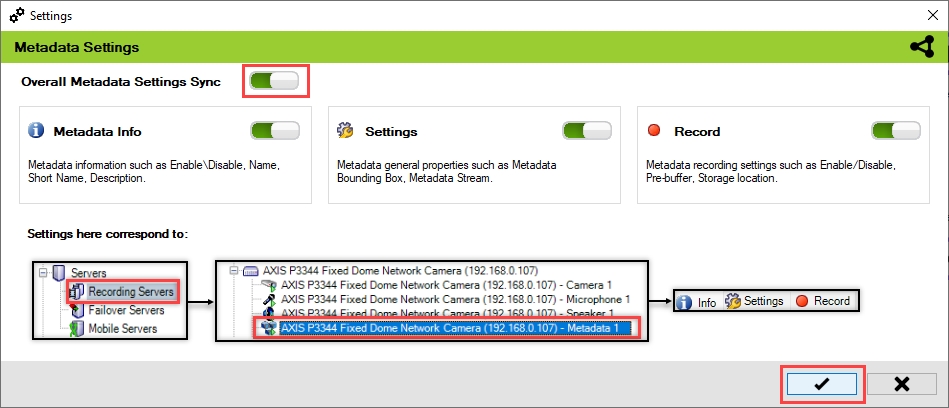
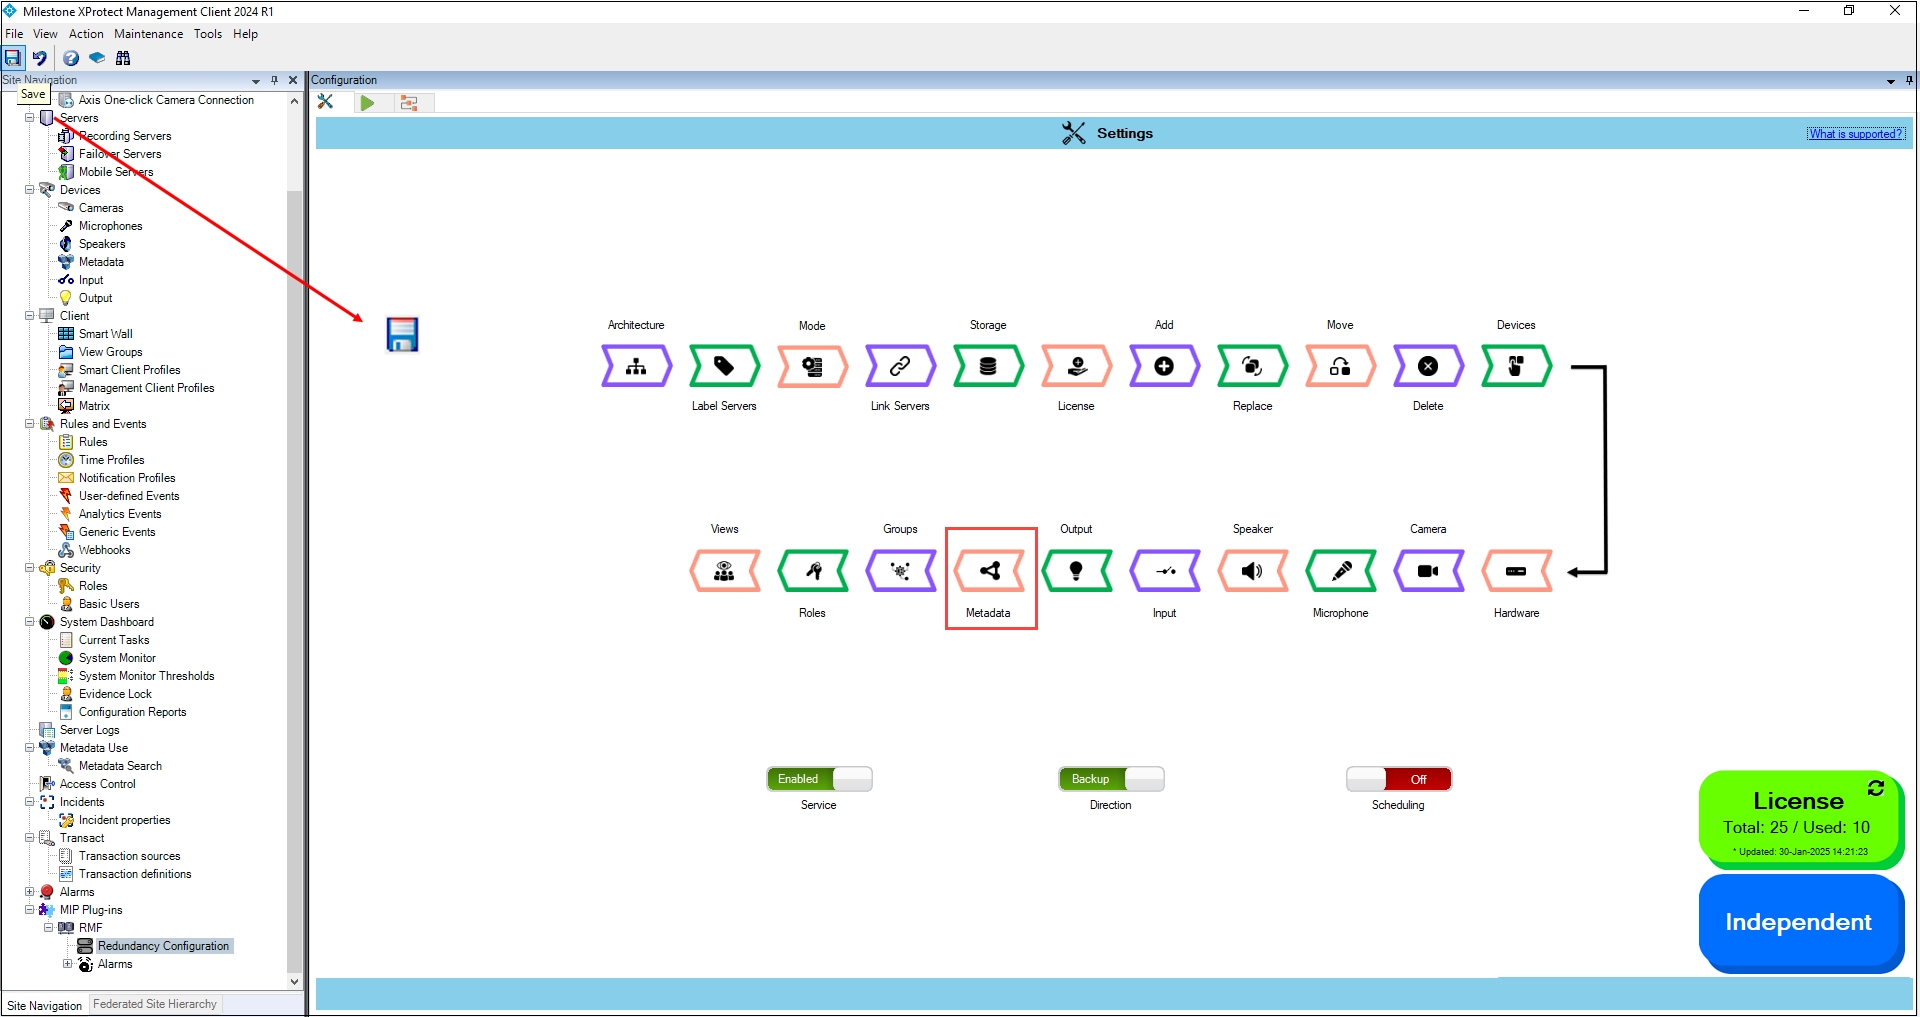


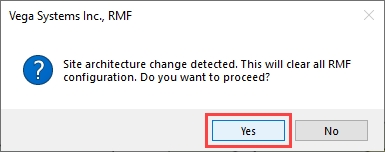

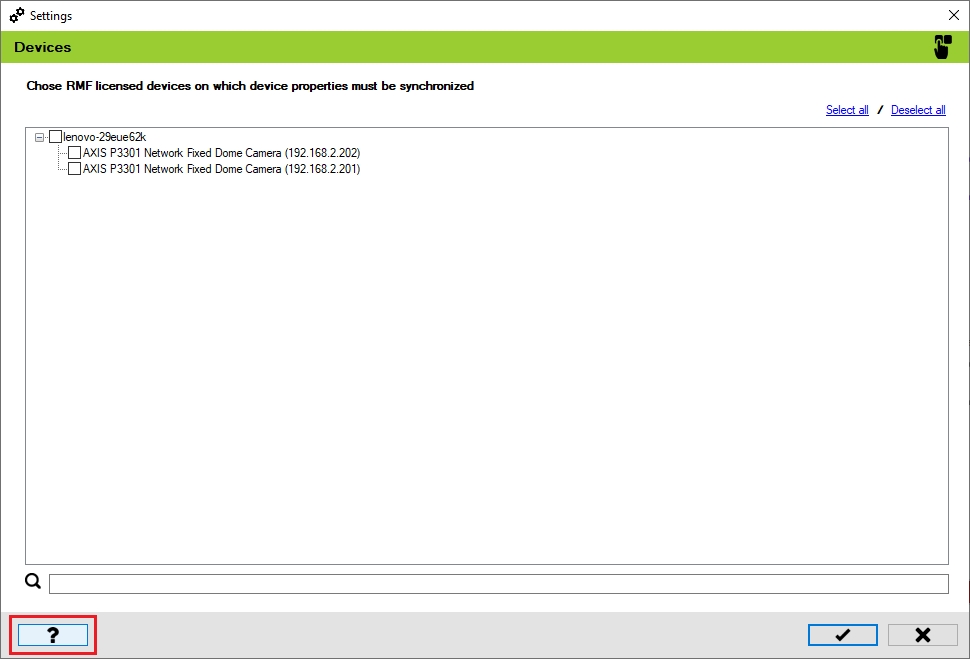


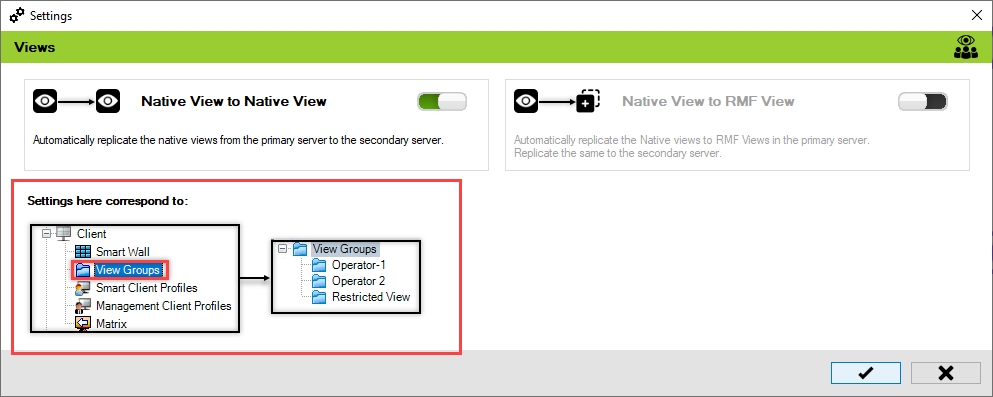
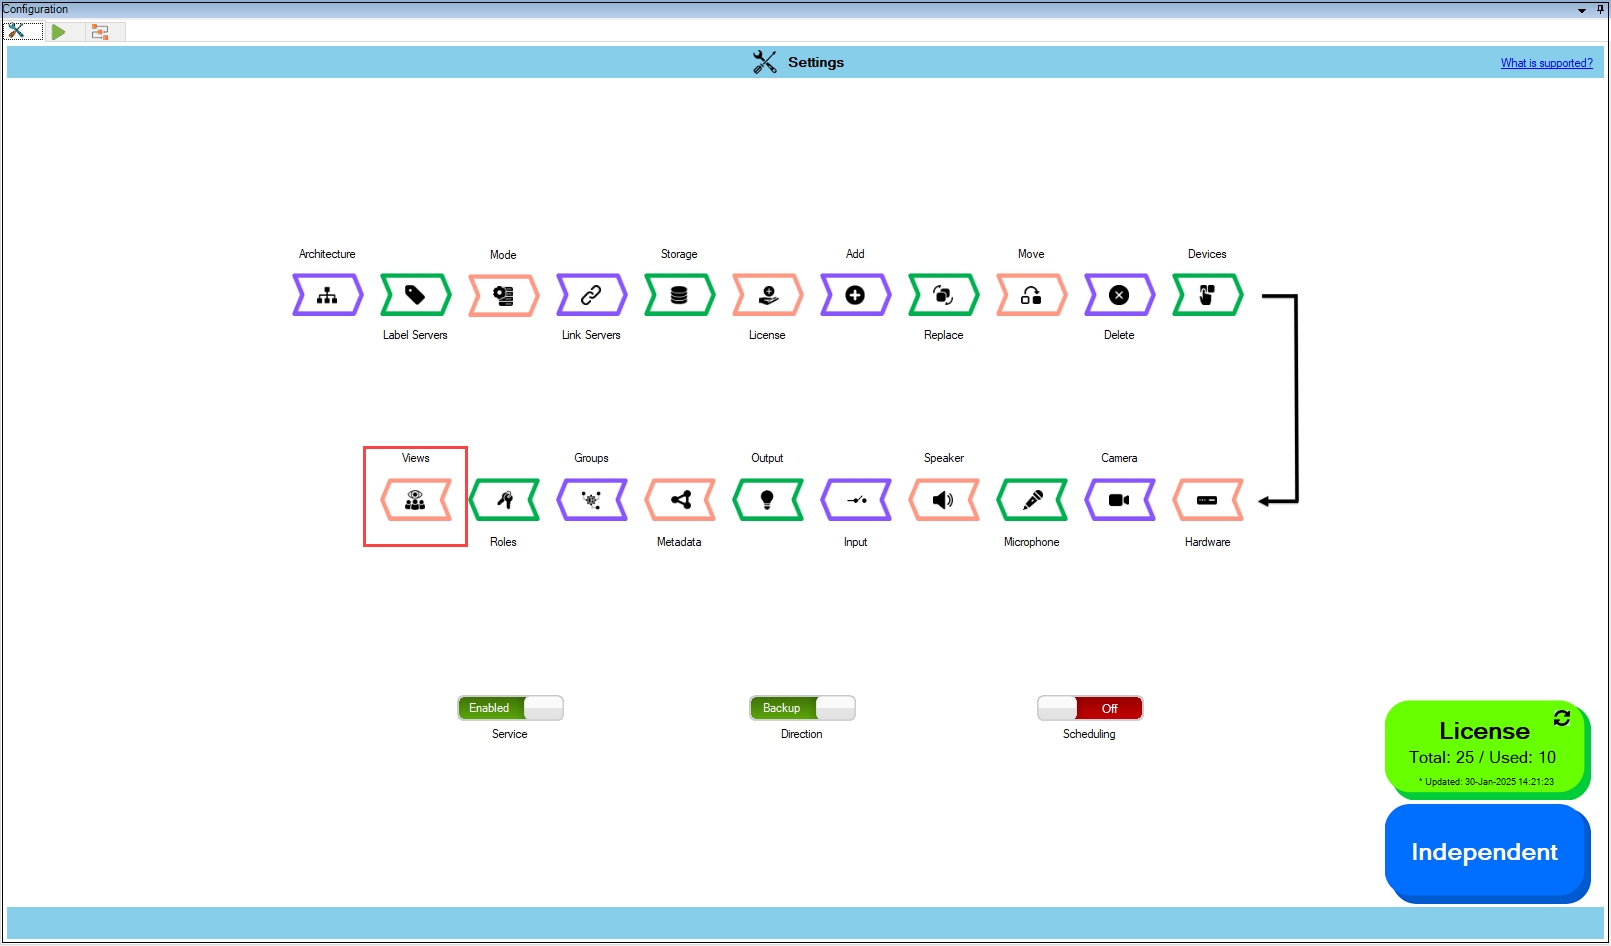
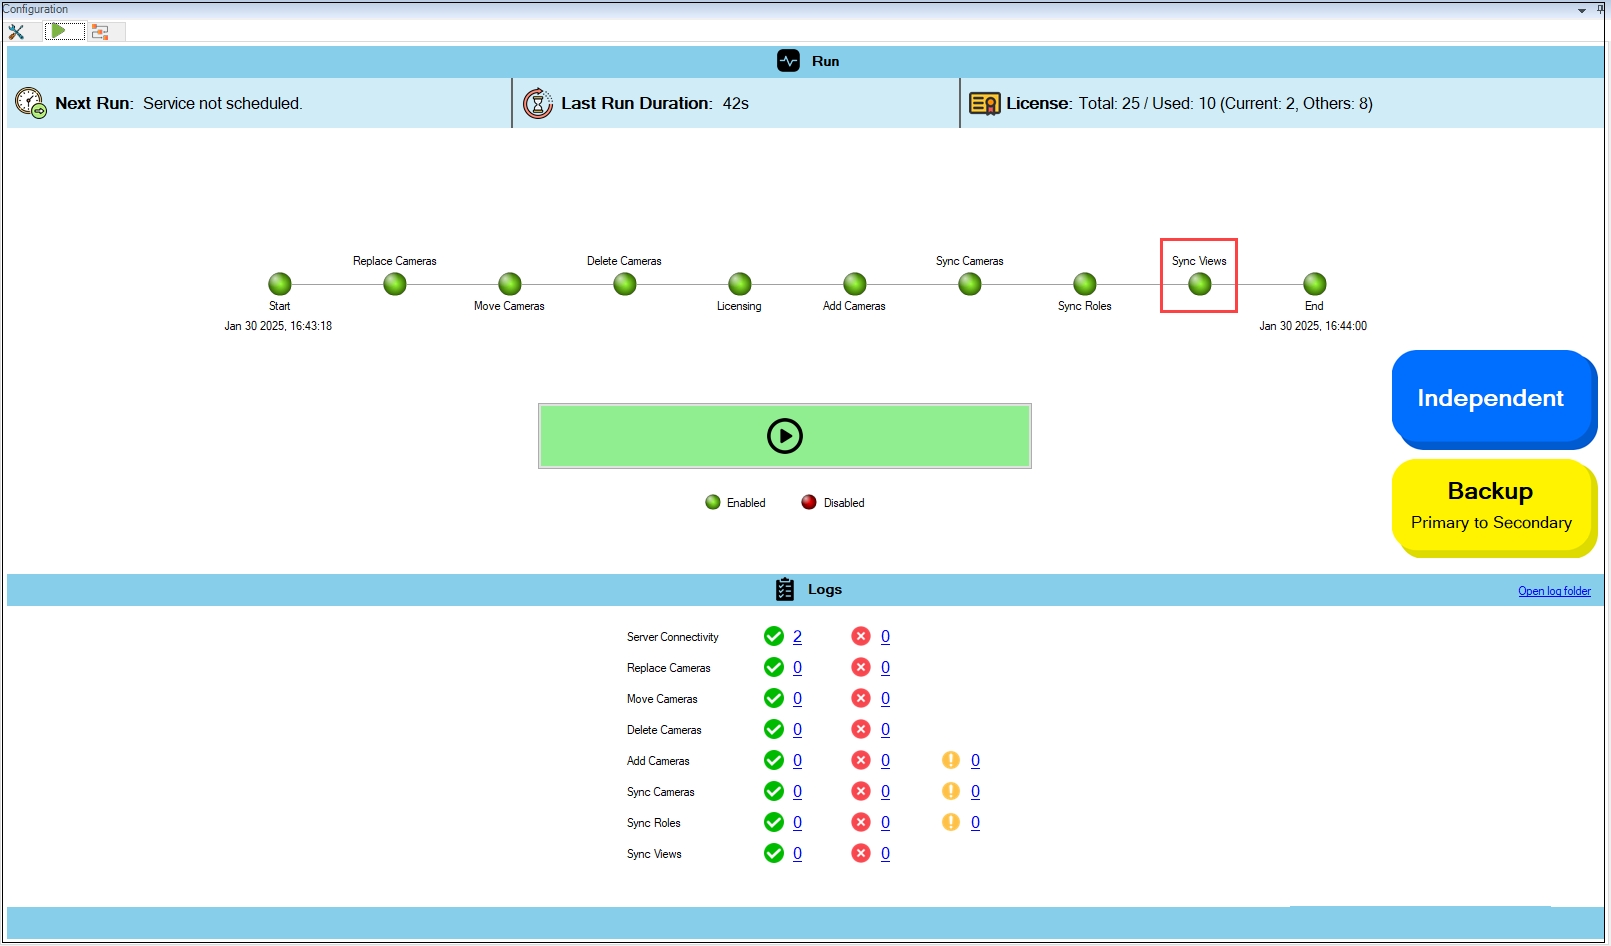


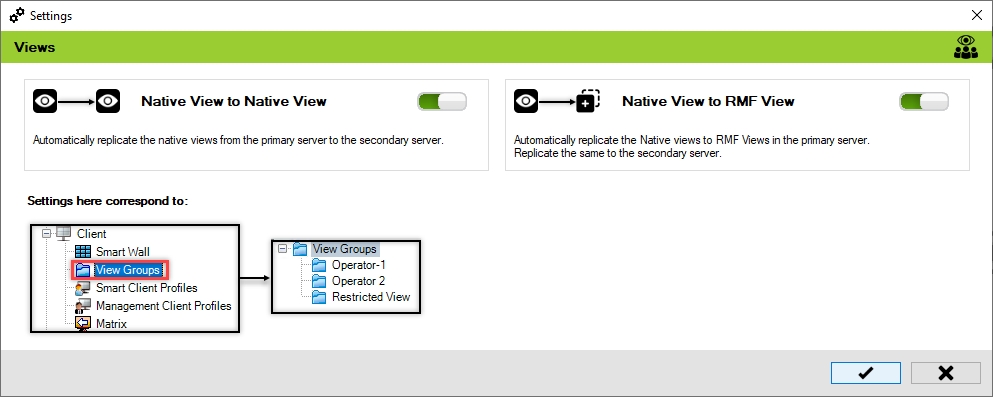
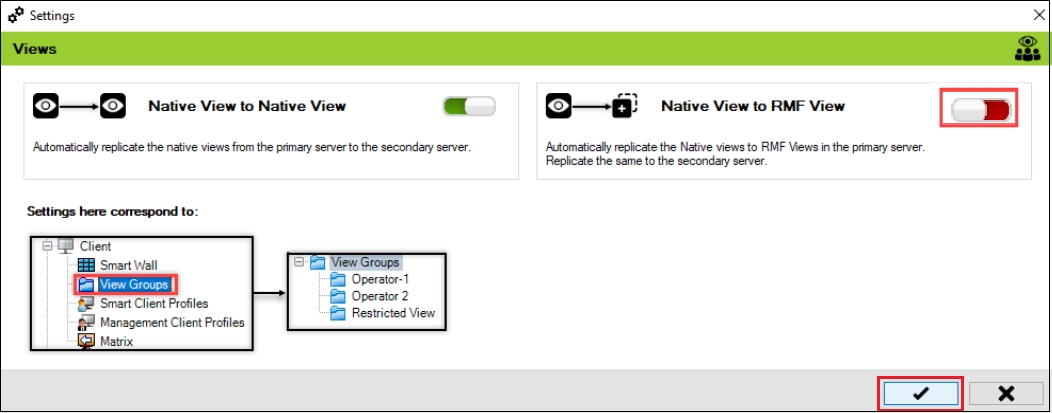
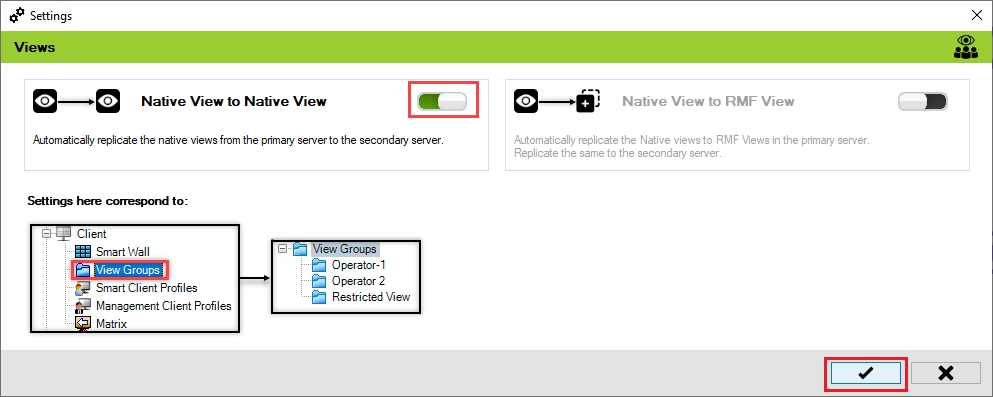
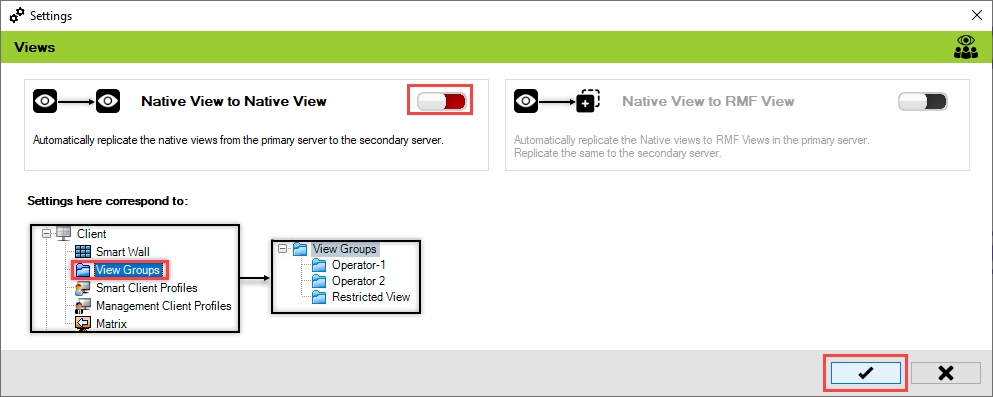


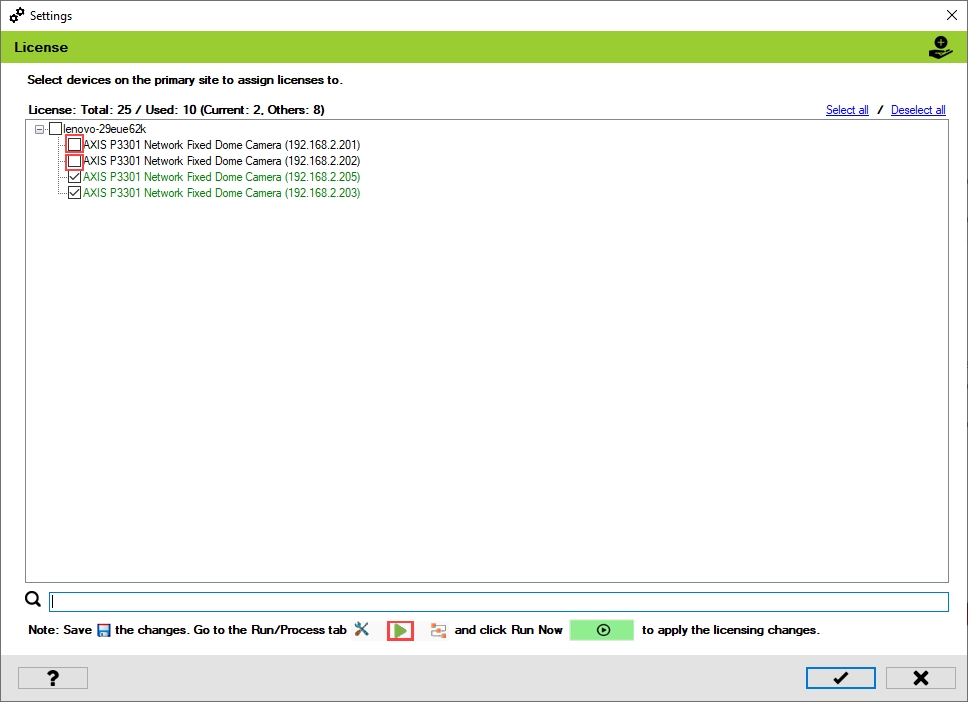
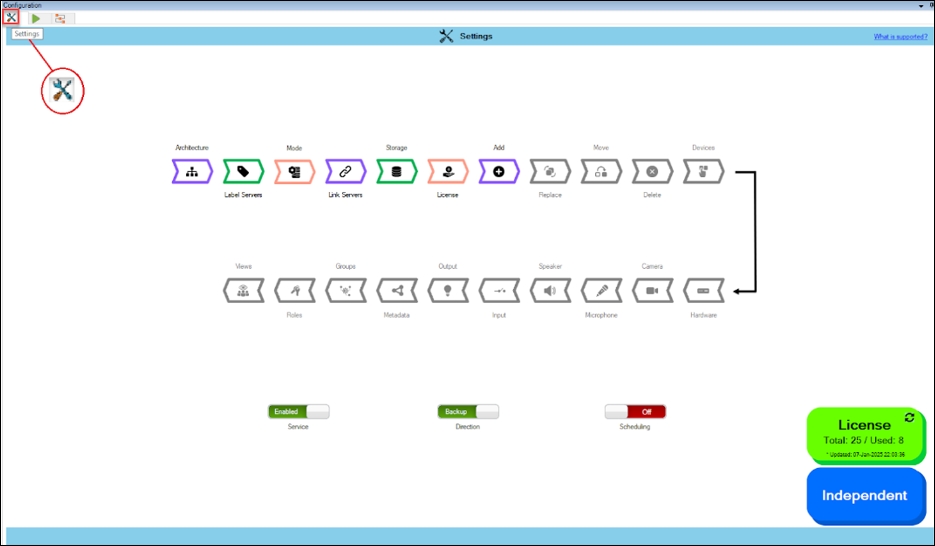

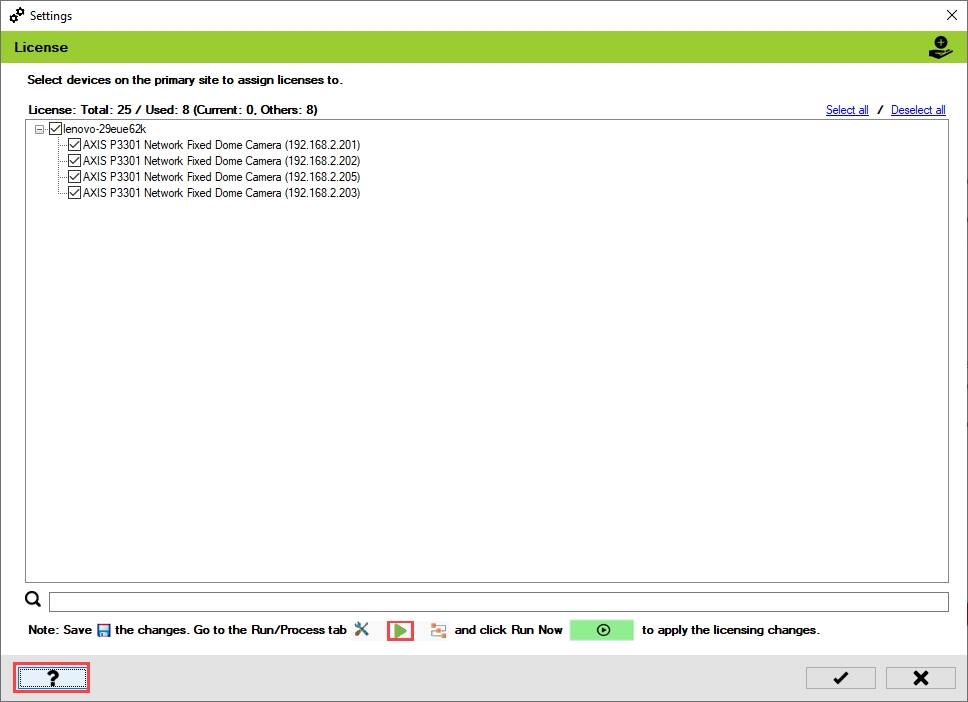

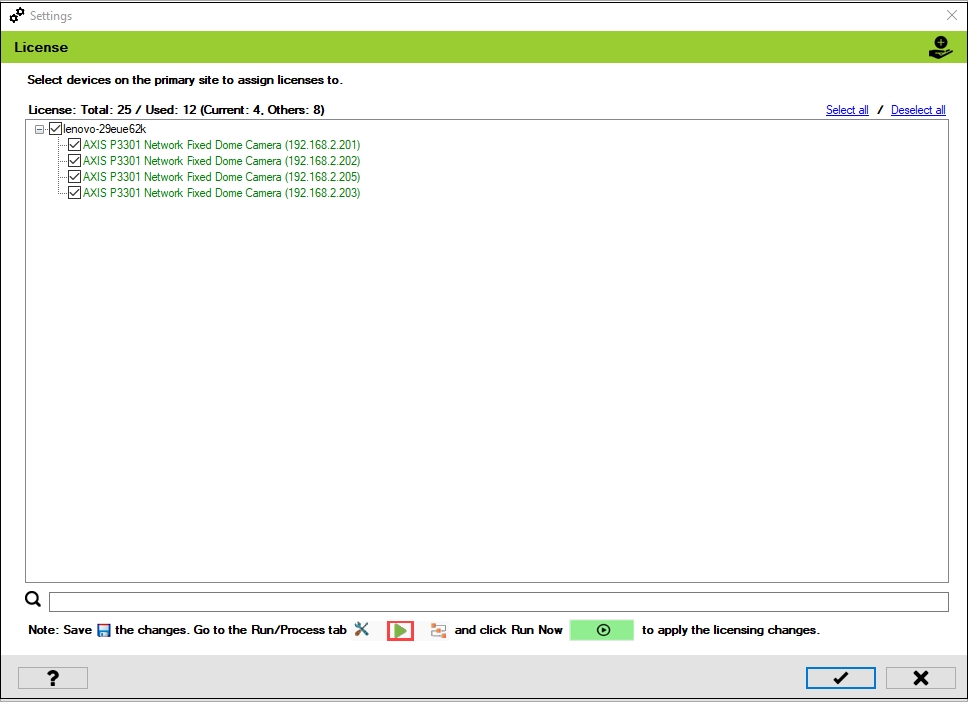
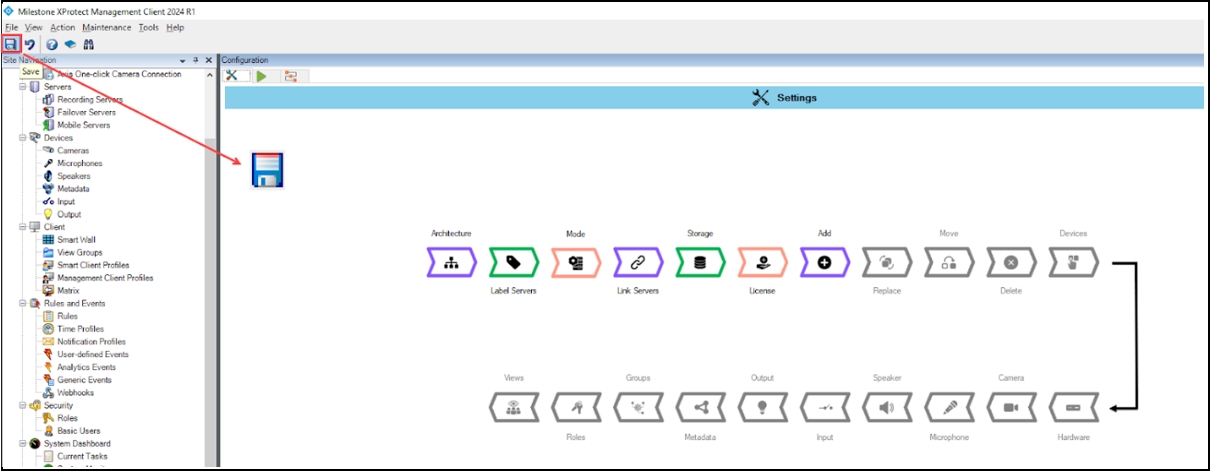

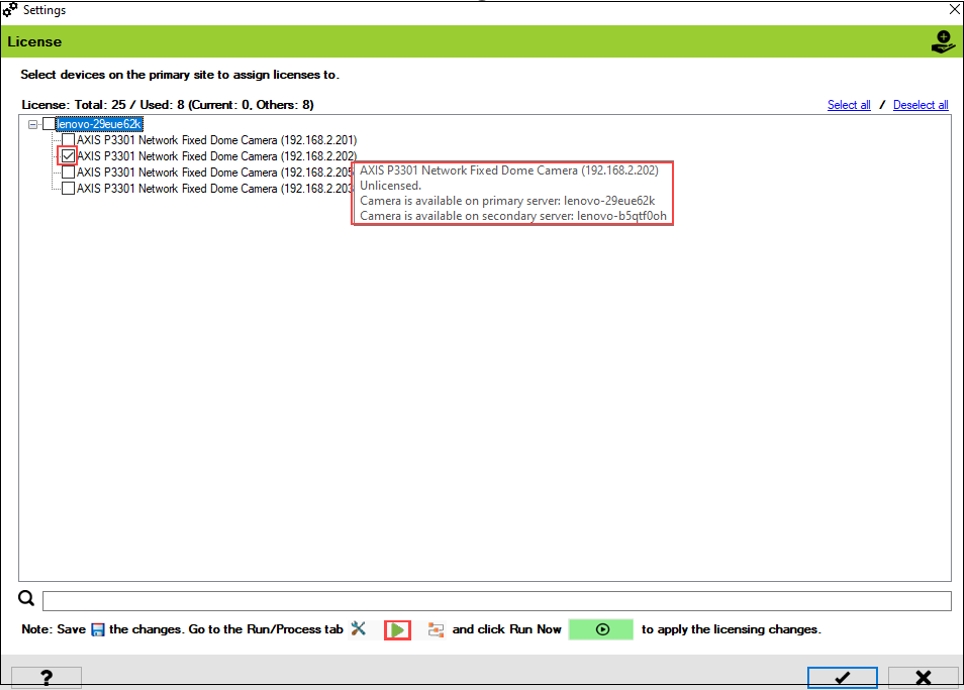

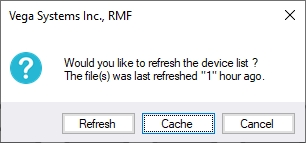
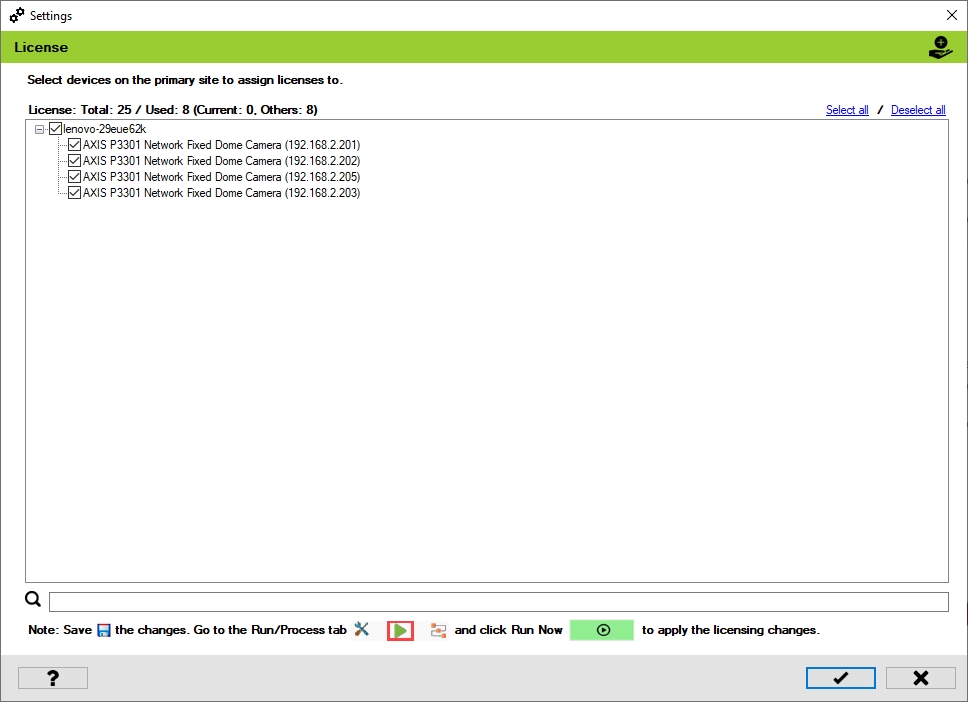
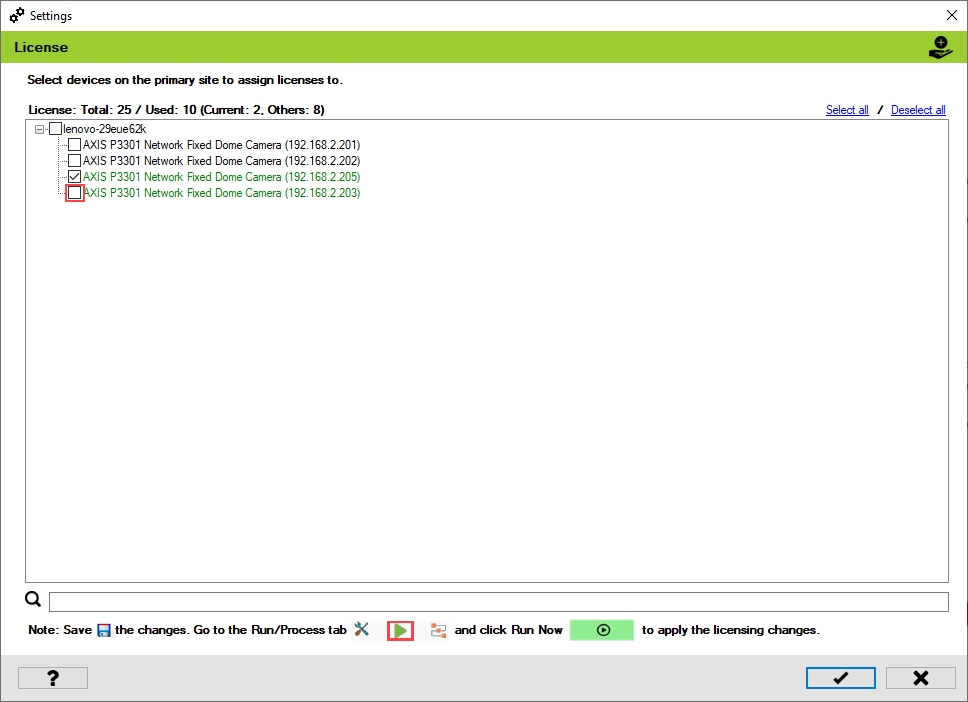

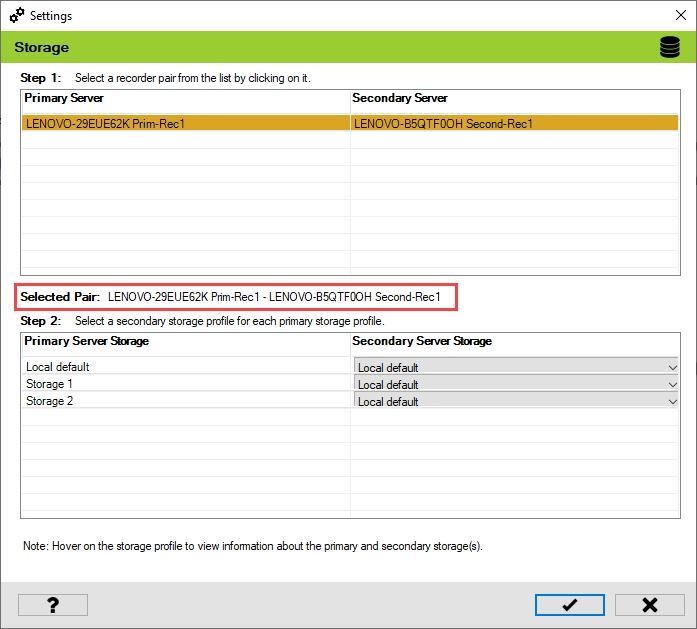
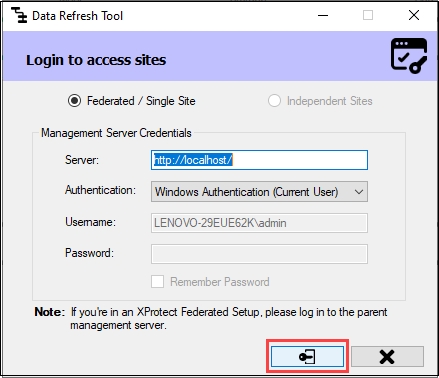
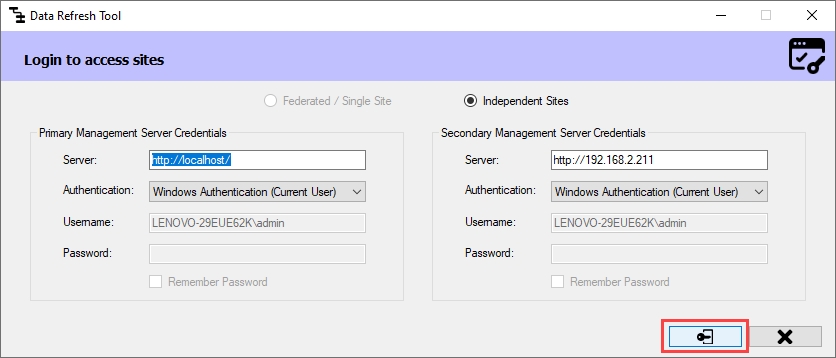
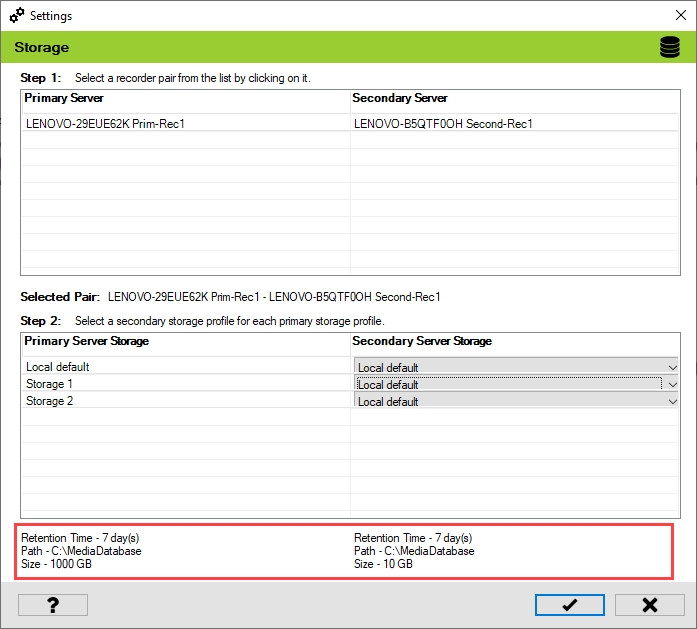
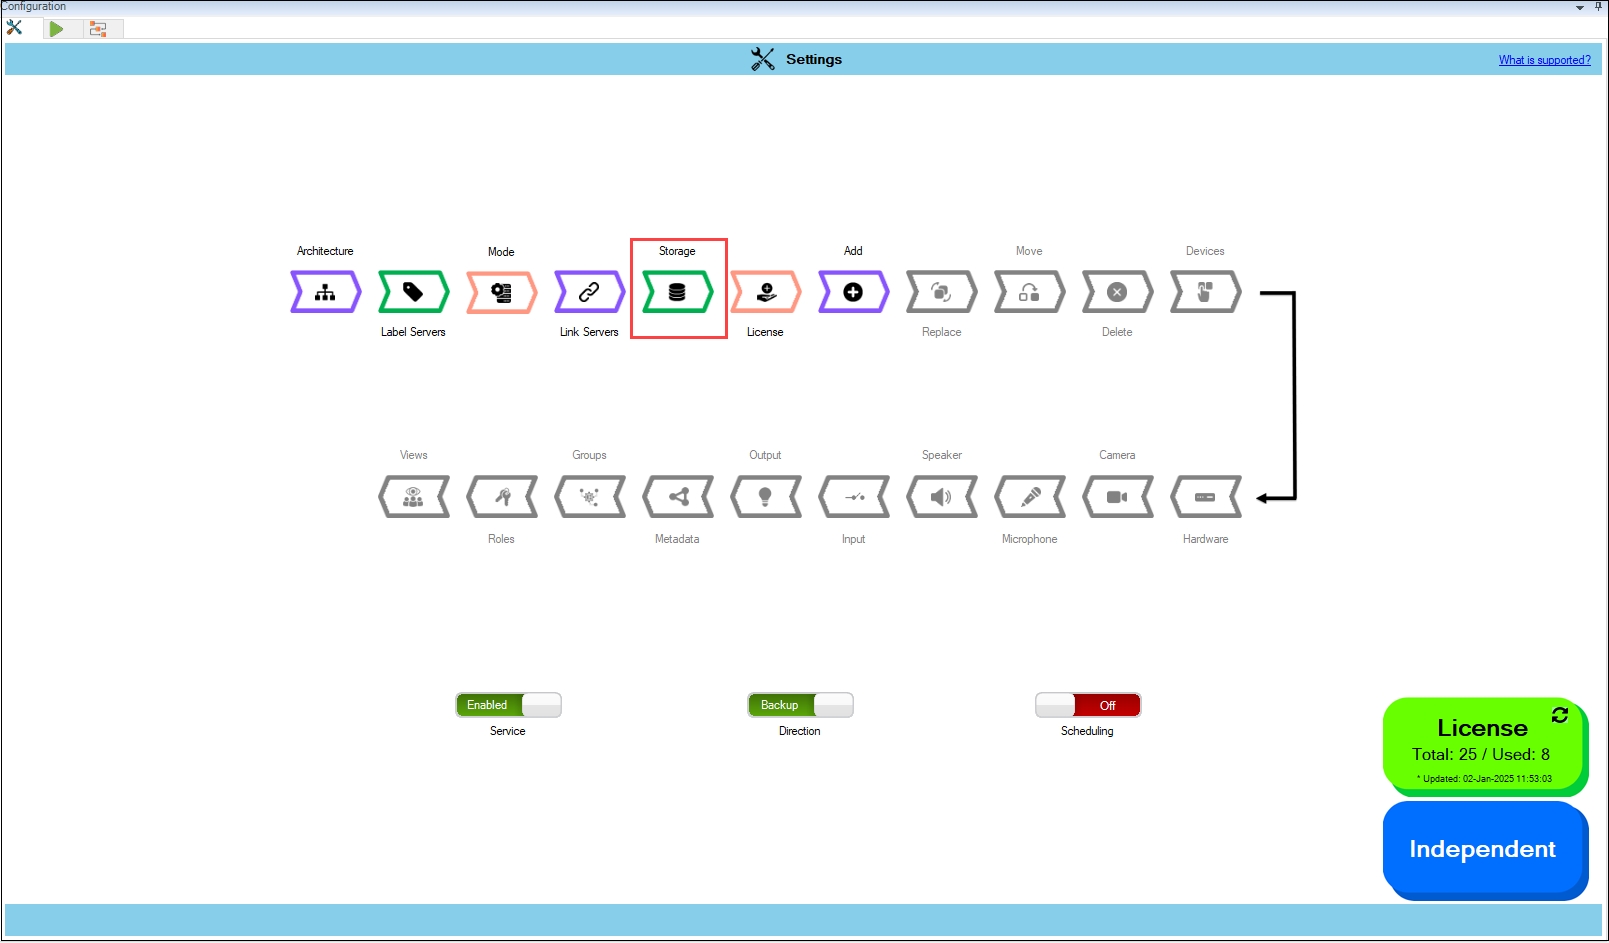
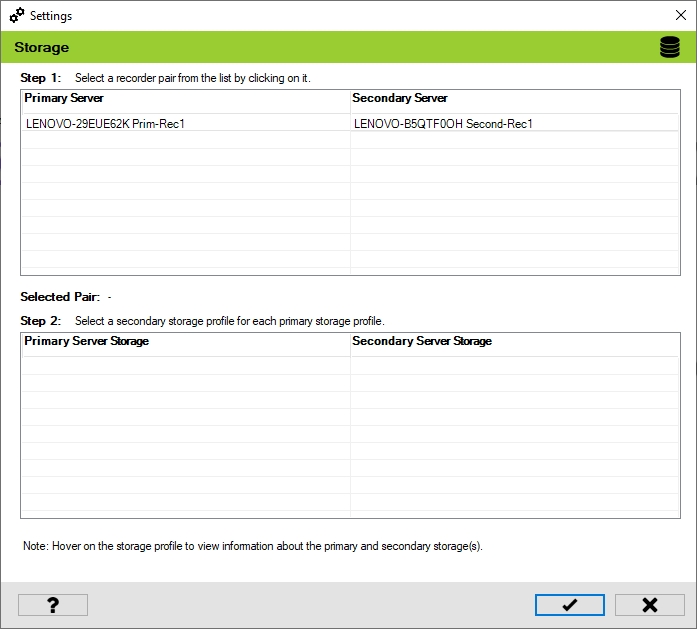
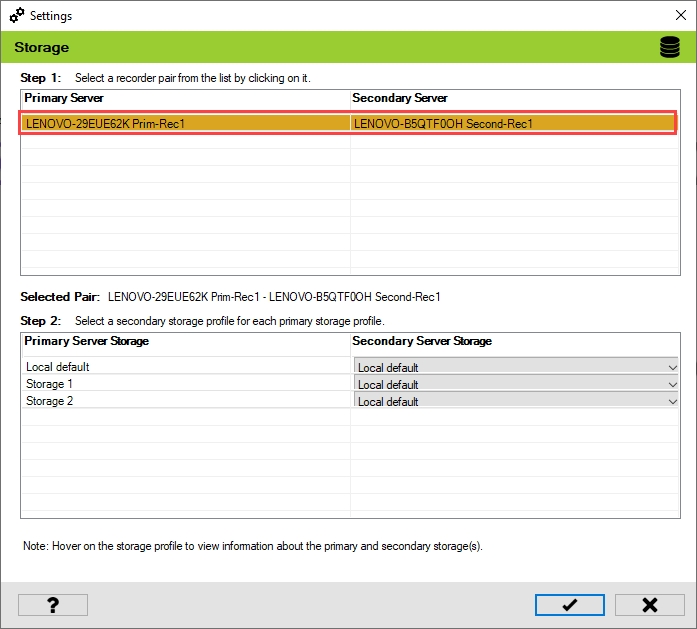
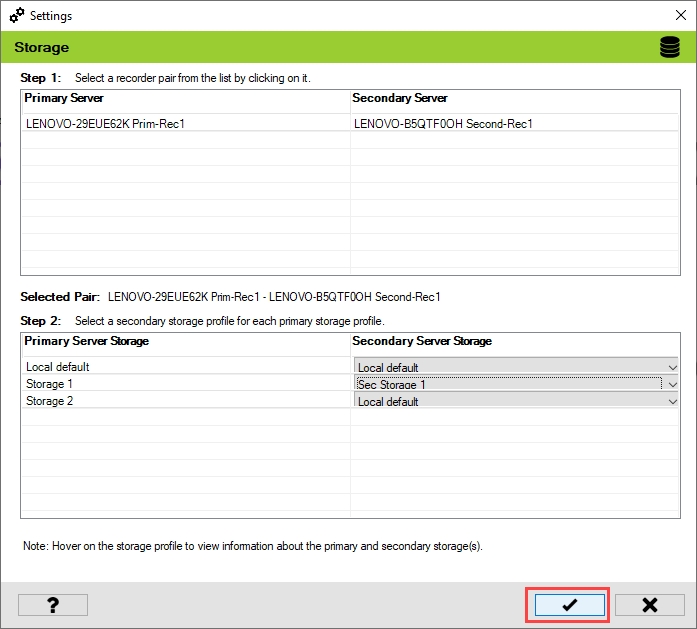
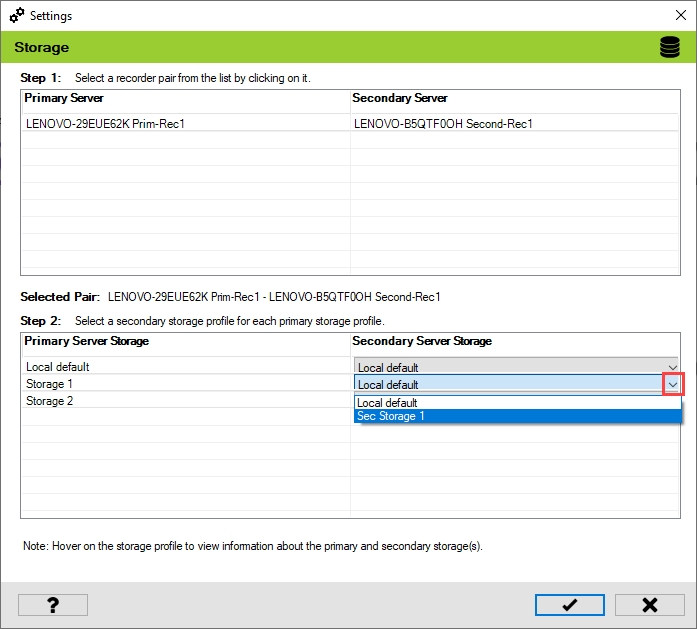
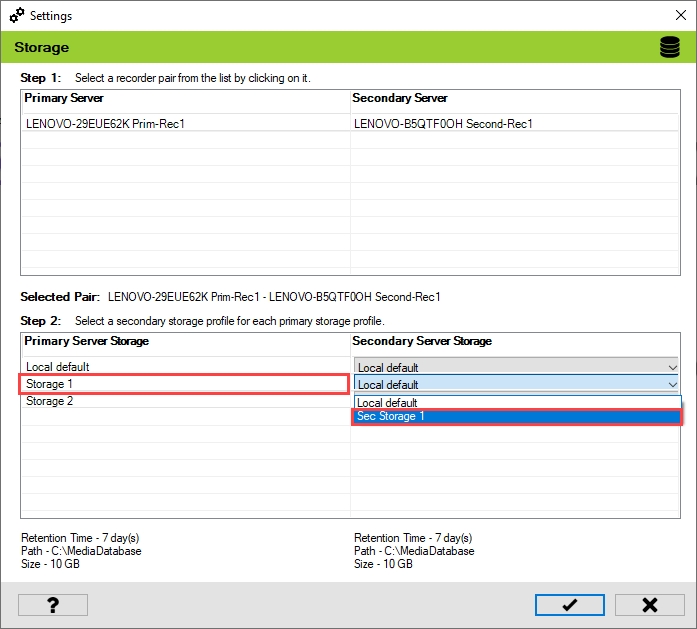
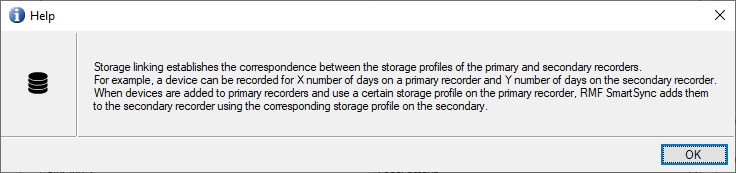
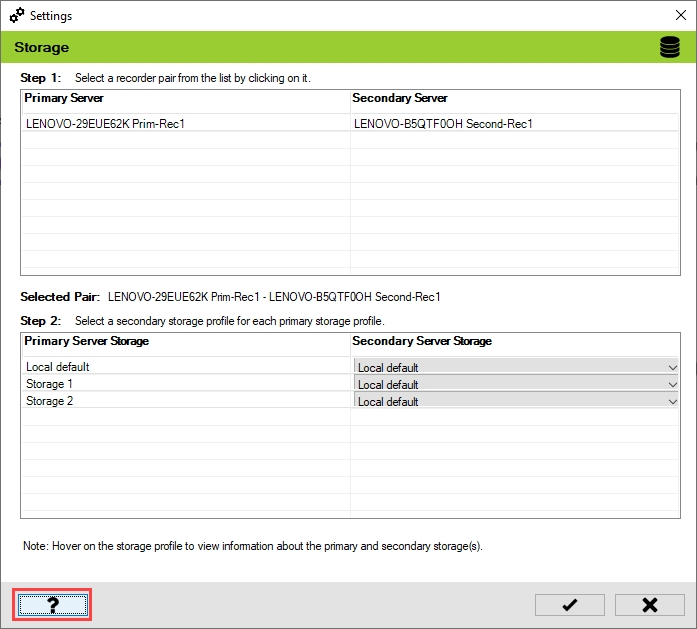
Getting there
To access the workflows dashboard, do the following steps.
Open the Milestone XProtect Management Client.
Navigate to MIP Plug-ins > RMF > Redundancy Configuration.
Click the Workflows tab on the RMF Information page.