
Loading...
Loading...
Loading...
Loading...
Loading...
Loading...
Loading...
Loading...
Loading...
Loading...
Loading...
Loading...
Loading...
Loading...
Loading...
Enable "Do Not Skip Gaps"
If the 'Do not Skip Gaps' is not enabled, while in playback, in the RMF viewer, the video will not be sourced from the alternate recording server during a recording gap in the first.
Choose one of the options below.
On the Playback’s dropdown list, set the option 'Do not skip gaps.'
Click the Default Smart Client Profile if all clients use this profile. Else, repeat the following steps on each profile.
Click the Timeline tab from the bottom menu. The Properties window appears.
On the Playback’s dropdown list, set the option to Do not skip gaps.
Tick the checkbox to lock the setting. Note: Using Smart Client Profiles, administrators can lock settings for each role, preventing users from changing any locked settings.
Click the Save button. Note: This ensures that the " Do not skip the gaps" option is set for all the SmartClient profiles related to RMF.
Hands-Free Operational Continuity
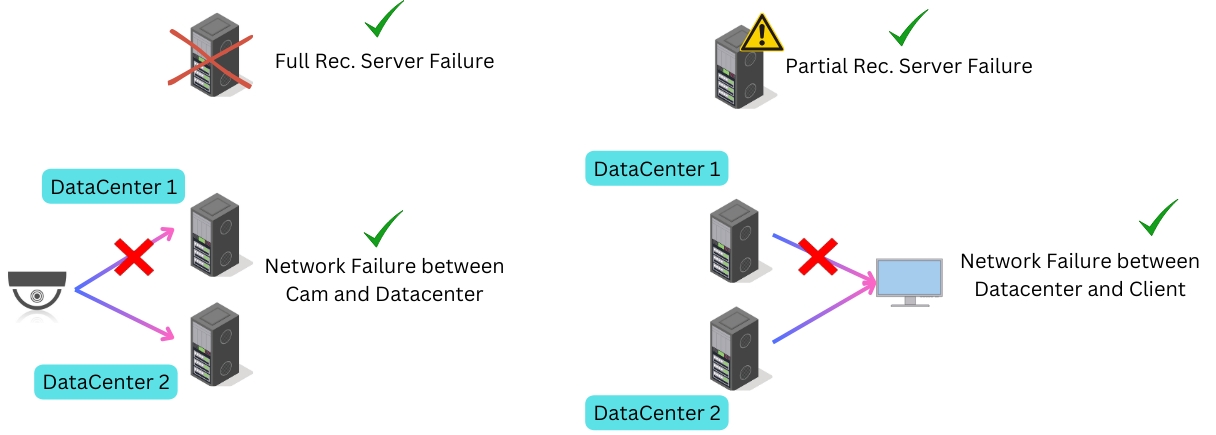
The RMF plugin is also integrated into the Milestone Smart Client application, ensuring continuous video monitoring and playback through seamless, cause-agnostic stream-level failover between primary and redundant recording servers.
Cause Agnostic Failure Detection and Mitigation: Effectively detects and addresses various types of failures, helping to mitigate video monitoring outages caused by multiple issues.
Rapid Stream-Level Failover: This capability integrates failure detection and mitigation into each client view, ensuring seamless failover. It enables deployments to achieve stream-level, sub-second live video failover and fast playback failover. Each client's view window independently determines its source recorder, independent of other windows and client machines, allowing for democratic, seamless transitions.
Failover extends to Independent Playback
In the Milestone XProtect Smart Client, Independent Playback is a feature in live view that enables users to view recorded video footage from a specific camera independently of the global or synchronized timeline used for other cameras.
RMF enhances the Milestone Smart Client with Independent Playback Stream-Level Failover, enabling each camera tile to automatically retrieve recorded video from the available source—primary or secondary—on a per-tile basis.
Select an RMF view while in live mode.
Click the Independent Playback button in the RMF plugin window to play the recording for the camera in the live view.
If a primary recorder does not have content at the playback timestamp, content is automatically sourced from the secondary recorder to continue uninterrupted playback.
Click the Independent Playback Exit button to stop playback.
Redundancy Aware Bookmark Creation and Searching
Bookmarks created through the RMF view are saved on both the primary and secondary recording servers. This redundancy ensures that even if one server goes offline, the bookmarks remain accessible through the other server.
When a user searches for bookmarks, RMF Software retrieves the data from both servers but intelligently eliminates duplicate entries, displaying only a single, consolidated result to the user.
View an RMF bookmark demo below.
Change PTZ preset parameters on both the primary and secondary sites
To update the PTZ preset, follow these steps.
Ha playback across Redundant recorders integrated into the Smart Client


When an operator opens a live view of a camera with the RMF plugin inside the Smart Client, RMF ensures that the view window receives the stream from the higher priority site under normal conditions. See Priority
Simultaneously, the RMF plugin in each Smart Client "democratically" monitors both primary and secondary video streams within each view window.
If the higher-priority stream is lost, the plugin automatically switches to the lower-priority source, ensuring live video continuity.
If the higher priority source is restored and validated, the system can optionally revert to it, depending on the user-defined failback policy. See
The switch is instantaneous and transparent—no need to change layouts, camera selections, or server IPs.
The switch time is controllable, and a sub-second time can be achieved on high-quality networks. See .
Each view window in the Smart Client evaluates Stream availability independently of other view windows
The switch decision is localized, meaning:
One view window's stream switch does not affect other view windows.
One user’s stream switch does not impact others.
Each client view's tile independently selects the most reliable source in real time.
Stream-level Failover - Video-Aware HA fails over only streams that can't be served from a site.
No Black Screens – Users always have access to the live feed, even if one site experiences issues.
Decentralized Intelligence – Each view window autonomously monitors and makes failover decisions, enhancing resilience.
User Transparency – No buttons, no manual input—failover occurs automatically.
Failsafe Security – Critical monitoring persists without interruptions during outages, cyber incidents, or maintenance.

RMF monitors recording availability across both primary and secondary Milestone XProtect sites.
When a user requests playback from a camera recorded on the primary site, but that site is offline, or if it does not contain recorded footage for the requested timestamp, requested:
RMF automatically reroutes the playback request to the redundant recording on the secondary site.
This process occurs transparently for the user—same Smart Client, same camera, uninterrupted access.
Navigate to the PTZ settings in the RMF client window while in live view, and click on the slider button.


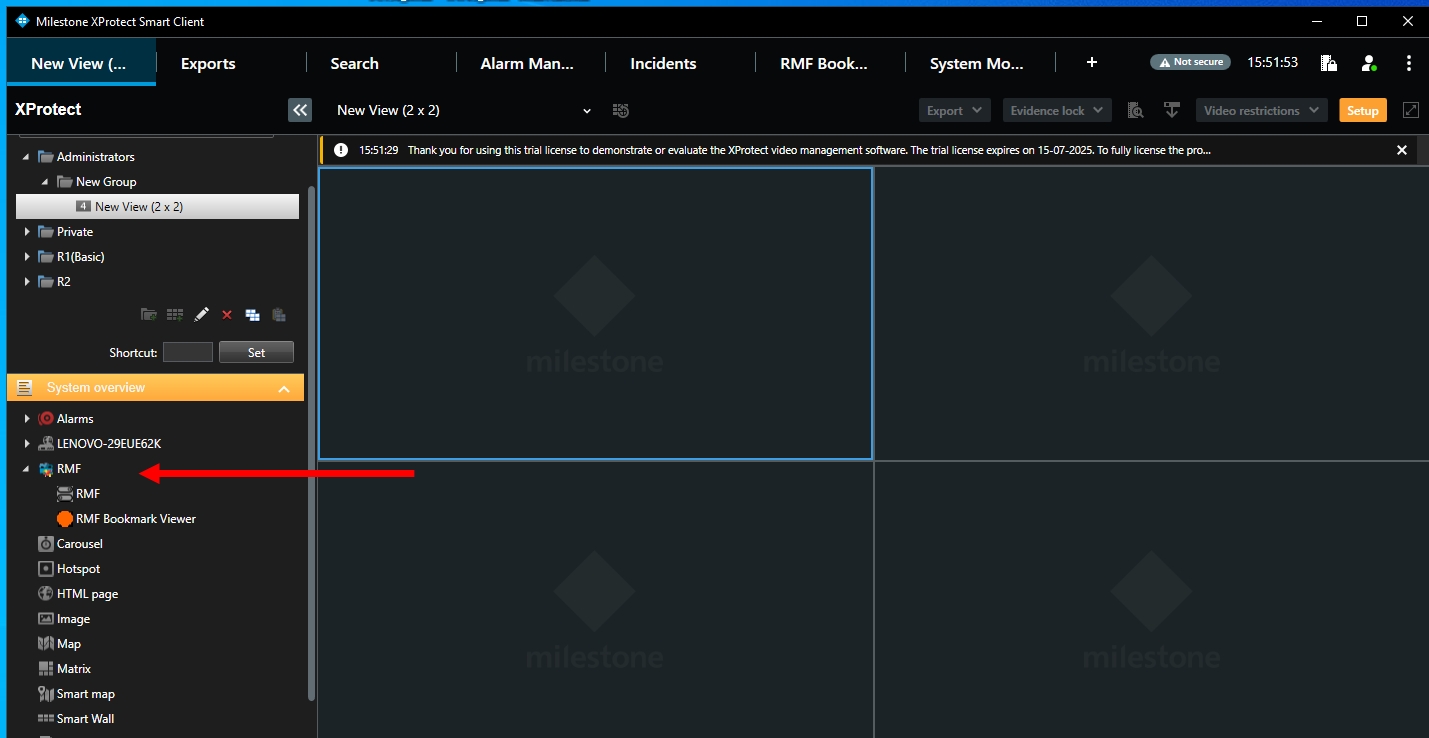
Creating an RMF View
The RMF Smart Sync service automatically generates RMF views that correspond to native Milestone Smart Client views. As the admin makes changes to view layouts for each role, these changes are automatically synchronized into the corresponding RMF views. For more details, refer to
However, administrators may want to create an RMF view manually for each role and not use native views. The steps below outline this process for administrators.


Export Video from the recorder that has content during the export window
If there are no recording gaps in the playback timeline of the serving recorder that coincide with the time window needed for export (t0 to t1, below), one may proceed with exporting the footage.
The following steps are recommended when exporting content from the Smart Client while viewing a camera through the RMF plugin, particularly when the recorder providing the content has a recording gap that overlaps with the time window required for export.
Upcoming RMF releases support bidirectional backfill, rendering the aforementioned forced failover unnecessary. However, the best way to prevent missing content is always to utilize edge recording and enable 'Restore from Edge.'
Remove a preset from both primary and secondary sites
To delete the PTZ preset, follow these steps.
If both the serving recorder and the backup recorder have gaps, then
If this camera supports Edge recording and the 'Restore from the Edge' feature is enabled, wait for the missing content to be restored onto either recorder before exporting.
If there is no edge recording, the best we can do at this moment is to export the duplicate camera footage from both recorders.


User driven start/stop recording on both recorders
With RMF, a single user-driven start or stop recording action in the Smart Client instantly triggers recording on both the primary and secondary XProtect sites, ensuring redundancy without added complexity.
One Click, Two Recorders – The command is mirrored to both sites, capturing identical footage from both recorders.


Built-In Smart Client Integration – This feature is conveniently embedded into each RMF-enabled view window, allowing operators to trigger or stop dual recording directly from the camera tile without navigating menus.
Resilient Evidence Capture – Ensures no gaps in recording, even if one site fails mid-session, making it ideal for high-security, audit-sensitive environments.
Select a camera in live mode from the RMF view.
Click the "Start Record" button to begin recording the visible camera.
Click the Stop Recording button to end the recording.
Go to Playback. You can view and play the manual recording.


Translate a single user PTZ preset management action to actions on both sites
With RMF, PTZ (Pan-Tilt-Zoom) presets remain available even during server failover. Whether connected to the primary or secondary site, the Milestone Smart Client retrieves the correct PTZ preset positions using RMF’s synchronized configuration layer.
Remember to grant PTZ access to the role that requires it. Without this option selected, a user cannot access or navigate the PTZ presets created by the admin user.
🕹️ Smooth Live View PTZ Control – Whether connected to the primary or secondary site, operators enjoy real-time, responsive PTZ control in live view. Preset recalls, manual moves, and zooms function identically across both systems.
✏️ Unified Preset Management – Through the RMF Smart Client plugin, users can add, update, or delete PTZ presets directly from the live view interface. RMF automatically synchronizes these changes to both P and S, maintaining consistency across sites.
⚠️ Intelligent Mismatch Detection – RMF monitors for preset discrepancies, including differences in preset name, number, or PTZ coordinates. When mismatches are detected, operators are prompted to choose whether to apply the primary configuration to the secondary or vice versa, ensuring intentional, audit-friendly synchronization.

Joysticks are supported in the RMF Smart Client view
RMF supports hardware joystick integration for PTZ (Pan-Tilt-Zoom) cameras, providing operators with a faster and more intuitive way to control camera movement beyond traditional mouse or software-based controls.
With joystick support, users can:
Pan horizontally, tilt vertically, and zoom with precision—ideal for full situational coverage.
Enjoy fluid, real-time control that's critical in high-pressure environments, such as traffic control centers or live security operations.
To enable this feature, connect your joystick device to the Smart Client system. Once set up, operators can take complete manual control of PTZ cameras, improving responsiveness and accuracy across both primary and secondary RMF-managed sites.
The Milestone Smart Client's native Joystick management is more comprehensive than RMF's. For instance, RMF does not support mapping Joystick buttons to PTZ presets. We plan to add functionality in future releases.


