Use Storage Linking to inform RMF how the retention rules on each Primary recorder are translated to its Secondary. Here, you map every storage profile on a Primary (e.g., “30-Day Local”, “7-Day Edge”) to the profile that should be applied on the Secondary (e.g., “90-Day DR”, “14-Day Cloud”). When SmartSync later detects a new camera—or you switch an existing one—to a given profile on the Primary, it automatically assigns the camera to the corresponding profile on the Secondary.
If no mapping is defined, SmartSync falls back to the Secondary’s default storage profile, which may not provide the expected retention. Therefore, create explicit links first to ensure your long-term, short-term, and regulatory retention tiers are perfectly aligned.
In Manual Mode – Because cameras can be routed to multiple secondaries, RMF first compiles a table of every unique primary-to-secondary pairing created by your camera map. For each pairing, you must define how the primary’s storage profiles translate to the secondary’s profiles; if you leave a pairing blank, the secondary will use its default profile whenever a camera from that primary is synced.
Perform the following steps to link the Storage profiles.
Click Storage.
Storage Option
Step Result: The Data Refresh Tool Dialog box appears.
a. For an Independent architecture, the following screen appears:
Login Screen—Independent
Note: You must log in with administrator privileges.
Click Connect at the bottom right corner of the screen to continue.
Connect Option—Independent
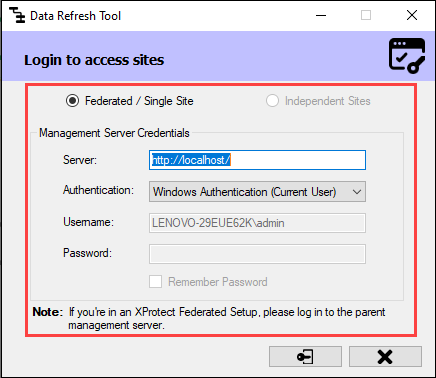
For Federated/Single Site, the following screen appears:
Login Screen—Federated/Single Site
Note: If your XProtect architecture is Federated, log in to the Parent Management Server.
Click Connect at the bottom right of the screen to continue.
Connect Option—Federated/Single Site
Step Result: The following screen appears.
Storage Screen
Select one of the Primary and Secondary recorder pairs from the list of linked servers that were associated in the previous step.
Primary and Secondary Server Pair
Step Result: The selected server pair is listed under the Selected Pair section. Also, the list of Storage profiles for the selected Primary and Secondary server pairs is visible.
Selected Pair of Servers
Note: To view more information about the storage profiles, such as Retention time, Path, and Size, hover over the storage profiles listed.
Storage Server Additional Information
Click the Help icon to view additional information about Storage Linking.
Help Icon
Help Information
Select one of the Storage Profiles under the Primary Server Storage.
Click the drop-down menu in the Secondary Server Storage section.
Secondary Storage Server Drop-down
Select the relevant Secondary Storage Profile from the drop-down.
Secondary Server Storage Profile
Click the tick mark at the bottom of the screen to save the changes.
Save Icon
8. Click Save in the Milestone toolbar to save the changes.