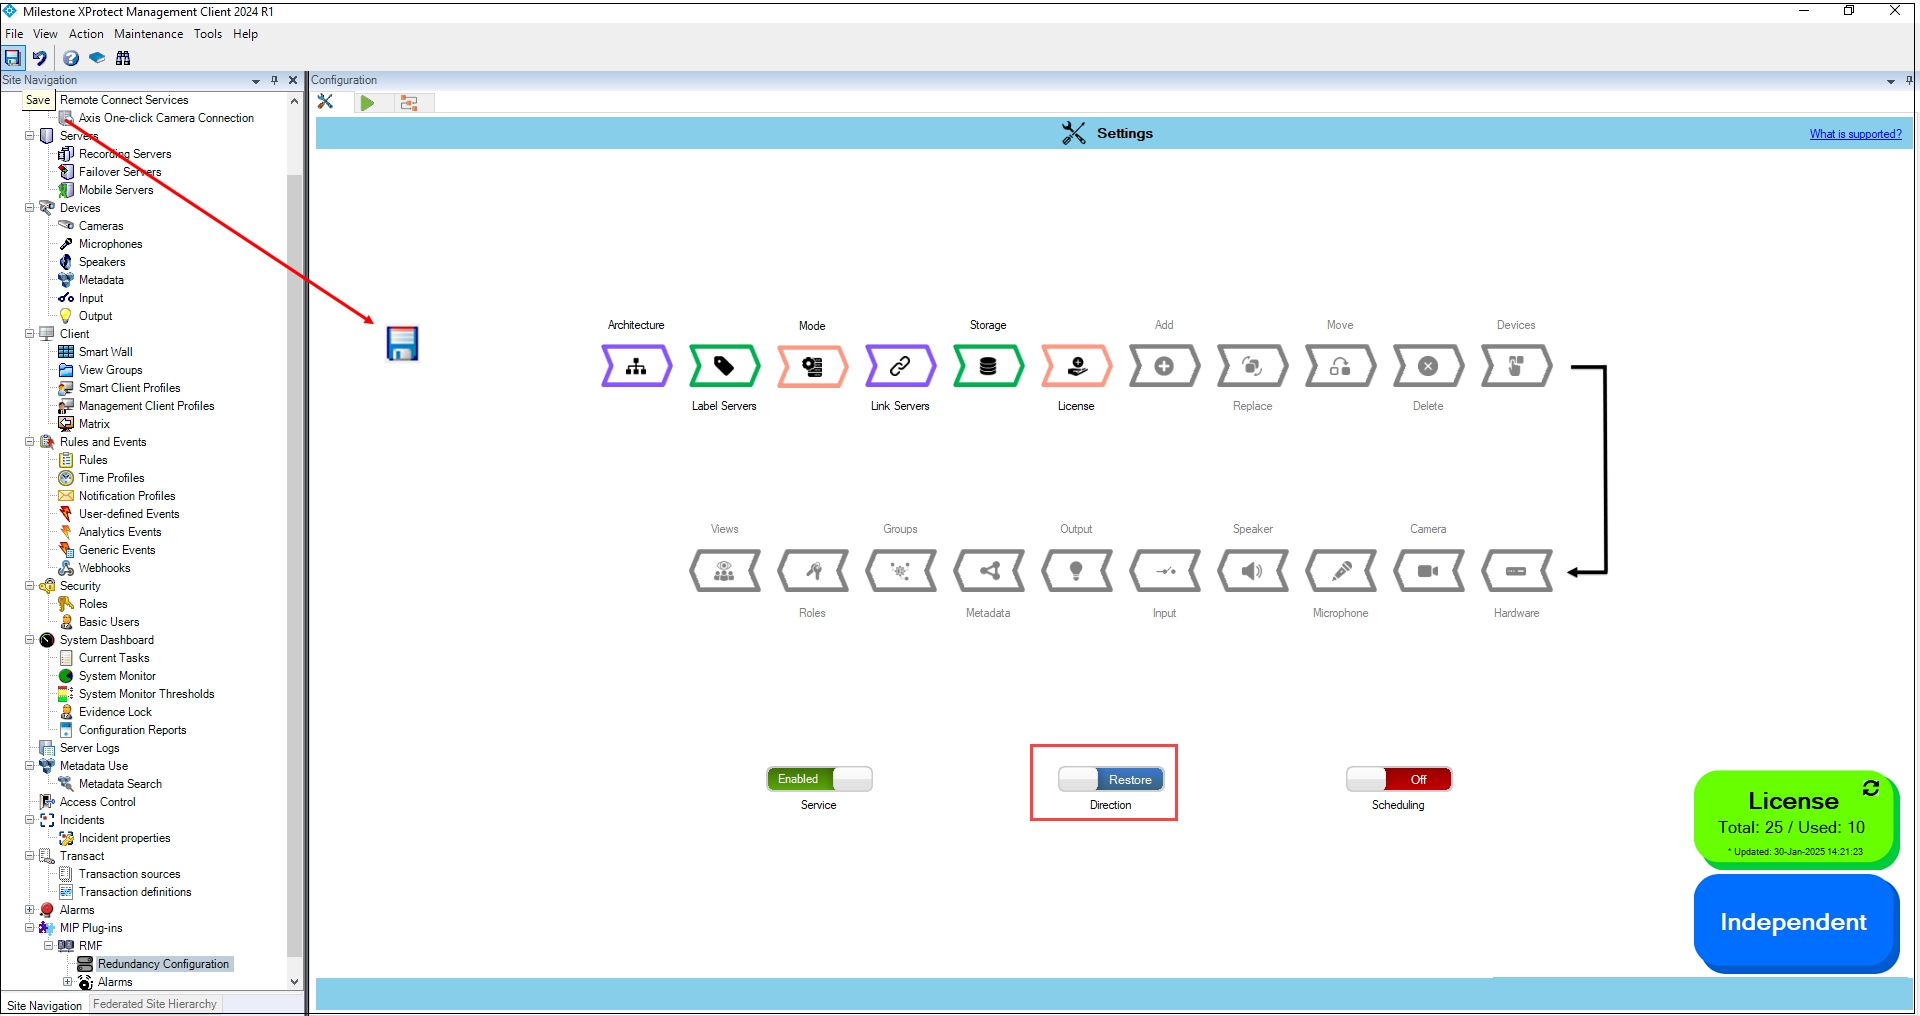
LogoLogo
Vega Systems IncRedundancyXPort
Redundancy Management Framework
  • 👋Introduction
  • 🗒️Release Notes
    • 7.4.0
    • 7.2.3
    • 7.2.2
    • 7.2.1
    • 7.2.0
    • 7.1.9
    • 7.1.8
    • 7.1.7
    • 7.1.6
    • 7.1.5
    • 7.1.4
    • 7.1.3
    • 7.1.2
    • 7.1.0
  • 🗝️Key Features
  • 💠Software Components
  • 🏗️Architecture Options
    • Federated
    • Independent
    • Single Site
  • 🗺️What to Install Where
    • Federated
      • Non-Clustered Mode
      • Clustered Mode
    • Independent
      • Non-Clustered Mode
      • Clustered Mode
    • Single Site
      • Non-Clustered Mode
      • Clustered Mode
  • 👨‍💻Installation
    • Pre-Installation
    • Manual Installation
      • RMF Services (Manual)
      • RMF Client (Manual)
    • Silent Installation
      • RMF Services (Silent)
      • RMF Client (Silent)
    • Post-Installation
      • Validate the Installation of RMF Services and UI
      • Validate the Installation of RMF Smart Client Components
    • Uninstallation
      • Manual Uninstallation
      • Silent Uninstallation
  • 🏷️License Activation
    • Online Activation
    • Offline Activation
      • Export License for Activation
      • Import Activated License
  • ⚙️Configuration Dashboard
    • Accessing the RMF Config Dashboard
    • Enable the SmartSync Service
      • Smart Sync Service Service Tray
        • Set Service Logon Settings
        • Start
        • Stop
        • Restart
        • Restart with detailed logs
        • Show Log
        • Clear Log
        • Exit
    • Set Synchronization Direction
      • Backup Mode
      • Restore Mode
    • Architecture Selection
      • Single Site
      • Federated
      • Independent
    • Server Labeling
    • Mode Selection
    • Server Linking
    • Storage Linking
    • Licensing
    • Add Camera
    • First Synchronization Run
    • Replace Camera
    • Move Camera
    • Delete Camera
    • Device Selection
    • Synchronize Hardware
    • Synchronize Camera
    • Synchronize Microphone
    • Synchronize Speaker
    • Synchronize Device Input
    • Synchronize Device Output
    • Synchronize Metadata
    • Synchronize Groups
    • Synchronize Roles
    • Synchronize Views
    • Scheduling Runs
      • Enable the SmartSync Scheduling
      • Disable the SmartSync Scheduling
  • ▶️Run Dashboard
    • Accessing the Dashboard
    • Run/Process Dashboard Details
  • 📊Workflows Dashboard
    • Accessing the Dashboard
    • Replicate Devices
    • Find and Fix Inconsistencies
    • Stream Selection
    • Roles Synchronization
    • Camera Password Updater
    • Reaction Time
    • Failback
    • Priority
    • Overlay
    • Logging
    • Export Log
    • Web API
    • Tune Performance
  • 💻High Availablity in the Smart Client
    • Prerequisites
    • Creating a High Availability View
    • High Availability Live Views
    • High Availability Playback
    • High Availability Independent Playback
    • PTZ Preset Management
      • Add PTZ Preset
      • Update PTZ Preset
      • Delete PTZ Preset
    • Video Export
    • High Availablity Bookmarks
    • Unified Start/Stop Recording Control
    • Joystick Support
    • Snapshot
  • 🔗Rest API
  • 🧩Integrations
    • VMS
    • PSIM
  • 👷Migration In Progress
Powered by GitBook
LogoLogo

Library

  • Redundancy
  • XPort

Website

  • Home
  • Contact Us

Privacy Policy

  • Policy

© 2025 Vega Systems Inc. All rights reserved.

On this page
Export as PDF
  1. Configuration Dashboard
  2. Set Synchronization Direction

Restore Mode

Switch to Restore Mode.

PreviousBackup ModeNextArchitecture Selection

RMF offers a Restore Mode, in which the RMF SmartSync service copies changes from the secondary site to the primary site. The Restore Mode is a convenient feature that can save administrators time in various scenarios, such as:

  • Administrators can restore deleted devices, roles, views, and groups on the primary site if accidentally deleted.

  • Admin can quickly fix misconfigurations on the primary site.

  • In cases where XProtect is Federated or Independent, and the primary site has been offline, users may have made changes directly on the secondary site. Restore Mode allows the administrator to restore those changes from the secondary site to the primary, ensuring flexibility in management.

To switch to Restore mode, perform the following steps:

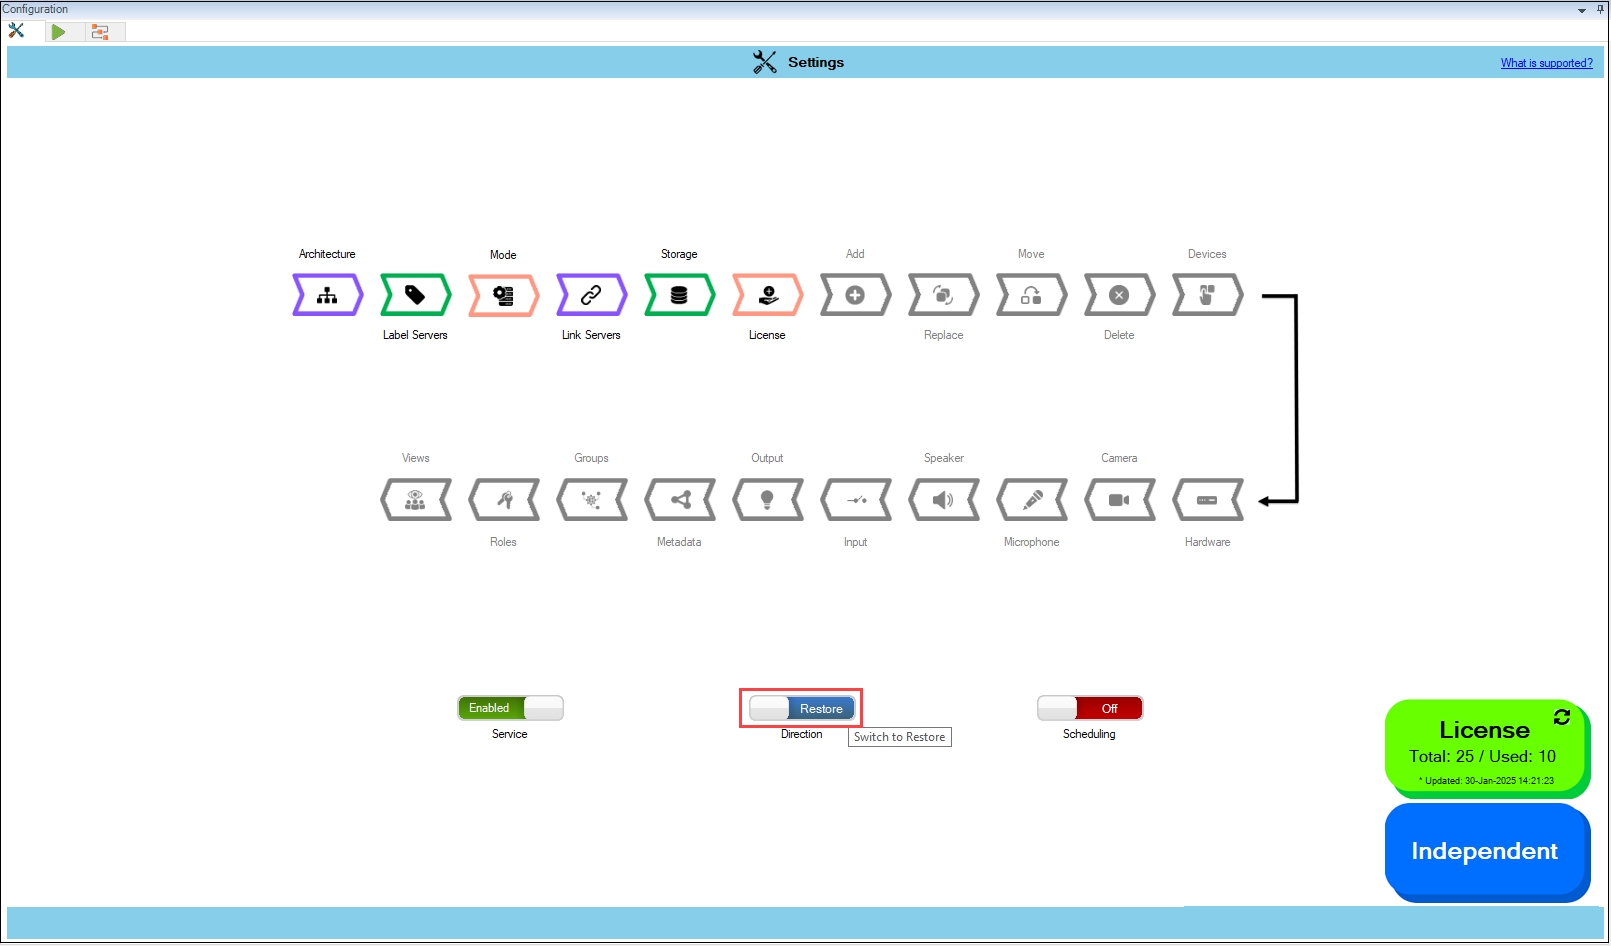
  1. Move the Direction toggle button at the bottom to display blue.

  1. Click Yes when the following pop-up screen appears.

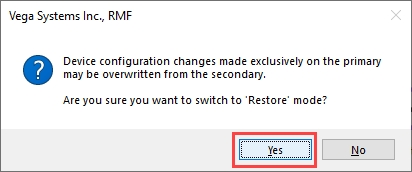
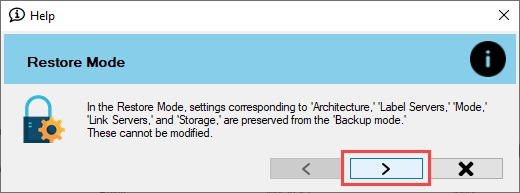
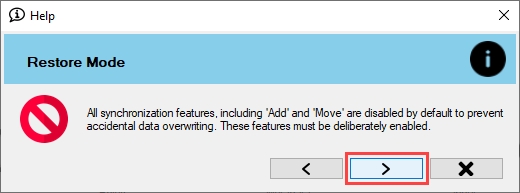
Warning: During the first synchronization run in Restore mode, configurations on the primary site that have not been backed up to the secondary site will be overwritten by the secondary site's settings. For example, if synchronization is scheduled to occur once daily, and the user switches to Restore mode after one of these cycles, any changes made on the primary site between cycles—such as modifying streaming parameters, altering views, device groups, or roles on RMF licensed cameras—will be replaced by the configurations from the secondary site.

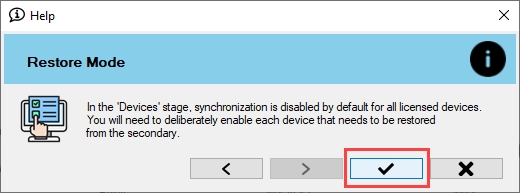
As a precaution, all RMF-licensed devices are unselected by default each time the user moves to Restore mode. Users must manually select the devices they wish to synchronize when switching to Restore mode.

  1. Click OK when the confirmatory pop-up screen appears.

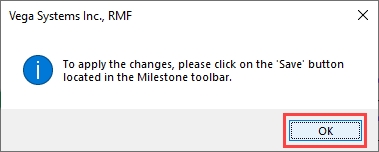
  1. Click Save in the Milestone toolbar to save the changes.

  1. Click the Next arrow button on the screen that appears.

Note: The configuration settings set for Architecture, Label Servers, Mode, Link Servers, and Storage are retained from the Backup mode and cannot be modified in the Restore mode.

  1. Click the Next arrow button on the screen that appears.

Note: To prevent inadvertent overwrites of primary configurations, all synchronization features, including Add and Move, are disabled by default. You'll need to enable these features manually each time you enter Restore mode.

  1. Click the Finish button to acknowledge.

⚙️
Switch to Restore
Confirmatory Pop-up Screen
Confirmatory Dialog Box
Save Icon—Milestone Toolbar
Restore Settings 1
Restore Settings 2
Restore Settings 3